background image


English


SAFETY - Continued


GROUNDING INTRUCTIONS 


This compressor should be grounded while in use to protect the 
operator from electric shock. The compressor is equipped with a 
three-conductor cord and three-prong grounding type plug to fit the 
proper grounding type receptacle. The green (or green and yellow) 
conductor in the cord is the grounding wire. Never connect the green 
(or green and yellow) wire to a live terminal. If your unit is for use on 
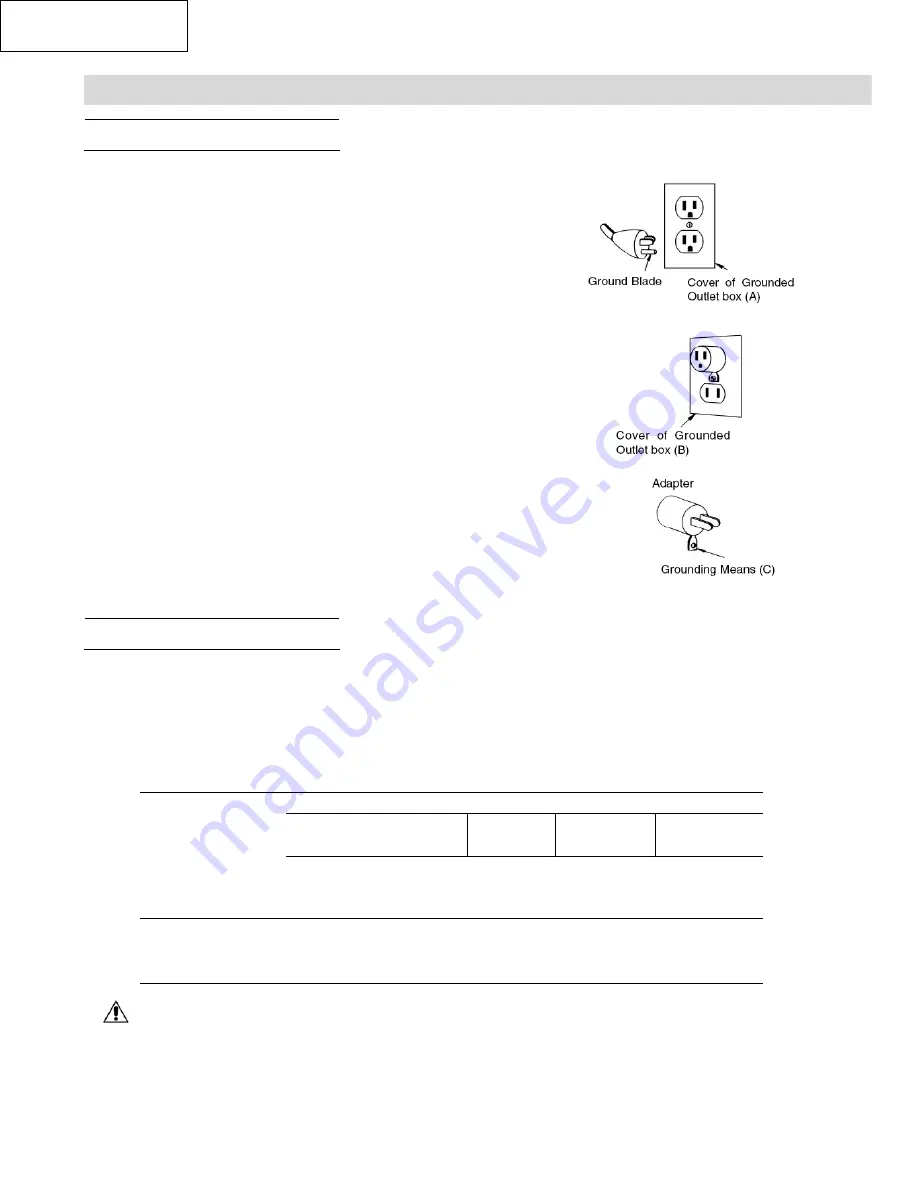
less than 150 volts, it has a plug that looks like that shown in sketch 
(A) in Figure on the right. An adapter, see sketches (B) and (C), is 
available for connecting sketch (A) type plugs to two-prong 
receptacles. The green-colored rigid ear, lug, or the like extending 
from the adapter must be connected to a permanent ground, such as 
a properly grounded outlet box. 
 
Note: The grounding adaptor, sketch (C), is prohibited in Canada by 

Canadian Electrical Code Part 1. Therefore, the instructions for 
its use are not applicable in Canada. 

 
We recommend that you never disassemble the compressor or try to 
do any rewiring in the electrical system. Any repairs should be 
performed only by HITACHI Service Centers or other qualified 
service organizations. Should you be determined to make a repair 
yourself, remember that the green colored wire is the “grounding” 
wire. Never connect this green wire to a “live” terminal. If you replace 
the plug on the power cord, be sure to connect the green wire only to 
the grounding (longest) prong on a 3-prong plug. 
If in doubt, call a qualified electrician and have the receptacle 
checked for ground. 


EXTENSION CORD 

 
Use only three-wire extension cords that have three-prong grounding-type plugs and three-pole receptacles that accept the compressor’s plug. 
Replace or repair damaged cord. 
Make sure your extension cord is in good condition. When using an extension cord, be sure to use one heavy enough to carry the current your 
product will draw. An undersized cord will cause a drop in line voltage resulting in loss of power and overheating. Table shows the correct size to 
use depending on cord length and name plate ampere rating. If in doubt, use the next heavier gage. The smaller the gage number, the heavier the 
cord. 


MINIMUM GAGE FOR CORD SETS


Total Length of Cord in Feet (Meter) 


0 – 25 

26 – 50 

51 – 100 

101 – 150 


(0 – 7.6) 

(7.9 – 15.2) 

(15.5 – 30.5) 

(30.8 – 45.7) 

Ampere  

Rating 


More  

Not 

More   

AWG 


Than  

Than 


0  

18 

16 

16 

14 

6  

10 

18 

16 

14 

12 

10  

12 

16 

16 

14 

12 

12  

16 

14 

12 

Not Recommended 


WARNING: Avoid electrical shock hazard. Never use this compressor with a damaged or frayed electrical cord or extension cord. 

Inspect all electrical cords regularly. Never use in or near water or in any environment where electric shock is possible. 


SAVE THESE INSTRUCTIONS AND MAKE THEM AVAILABLE TO OTHER 

USERS OF THIS TOOL! 

English


Summary of Contents for EC 510

Page 1: ...ion du compresseur de manière incorrecte ou ne respectant pas les consignes de sécurité peut entraîner la mort ou de graves blessures Manuel d utilisation renferme des informations importantes relatives à la sécurité Veuillez lire attentivement manuel d utilisation avant de mettre le compresseur en service Laissez manuel d utilisation à la disposition des personnes qui vont utiliser le compresseur...

Page 2: ...OMPRESSEUR 11 PIÈCES DE RECHANGE 12 INSTRUCTIONS DE MISE À LA TERRE 13 CORDON DE RALLONGE 13 UTILISATION ET ENTRETIEN NOM DES PIÈCES 14 SPECIFICATIONS 14 APPLICATION 15 AVANT L UTILISATION 15 TRANSPORT 15 UTILISATION 15 ENTRETIEN 16 SERVICE APRÈS VENTE ET RÉPARATIONS 16 LISTE DES PIÈCES 25 Español ÍNDICE Pàgina INFORMACION IMPORTANTE 17 SIGNIFICADO DE LAS PALABRAS DE SEÑALIZACIÓN 17 SEGURIDAD INST...

Page 3: ... this Instruction Manual and in the sections which contain the operation and maintenance instructions Hazards that must be avoided to prevent bodily injury or machine damage are identified by WARNINGS on the compressor and in this Instruction Manual Never use this compressor in a manner that has not been specifically recommended by HITACHI unless you first confirm that the planned use will be safe...

Page 4: ...g operation Never use compressor in sites containing lacquer paint benzine thinner gasoline gases adhesive agents and other materials which are combustible or explosive In order to avoid damaging this compressor do not allow the unit to be tilted more than 10 when operating 10 KEEP CHILDREN AWAY Do not let visitors contact compressor extension cord All visitors should be kept safely away from work...

Page 5: ... injury do not direct air stream at persons or animals 29 DRAIN TANK Risk of bursting Water will condense in the air tank If not drained water will corrode and weaken the air tank causing a risk of air tank rupture Drain tank daily or after 4 hours of use To drain tank open valve slowly and tilt compressor to empty accumulated water 30 DO NOT STOP COMPRESSOR BY PULLING OUT THE PLUG This could resu...

Page 6: ... grounding wire Never connect this green wire to a live terminal If you replace the plug on the power cord be sure to connect the green wire only to the grounding longest prong on a 3 prong plug If in doubt call a qualified electrician and have the receptacle checked for ground EXTENSION CORD Use only three wire extension cords that have three prong grounding type plugs and three pole receptacles ...

Page 7: ...phase universal Motor Power Source Single phase 120V AC 60 Hz Running Horse Power 1 1 HP 0 8 kW Current 8 A Tank Capacity 6 gal 22 7 ltr Maximum Pressure 145 PSI 10 bar Free Air Delivery at 40 PSI 2 8 bar 2 8 CFM 80 ltr min at 90 PSI 6 2 bar 2 CFM 56 6 ltr min Lubrication Oil less Rubber bumper Foot Drain cock discharge tap Knob of the pressure switch Handle Motor cooling fan Tank Pressure gauge A...

Page 8: ...and 104 F 0 C and 40 C CAUTION Never operate in temperatures below 32 F 0 C or above 104 F 40 C TRANSPORT Push the knob of the pressure switch to OFF and disconnect it from the power source before move the compressor Transport the compressor in the correct manner OPERATION 1 Start up Insert the plug into the receptacle and start the compressor by pulling the knob of the pressure switch to ON Refer...

Page 9: ... accumulated water Keep face and eyes away from drain cock Fig 5 MAINTENANCE WARNING Disconnect the compressor from the power source and remove the compressed air from the air tank before performing the maintenance operations Allow the compressor to cool before performing the maintenance operations 1 Draining tank Drain tank daily or after 4 hours of use Open drain cock and tilt compressor to empt...

Page 10: ...uel ainsi qu aux chapitres relatifs aux instructions pour l utilisation et l entretien Les risques à éviter pour prévenir les blessures aux personnes ou des dommages à la machine sont signalés par l indication AVERTISSEMENT figurant sur le compresseur et dans le cet Manuel d instructions N utilisez jamais ce compresseur de façon non spécifiquement recommandée par HITACHI à moins d avoir préalablem...

Page 11: ...sur la zone de travail peut favoriser le risque de blessures Débarrassez toutes les zones de travail de tout objet inutile fragments meubles etc 9 PRETEZ UNE ATTENTION PARTICULIERE AUX CONDITIONS ENVIRONNEMENTALES La zone de travail doit être bien éclairée et correctement aérée Risque d incendie ou d explosion Ne portez pas et n utilisez pas le compresseur ou tout autre dispositif électrique à pro...

Page 12: ...resseur ne fonctionne pas régler le sélecteur de l interrupteur barométrique sur OFF débrancher le compresseur et ouvrir le robinet de vidange pour vider le réservoir d air comprimé 27 NE TOUCHEZ JAMAIS LES SURFACES CHAUDES Pour éviter tout risque de brûlures ne pas toucher les tubes les culasses ni les moteurs 28 NE DIRIGEZ JAMAIS LE JET D AIR VERS DES PARTIES DU CORPS Risque de lésion ne dirigez...

Page 13: ...fil vert uniquement à la broche de terre la plus longue d une fiche avec mise à la terre En cas de doute consulter un électricien qualifié ou faire vérifier la mise à la terre de la prise CORDON DE RALLONGE Utiliser exclusivement des cordons de rallonge avec fiche de mise à la terre à trois broches et des prises à trois pôles capables de recevoir la fiche du compresseur Remplacer ou faire remplace...

Page 14: ...Moteur Moteur universelle Alimentation Monophasée 120V AC 60 Hz Puissance de sortie 1 1 HP 0 8 kW Courant 8 A Contenance du réservoir 6 US gal 22 7 ltr Pression maximale 145 PSI 10 bar Refoulement d air libre à 40 PSI 2 8 bar 2 8 CFM 80 ltr min à 90 PSI 6 2 bar 2 CFM 56 6 ltr min Lubrication Sans huile Indicateur de pression A indique la pression à l intérieur du réservoir Indicateur de pression B...

Page 15: ...0 C 32 F and 104 F PRÉCAUTION Ne jamais mettre en marche si la température est inférieure à 0 C 32 F ou supérieure à 40 C 104 F TRANSPORT Poussez le bouton interrupteur de pression sur OFF et débranchez le de la source d alimentation avant de déplacer le compresseur Transporter le compresseur en manière correcte UTILISATION 1 Démarrage Brancher la fiche dans la prise et mettre le compresseur en ma...

Page 16: ...our que l eau accumulée s écoule N approchez pas le visage et les yeux du robinet de vidange Fig 5 ENTRETIEN AVERTISSEMENT Débrancher le compresseur de sa source d alimentation et vider le réservoir d air comprimé avant toute opération d entretien Laisser le compresseur refroidir avant de réaliser toute opération d entretien 1 Vidange du réservoir Vidanger le réservoir tous les jours ou toutes les...

Page 17: ...sente Manual de instrucciones y en las secciones que contienen las instrucciones de uso y mantenimiento Los riesgos que se deben evitar para prevenir lesiones a las personas o daños a la máquina están señalizados con señales de ADVERTENCIA que se encuentran tanto en el compresor como en esto manual de instrucciones No usar nunca el compresor en modo distinto al específicamente recomendado por HITA...

Page 18: ...ntilada Riesgo de fuego o de explosión No llevar ni operar el compresor ni dispositivo eléctrico alguno cerca del area del rociado No utilice el compresor cerca de líquidos ni gases inflamables No colocar nunca objetos contra el compresor o encima del mismo El compresor produce chispas durante la operación No utilice el compresor en lugares en donde haya laca pintura bencina deluidor de pintura ga...

Page 19: ...e comprimido del tanque de aire 27 NO TOCAR NUNCA LAS SUPERFICIES CALIENTES Para reducir el riesgo de quemaduras no togue los tubos la culata del cilindro los cilindros ni el motor 28 NO DIRIGIR NUNCA EL CHORRO DE AIRE HACIA PARTES DEL CUERPO Riesgo de accidente no dirigir el flujo de aire hacia personas o animales 29 VACIAR EL DEPÓSITO Riesgo de explosión El agua se condensa en el depósito de air...

Page 20: ...e de 3 contactos Si tiene dudas llame a un electricista cualificado y haga que le compruebe la puesta del tomacorriente CABLE PROLONGADOR Utilice solamente cables prolongadores que posean enchufes y tomacorrientes de tres contactos con puesta a tierra que acepten el enchufe del cable del compresor Reemplace o repare los cables dañados Cerciórese de que el cable prolongador esté en buenas condicion...

Page 21: ...Fig 1 ESPECIFICACIONES Modelo EC 510 Motor Motor universal Voltaje 120V AC 60 Hz monofásica Potencia de salida 1 1 HP 0 8 kW Curriente 8 A Capacidad del depósito 6 gal 22 7 ltr Presión máxima 145 PSI 10 bar Salida de aire a 40 PSI 2 8 bar 2 8 CFM 80 ltr min a 90 PSI 6 2 bar 2 CFM 56 6 ltr min Lubricación Oil less Manómetro A indica la presión en el tanque de aire Manómetro B indica la presión de t...

Page 22: ...id entre 30 F and 104 F 0 C and 40 C PRECAUTIÓN No usar nunca a temperatura inferior a 32 F 0 C ni superior a 104 F 40 C TRANSPORTE Presionar el mando del interruptor de presión OFF y desconecte de la fuente de alimentación antes de mover el compresor Transporte el compresor en la manera correcta OPERACIÓN 1 Puesta en funcionamiento Inserte el enchufe en un receptáculo y ponga en funcionamiento el...

Page 23: ...resor para eliminar el agua acumulada Tener alejado el rostro y ojos del grifo de vaciado Fig 5 MAINTENIMIENTO ADVERTENCIA Antes de realizar las operaciones de mantenimiento desconecte el compresor de la fuente de alimentación y vacíe el aire comprimido del depósito de aire Deje que el compresor se enfríe antes de realizar las operaciones de mantenimiento 1 Drenaje del depósito Drene el depósito d...

Page 24: ...27 881657 SCREW 1 4084170000 28 881604 SCREW 1 4084040000 29 887513 EXAGONAL SUPORT 2 9106710140 30 887501 REAR COVER 1 9106710020 31 887502 LOWER HANDLE 1 9106710030 32 0 SCREW 2 4080690000 33 881595 SCREW 4 4084310000 34 887503 UPPER HANDLE 1 9106710040 35 887495 SCREW 5 4080620000 36 887500 FRONT COVER 1 9106710010 37 887506 PRESSURE SWITCH MOTOR CABLE 1 9106710070 38 0 POWER CORD 1 9700000809 ...

Page 25: ...Parts are subject to change without any obligation on the part of HITACHI due to improvements Sep 10 EC 510 ...

Page 26: ...24 ...

Page 27: ...25 ...

Page 28: ...y Tower A 15 1 Konan 2 chome Minato ku Tokyo 108 6020 Japan Distributed by 3950 Steve Reynolds Blvd Norcross GA 30093 450 Export Blvd Unit B Mississauga ON L5T 2A4 007 Code No C99194461 Printed in China Cod 9106710001 rev 09 2010 ...

Reviews: