-7-
Reassembly can be accomplished by reversing the disassembly procedure. However, special attention
should be given to the following items.
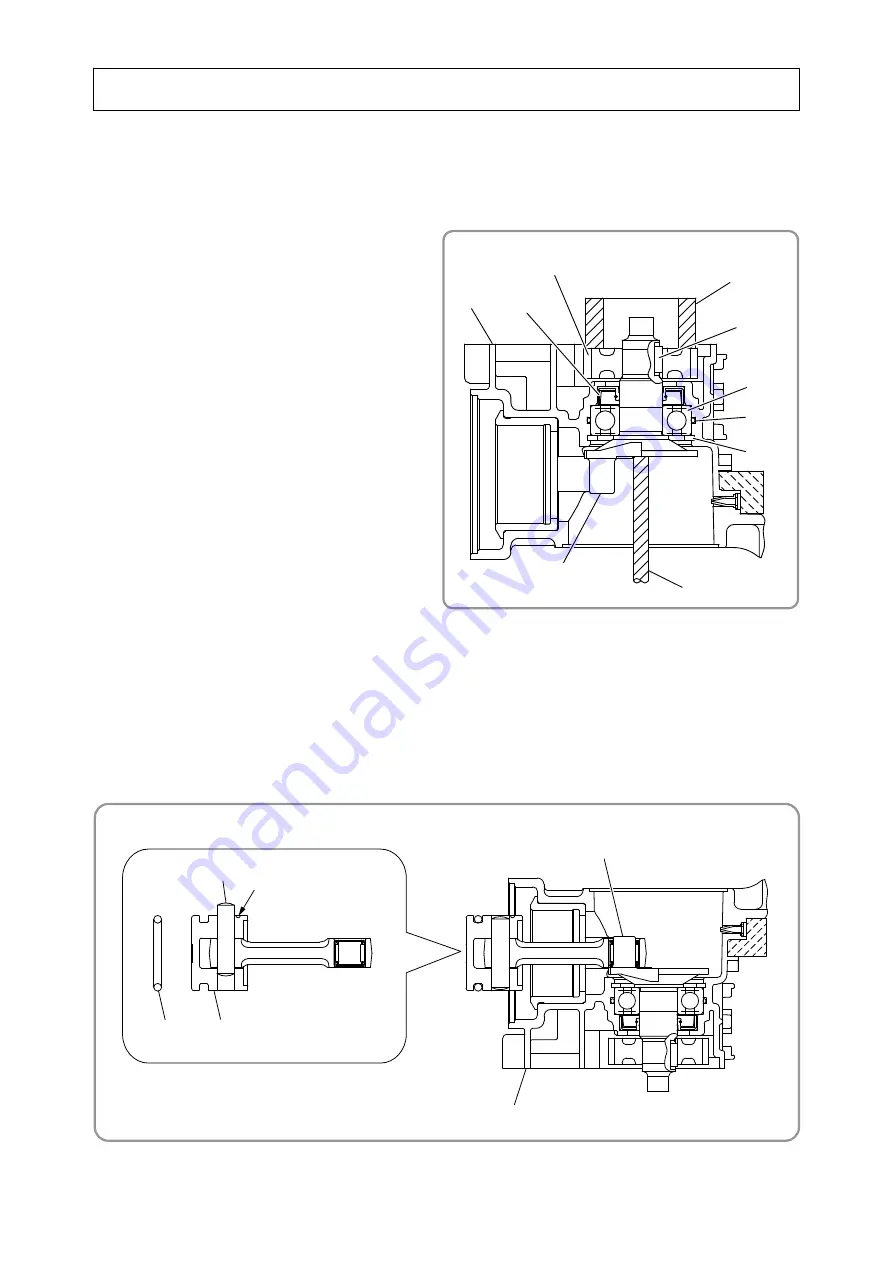
1. Reassembly of the hammering mechanism
(1) Mounting the first gear and crank shaft
(a) Press-fit Oil Seal (B)
[90]{87}
to the Crank
Case
[91]{88}
. Mount the O-ring (S-40)
[89]{86}
. Press-fit the Ball Bearing 6203DD
[88]{85}
. Use a retaining ring puller to
mount the Retaining Ring for D40 Hole
[87]{84}
. Press-fit the Crank Shaft
[86]{83}
to the Ball Bearing 6203DD
[88]{85}
.
(b) Insert the Feather Key 3 x 3 x 10
[83]{80}
into the Crank Shaft
[86]{83}
groove.
Support the plane of the Crank Shaft
[86]{83}
with an adequate steel rod and use
an adequate tool to press-fit the First Gear
[96]{93}
.
NOTE: Prior to press-fitting, make sure
the Feather Key 3 x 3 x 10
[83]{80} matches the key groove
of the First Gear [96]{93}.
(2) Mounting the piston
(a) Insert the Connecting Rod Ass'y
[42]{39}
into the Piston
[41]{38}
. Press-fit the Piston Pin
[40]{37}
into the D8 hole (marked “
Φ
2”) of the Piston
[41]{38}
being careful not to let the Piston Pin
[40]{37}
project from the outer diameter of the Piston
[41]{38}
. Mount the O-ring (S-40)
[89]{86}
on the
Piston
[41]{38}
to make the piston ass’y.
(b) Turn the Crank Shaft
[86]{83}
to the position shown below, and then mount the piston ass’y to
the Crank Shaft
[86]{83}
from the Cylinder Case
<19>
side of the Crank Case
[91]{88}
.
Reassembly
Adequate steel rod
“
Φ
2” mark
Adequate tool
[83]{80}
[91]{88} [90]{87}
[96]{93}
[88]{85}
[86]{83}
[89]{86}
[87]{84}
[86]{83}
[91]{88}
[41]{38}
[40]{37}
[89]{86}


