background image

8

NOTE:

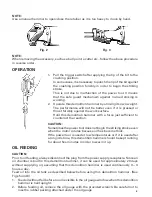
Use a manual hammer to open/close the retainer as it is too heavy to move by hand.

NOTE:

When removing the accessory, such as a bull point, a cutter etc., follow the above procedure
in reverse order.

OPERATION

1.

Pull the trigger switch after applying the tip of the bit to the
crushing position.
In some cases, it is necessary to punch the tip of the bit against
the crushing position forcibly in order to begin the striking
stroke.
This is not due to malfunction of the power tool. It means
that the safe guard mechanism against no-load striking is
working.

2.

Operate this demolition hammer by utilizing its own weight.
The performance will not be better even if it is pressed or
thrust forcibly against the work surface.
Hold this demolition hammer with a force just sufficient to
counteract the reaction.

CAUTION:

Sometimes the power tool does not begin the striking stroke even
when the motor rotates because oil has become thick.
If the power tool is used at low temperatures or if it is used after
a long idle time, this demolition hammer should be kept running
for about five minutes in order to warm it up.

OIL FEEDING

CAUTION:

Prior to oil feeding, always disconnect the plug from the power supply receptacle. Since an
oil chamber is built in this demolition hammer, it can be used for approximately 20 days
without supplying oil, assuming that this demolition hammer is used continuously 3 ~ 4
hours a day.
Feed oil into the oil tank as described below before using this demolition hammer. (See
Figs 5 and 6)
1.

Feed oil without fail before no oil is visible in the oil gauge window when this demolition
hammer is held upright.

2.

Before feeding oil, remove the oil gauge with the provided wrench. Be careful not to
lose the rubber packing attached under the oil gauge.

Fig. 3

Fig. 2

Summary of Contents for H 65

Page 1: ...e Before using this HITACHI Demolition Hammer carefully read through this INSTRUCTION MANUAL to ensure efficient safe operation It is recommended that this INSTRUCTION MANUAL be kept readily available as an important reference when using this power tool ...

Page 2: ...act the power tool or extension cord All visitors or children should be kept away from work area 5 STORE IDLE POWER TOOLS When not in use power tools should be stored in dry and high or locked up place out of reach of children 6 DON T FORCE THE POWER TOOL It will do the job better and safer at the rate for which it was intended 7 USE RIGHT POWER TOOLS Don t force a small power tool or attachment t...

Page 3: ...ool for applications other than those specified in this instruction manual 20 ENSURE SAFE OPERATION THROUGH CORRECT HANDLING Secure safe operation through correct handling by observing the instructions described herein Do not employ accessories other than those specified herein otherwise a hazardous condition may be created Never allow the power tool to be used by persons not familiar with correct...

Page 4: ...y water 31 WHEN REPLACING A COMPONENT PART ADOPT THE SAME TYPE When replacing a component part with a new one adopt the same type of new part Also never attempt to repair the power tool yourself Bring it to an authorized service center for repair WARNING Some dust created by power sanding sawing grinding drilling and other construction activities contains chemicals known to the State of California...

Page 5: ... less than 150 volts it has a plug that looks like that shown in sketch A in Figure on the right An adapter see sketches B and C is available for connecting sketch A type plugs to two prong receptacles The green colored rigid ear lug or the like extending from the adapter must be connected to a permanent ground such as a properly grounded outlet box WARNING The grounding adaptor sketch C is prohib...

Page 6: ...5 2 15 5 30 5 30 8 45 7 Ampere Rating AWG More Not More Than Than 0 6 18 16 16 14 6 10 18 16 14 12 10 12 16 16 14 12 12 16 14 12 Not Recommended PARTICULAR PRECAUTIONS ON DEMOLITION HAMMER In addition to the precautions mentioned above following particular precautions for this demolition hammer should be followed 1 Use earplugs to keep your ears noise free while working 2 Wear protective shoes to ...

Page 7: ...nt or accessory is not recommended because it may cause hazard including bodily injury STANDARD ACCESSORIES 1 Steel Case 1 2 Bull Point Code No 985230 1 3 Oil Feeder Code No 931848 1 4 Hexagon Bar Wrench for M8 Code No 872422 1 5 Wrench Code No 971109 1 OPTIONAL ACCESSORIES sold separately 1 Bull point Overall length 20 1 2 520 mm Code No 985230 2 Cold chisel Overall length 20 1 2 520 mm Code No 9...

Page 8: ...he power source use an extension cord of sufficient thickness and rated capacity The extension cord should be kept as short as practicable 4 Confirm the power receptacle If the power receptacle loosely accepts the plug the receptacle must be repaired Contact the nearest authorized service center for repair service If such a faulty receptacle is used it may cause overheating resulting in a serious ...

Page 9: ...teract the reaction CAUTION Sometimes the power tool does not begin the striking stroke even when the motor rotates because oil has become thick If the power tool is used at low temperatures or if it is used after a long idle time this demolition hammer should be kept running for about five minutes in order to warm it up OIL FEEDING CAUTION Prior to oil feeding always disconnect the plug from the ...

Page 10: ...iner may become loose due to excessive use Always pay attention to its proper functioning to securely hold the accessory shank portion If any wear and tear is found bring this demolition hammer to an authorized service center for maintenance service 4 Inspecting the carbon brushes Fig 7 The motor employs carbon brushes which are consumable parts Since an excessively worn carbon brush results in mo...

Page 11: ...10 ...

Page 12: ...rush Cap Carbon Brush Brush Holder Cover Seal Cover Plate Hexagon Socket Hd Bolt M5 12 Oil Gauge Valve O Ring S 40 Felt Holder Hexagon Socket Hd Bolt M4 12 56 57 58 59 60 61 62 63 64 65 66 67 68 69 70 71 72 73 74 75 76 77 78 79 80 81 82 83 84 85 86 87 88 89 90 91 92 93 94 95 96 97 98 99 100 101 102 103 501 502 503 504 505 Item Part Name No Item Part Name No Parts are subject to possible modificati...

Reviews: