background image

- 21 -

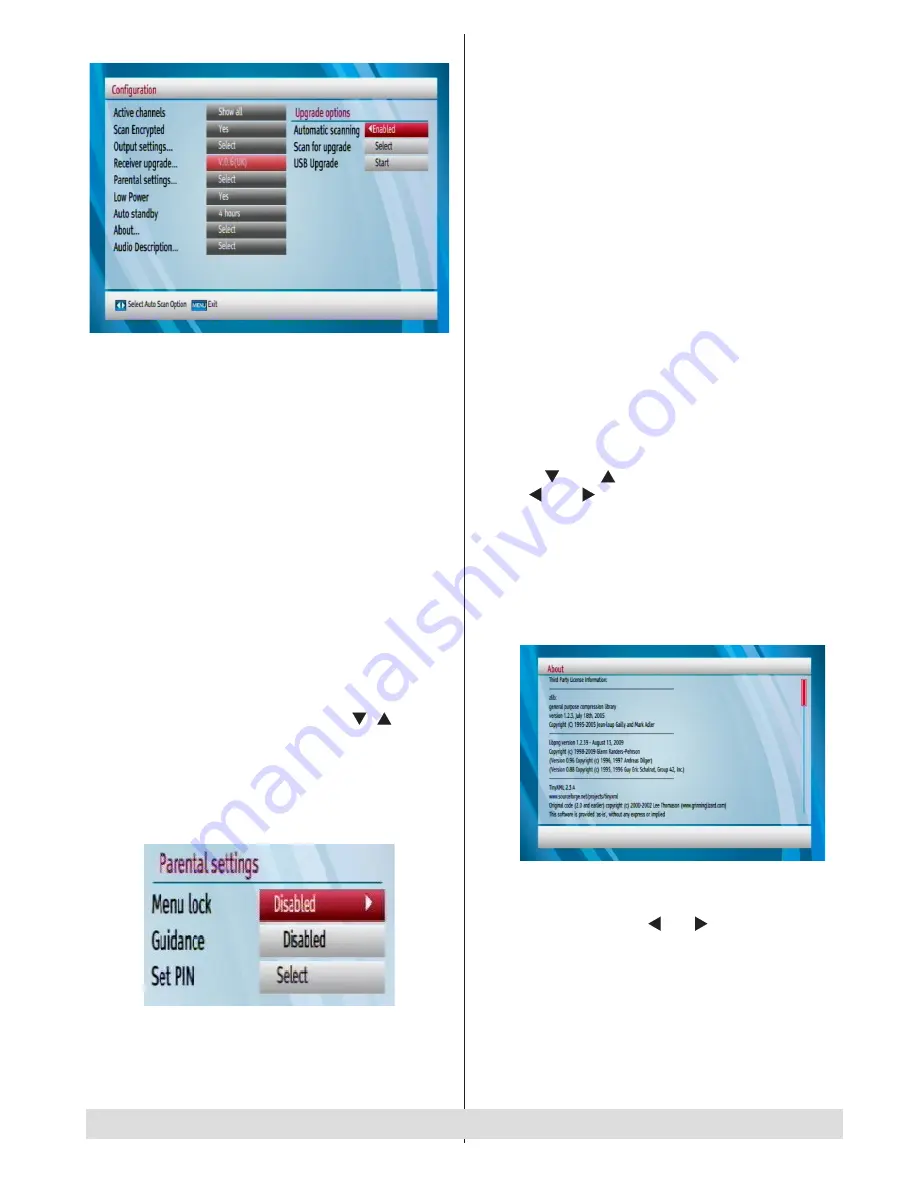
Receiver Upgrade

• To ensure that your set top box always has the most 

up to date information, you can use this setting. In 

order for the proper operation, please ensure that 

the box is set to standby mode.

• 

The STB automatically powers up at 3.00 A.M. every 

day and searches for any new software that may 

be broadcast. If found, the box will download new 

software automatically. This operation will normally 

take approximately 30 minutes. 

• You can enable or disable automatic upgrade by 

setting 

Automatic Scanning

 option.

•  You  can  manually  search  for  new  software  by 

selecting 

Scan for upgrade

.

• You can also update your set top box by using the 

USB upgrade option.

Parental Settings

• This setting configures menu locking.
• Select Menu Locking option by using “ ”/“ ” buttons. 
• Press 

OK

 button to enter the menu. 

• To display parental lock menu options, PIN number 

should be entered. Factory default PIN number is 0000. 

After coding the correct PIN number, parental settings 

menu will be displayed: 

Menu Lock

•  Menu  lock  setting  enables  or  disables  the  menu 

access. You can disable access to the installation 

menu or the whole menu system.

        For any help concerning set up and use of your STB please call the Customer Helpline: 0845 604 0105

Guidance

Guidance  setting  enables  or  disables  the  menu 

access.

Set Pin

•  Press 

OK

  to  display  the  “

Set PIN

”  window.  Use 

numeric buttons to enter  the new pin number. You 

will  need  to  input  your  new  pin  a  second  time  for 

verification purposes. 
• The factory default pin number is 0000. If you change 

the pin number make sure you write it down and 

keep it safe.

Low Power

If you enable low power option, low power mode will be 

activated. In low power mode the power consumption 

is less then 0.5W (in standby). If you disable low power 

option the power consumption will be high in standby 

mode .However the opening time will be shorter and 

aerial RF  loop_through is operative in stand-by when 

the “Low Power” is set to “NO”.

Auto Standby

•  Press  “ ”  or  “ ”  button  to  select Auto  Sleep. 


Use  “ ”  or  “ ”  button  to  set  the Auto  Sleep  to 

Disabled, 2 Hours, 4 Hours, 6 Hours 

or 

8 Hours.

• After  the  timeout  value  is  reached,  the  box  will 

switch off.

About

Select 

About

 and press 

OK

 button to display system 

information.


Audio Description

This function enables or disables the audio description 

feature by pressing the “ ” or “ ” buttons.
Audio  description  refers  to  an  additional  narration 

track  for  blind  and  visually  impaired  viewers  of 

visual  media,  including  television  and  movies. The 

description  narrator  talks  through  the  presentation, 

describing what is happening on the screen during the 

natural pauses in the audio (and sometimes during 

dialogue,  if  deemed  necessary).You  can  use  this 

feature, only if the broadcaster supports that additional

Summary of Contents for HDR5T01

Page 1: ...se instructions contain important information which will help you get the best from your television and ensure safe and correct installation and operation Lines open 9am 8pm Monday to Saturday and 10am 4pm Sunday For any help concerning set up and use of your STB please call the Customer Helpline 0845 604 0105 INSTRUCTION MANUAL ...

Page 2: ... Important Hard Disk Information 10 Recording Format 10 First Time Installation 11 Changing Channels 11 Adjusting the Volume 11 Volume Up Down 11 Mute 12 On Screen Information 12 Instant Recording 12 Time Shifting Pause Live Recording 12 Viewing the Main Menu 13 Operating the Channel List 13 Selecting a Specific Channel 13 Deleting Channels 13 Deleting Multiple Channels 13 Renaming Channels 13 Add...

Page 3: ... begins to search for channels Instant Recording Press RECORD button to start recording an event instantly while watching a programme t u The duration of the recording will be determined automatically from the Electronic Programme Guide EPG It is also possible to record a programme in the EPG by selecting it and pressing the RECORD button Pause Live Recording is a feature that enables you to pause...

Page 4: ...t have a high humidity Condensation that may arise in a kitchen for example may cause a malfunction or damage the device Heating or other thermal radiation under the set also may cause malfunction or damage the device The hot air which arises during operation should be ventilated with sufficient air circulation Please do not put the device into closed areas and do not cover it Please avoid contact...

Page 5: ...equipment DON T place hot objects or naked flame sources such as lighted candles or nightlights on or close to equipment High temperatures can melt plastic and lead to fires DON T use makeshift stands and NEVER fix legs with wood screws to ensure complete safety always fit the manufacturer s approved stand or legs with the fixings provided according to the instructions DON T use equipment such as ...

Page 6: ... 5 Overview of the Remote Control Setup Portal For any help concerning set up and use of your STB please call the Customer Helpline 0845 604 0105 ...

Page 7: ...HDMI connection 5 LAN Ethernet Input 6 SCART OUT If your TV has a scart connector you can connect the box to your TV using a scart cable 7 POWER CABLE DC IN 12V Make sure that you connect all cables and connections before you plug the unit into the mains supply After you connect the unit to the mains supply the LED light located on the front panel will be red Standby mode For any help concerning s...

Page 8: ...o the remote control it is probable that the batteries are exhausted If so you can still use the local buttons of the receiver You can replace batteries after they are exhausted Note Remove the batteries from the remote control when it is not to be used for a long period Otherwise it can be damaged due to batteries leaking Connecting the Set Top Box to a TV Set You can connect the set top box to y...

Page 9: ...em that supplies 220 240V AC 50Hz After unpacking allow the set top box to reach the ambient room temperature before you connect the set to the mains Antenna Connection This illustration shows how to connect an antenna Use ANTENNA IN to connect to an antenna system For any help concerning set up and use of your STB please call the Customer Helpline 0845 604 0105 ...

Page 10: ...ive standby mode Although it is not recommended for enviromental reasons you may disable low power mode in your product at setup configuration menu Auto Power Down This box will automatically switched from active mode into standby mode after less than three hours in active mode following the last user interaction and or a channel change with an alert message two minutes before going in to standby ...

Page 11: ... first delete unnecessary programmes and then record with an extra margin in the amount of remaining space There is an option in the configuration menu to discard the recordings You can choose between three options Deleting 1 Oldest recordings 2 Largest recordings 3 Shortest recordings When the HDD is out of space it will operate regarding one of these options and delete the recordings Even if you...

Page 12: ...u should allow the set top box to complete the search to store all available stations Note You can press MENU button to cancel Changing Channels You can change channels with the following methods You can press the numeric buttons 0 9 to directly enter the channel number You can press numeric buttons consecutively to enter two or more digits Press the P P buttons to move up or down to the next avai...

Page 13: ...nt will be recorded Press STOP button to cancel instant recording The following OSD will be displayed Select Yes by using or OK buttons to cancel instant recording Note When two recordings are active you can only watch recorded channels It is allowed to schedule recordings up to four events by Instant Recording Time Shifting Pause Live Recording Pause Live Recording is a feature that enables you t...

Page 14: ...a specific channel you should highlight the desired channel using buttonandpress OK button Selected channel will be displayed If the selected channel is password protected the parental lock password will be required to watch the selected channel Deleting Channels Select the channel that you want to delete and select Delete option using button Press OK button to continue Amessage will be displayed ...

Page 15: ...n use GREEN key Setting Favourites Select Favourites by using button and press OK button You can set various channels as favourites so that only the favourite channels are navigated Select a list by pressing buttons Afterwards select a channel by using button Press OK button to add selected channel to the favourites list Star icon indicates that the selected channel is added to the favourites list...

Page 16: ... option in the menu which appears and press the OK button again The selected programme will then be set up for series recording With this feature you can record a programme and all of its following parts within 8 days The information belonging to the selected programme will be saved from the software and following parts of the selected programme which are not included in the period of 8 days will ...

Page 17: ...ternatives If you press this button you will get alternatives for the programme which causes a conflict NOTE A conflict is caused if more than two programmes are set for recording in the same time interval To solve this conflict you have to select an alternative for one of those programmes or cancel one of the recording timers NOTE If there is still a conflict and you leave this menu by pressing t...

Page 18: ...To view the list of recordings press the MENU button to display the main menu and use the or button to highlight the Recordings Library line and press the OK button Recordings Library will then be displayed with available recordings All the recordings are kept in a list in the recordings library Red bar Indicates the used space of the recordings on the hard disk Green bar Displays the approximate ...

Page 19: ... the following menu will be displayed In this menu only Start recording at and Stop recording at options are active If you have already split the recording you could select any chapter If it is not split in chapters the beginning and ending time of the recording will automatically be the beginning and ending time of the archiving Main Title If you want to display a main title select Include If not...

Page 20: ...D is full and a timer is set to record the unit will automatically discard previous recordings based on this setting The options are as follows None The unit will not discard any recordings and the timer will not record the requested programme Oldest Starting with the oldest recordings will be deleted to make space for the requested timer Longest Starting with the longest recordings will be delete...

Page 21: ...set as Off encrypted channels will not be located in automatic search or manual search Use buttons to highlight Scan Encrypted and press buttons to select YES or NO Output Settings TV Type Digital terrestrial television channels can be broadcast in a widescreen format which must be output differently to normal and widescreen TV sets This function defines the screen format of the connected TV to en...

Page 22: ...ables the menu access Set Pin Press OK to display the Set PIN window Use numeric buttons to enter the new pin number You will need to input your new pin a second time for verification purposes The factory default pin number is 0000 If you change the pin number make sure you write it down and keep it safe Low Power If you enable low power option low power mode will be activated In low power mode th...

Page 23: ...Audio Sets the preferred audio language Subtitle Sets the subtitle language Selected language will be seen in subtitles Guide Sets guide language Current Thesesettingscanbechangedifonlythebroadcaster supports Otherwise settings will not be available to be changed Audio Changes the audio language for the current channel Subtitle Sets the subtitle language for the current channel Installation Retune...

Page 24: ...After you select Yes factory settings will be loaded Installation wizard will guide you through the installation process See the section First Time Installation in previous chapters for more information on this process IP Settings You can configure your receiver s IP settings by using this menu screen Press YELLOW button to set static IP settings Use BLUE button to configure dynamic IP settings Yo...

Page 25: ...y using button and press OK to export Also you can rename or delete selected files For any help concerning set up and use of your STB please call the Customer Helpline 0845 604 0105 Viewing USB Disk Contents You can play music video and picture files from a USB memory stick but only music and picture can be played from an external Hard Disk Drive Note Some USB compliant devices may not be supporte...

Page 26: ...r STB please call the Customer Helpline 0845 604 0105 Play This OK button Plays the selected file File Operation You can move or copy your files to harddisc from external USB Select your desired files by using button and press OK to export Also you can rename or delete selected files Play button Play files Stop button Stop the playing file Pause button Pauses the playback Rewind button Goes backwa...

Page 27: ...adcast pages of information on the programmes the weather news and other topics This digital teletext can be displayed by your set top box Indeed some channels broadcast teletext information entirely When such a channel is selected it will usually display the opening page of information automatically after a short break Some channels mostly have digital teletext pages broadcast along with the tele...

Page 28: ...network connection should be established in order to activate BBC Iplayer Internet Portal You can access internet portal using your set top box To do this an active internet connection is required After the connection is established you can select Internet Portal option from the main menu to activate the portal You can access several applications using this portal For any help concerning set up an...

Page 29: ...TANDBY button Check that the remote control range is clear Replace the batteries with new ones Information for Users in European Union Countries The above mark is in compliance with the Waste Elektrical and Electro nicEquipment Directive 2002 96EC WEEE The mark indicates the requi rement NOT to dispose the equipment including any spent or discarded batteries as unsorted municipal waste but use the...

Page 30: ... FEC for all DVB Modes Automatically found 16QAM 64QAM 256QAM with 1k 2k 4k 8k 16k 32k FFT mode VIDEO ALL MPEG 4 part 10 MP ML Video Decoder Aspect Ratio 4 3 16 9 with pan vector RGB analogue outputs BW 5MHz at 0 5 to 5 MHz sweep signal CVBS analogue output Profiles MPEG 4 H 264 AVC HP L 4 0 MP L 4 0 HD H 264 AVC MP L 3 2 HP L 3 2 SD MPEG 2 MP HL MP ML SD AUDIO MPEG1 Layer 1 and 2 Sampling frequen...

Page 31: ...pacity 500 GB FRONT PANEL Display Seven segment display Remote Control Keys On Off Down Up AUDIO Output 2 Vrms 0 dBfs Z 10 kohm DIGITAL AUDIO Output Optical SPDIF A V DATA IN OUT Scart TV scart RGB Video Output TV scart Analog Audio Output TV scart Digital Audio Output Optical output For any help concerning set up and use of your STB please call the Customer Helpline 0845 604 0105 ...

Page 32: ...ust be correctly installed and operated in accordance with the instructions contained in this manual It must be used solely for domestic purpose The guarantee will be rendered invalided if the product is re sold or has been damaged by inexpert repair Specifications are subject to change without notice The manufacturer disclaims any liability for the incidental or consequential damages The guarante...

Page 33: ...g that lost remote control Any other technical issues you may need assistance with Call us today 0845 604 0105 Local call rates applies Lines open 9am 8pm Monday to Saturday and 10am 4pm Sunday Calls to Argos enquiry lines may attract a charge and set up fee from residential lines depending on your call plan tariff Mobile and other providers costs may vary see www bt com pricing for details For Se...

Page 34: ...idigitalmedia com Manufacturer Hitachi Europe Ltd Whitebrook Park Lower Cookham Road Maidenhead Berkshire SL6 8YA U K Importer Argos Ltd 489 499 Avebury Boulevard Central Milton Keynes Buckinghamshire MK9 2NW U K ...

Reviews: