background image

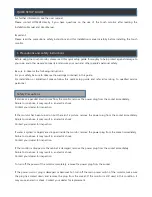
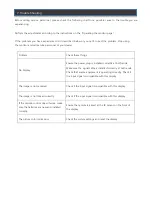
Before  calling  service  personnel,  please  check  the  following chart for a possible cause to the trouble you are 
experiencing.


Perform the adjustments according to the instructions on the  “Operating the monitor page”.


If the problem you have experienced isn’t described below or you can’t correct the problem, stop using   
the monitor and call service personnel or your dealer.


Problem 

Check these things 

No Display


Ensure the power plug is installed correctly at both ends. 
Make sure the signal cable is installed correctly at both ends. 
Check that source equipment is operating correctly. Check if 
the input signal is compatible with this display.


The image is not centered


Check if the input signal is compatible with this display.


The image is not locked correctly


Check if the input signal is compatible with this display


If the remote control doesn’t work, make 
sure the batteries are new and installed 
correctly.


Ensure the remote is aimed at the IR sensor on the front of   
the display


The picture color looks poor


Check the picture settings and reset the display


7. Trouble Shooting 

Summary of Contents for HILF75101

Page 1: ...75 Interactive LED LCD Version 5 19 9 2015 Installation Manual 75 190cm Model HILF75101 ...

Page 2: ...lt in an electric shock Contact your dealer for inspection If the monitor has been turned on but there isn t a picture remove the power plug from the socket immediately Failure to do above it may result in an electric shock Contact your dealer for inspection If water is spilled or objects are dropped inside the monitor remove the power plug from the socket immediately Failure to do above it may re...

Page 3: ...ed resulting in overheating or electric shock Don t install in a high humidity environment This may cause overheating or electric shock Don t install near any heat sources such as radiators hot air outlets stoves or other apparatus that produce heat This may cause an electric shock Don t overload sockets or cables beyond electrical capacity Don t use extension leads otherwise this may cause an ele...

Page 4: ...the other objects for sufficient ventilation Don t move the touch monitor when it is connected to the power cord and AV cables When moving the monitor make sure you remove the plug and cables from the socket or source When unpacking or carrying the monitor at least 4 people are needed Make sure the monitor is carried upright Transport the monitor upright Avoid placing the monitor face up or face d...

Page 5: ...om the top of the box before removing the top cushions 4 Remove the top cushion and take the accessories box out 5 Take vinyl bag off and assembled bracket if it needs Contents of the Accessories box 1 Power cord 2 Remote controller 1 button cell battery included 3 USB cable 4 HDMI cable 5 Pen 6 Warranty Card 7 CD Item Q ty 1 Interactive monitor 1 2 Carton 1 3 Bottom cushion 3 4 Top cushion 2 5 Pa...

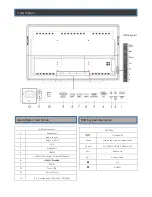
Page 6: ...to front HDMI input 8 HDMI 1 Disabled 9 RS232C 10 Touch USB 11 Power Switch 12 AC in socket Input 100 240V 50 60Hz OSD 7Key ON and OFF Menu Display the main on Screen Menu Source PC HDMI 1 HDMI 2 HDMI 3 DP Vol Volume Up Vol Volume Down UP DOWN Input Output Description OSD Keypad Description OSD Keypad 3 Description ...

Page 7: ...Front Notebook Important Notice 1 The USB cable 5 m that Hitachi provides in this accessory box is for use of connection to Touch USB at the back Therefore in case of connecting USB cable to Touch USB in front separate USB cable is required and the length of cable is strongly recommended to be less than 3 m to make sure signal intensity of touch sensor work properly 2 HDMI 1 disabled We recommend ...

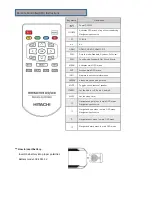
Page 8: ...mode Standard Flat Music Movie MENU Activates main OSD menu EXIT Escapes main OSD menu INFO Displays input source information FREEZE Videos are saved with pictures MUTE Toggles sound status of speaker STEREO Set the Audio L R Audio L Audio R SLEEP Set the sleep timer Navigates upper menu in main OSD menu Navigates input source Navigates down menu in main OSD menu Navigates input source Navigates n...

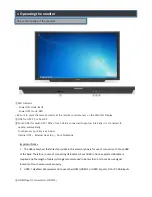
Page 9: ...ating systems Installation 1 Connect the signal cable to the monitor and then turn on the monitor 2 Connect one side of the USB cable type B USB connector on the monitor side See chapter 3 Signal Source Input for exact location 3 Connect the other side of the USB cable type A USB connector to the computer 4 Turn the computer on Windows 7 8 and Mac OSX Version 10 7 10 10 Window System No need to in...

Page 10: ...An USB is automatically connected when you connect a laptop The rear B type USB is for PC An USB is automatically connected to laptop when you connect a laptop and PC at the same time Remove the laptop USB if you want to use a PC VESA mount size 600 W x 400 H mm Separate wall mount screw and pipe from Monitor As shown below wall mount bracket is assembled with screw and pipe Pipe only use the uppe...

Page 11: ...alled correctly at both ends Make sure the signal cable is installed correctly at both ends Check that source equipment is operating correctly Check if the input signal is compatible with this display The image is not centered Check if the input signal is compatible with this display The image is not locked correctly Check if the input signal is compatible with this display If the remote control d...

Page 12: ......

Reviews: