54
8. PERIODIC MAINTENANCE [Oil Separator Element]
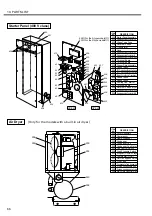
8.11.2 Attach Oil Separator Element
When to change the element, change housing and
square ring with new replacements as well.
q
Check if there is any damage found on the
thread portion of the element head or the ditch
portion of square ring seal.
If there is any dirt or damage on them, it may
cause leakage, so dress it with tool like a fine
file.
w
Check if there is any nick, damage or painting
fault on a new housing.
e
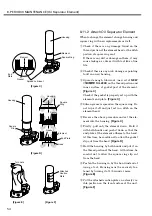
Spread enough lubricant (new oil of
NEW
A
OIL 2000
) on the thread portion and
inner surface of gasket part of the element.
[Figure C]
Check if the gasket is properly set up with the
element’s end plate.
[Figure C]
r
Silicon grease is spread on the square ring. Do
not wipe it off and just set in a ditch on the
element head.
t
Reverse the above procedure and set the ele-
ment into the housing.
[Figure C]
y
Firstly, pull only the element down. Hold it
with both hands and push it down so that the
end plate of the element adheres to the head.
At this time, be careful not to allow the gasket
slip out from the head.
[Figure D]
u
Hold the housing by both hands and put it on
the thread portion of the head. At this time, be
careful not to allow the square ring slip out
from the head.
i
Fasten the housing in by the hand instead of
using a tool. Housing must be securely fas-
tened by turning it at 1/5 round or more.
[Figure E]
o
Put the attached caution plate on a clearly vis-
ible position on the front surface of the unit.
[Figure F]
[Figure E]
[Figure F]
[Figure C]
Turn here.
Attached
Caution
Plate
;;
;;
;
;
Housing
Element
Square Ring
Spread Lubricant
Gasket
End
Plate
Element
Housing
Square
Ring
Gasket
Gasket
Element
End Plate
Head
;;;;;;
;;;;;;
;;;;;;
;;;;;;
;;;;;;
;;;;;;
;;;;;;
;;;;;;
;;;;;;
;;;;;;
;;;;;;
;;;;;;
;;;;;;
;;;;;;
;;;;;;
;;;;;;
;;;;;;
;;;;;;
;;;;;;
;;;;;;
;;;;;;
;;;;;;
;;;;;;
;;;;;;
;;;;;;
;;;;;;
;;;;;;
;;;;;;
;;;;;;
;;;;;;
;;;;;;
;;;;;;
;;;;;;
;;;;;;
Housing
Square
Ring
[Figure D]

