8.10.2 Attach Oil Separator Element
When to change the element, change housing and
square ring with new replacements as well.
①
Check if there is any damage found on the thread
portion of the element head or the ditch portion of
square ring seal.
If there is any dirt or damage on them, it may cause
leakage, so dress it with tool like a fine file.
②
Check if there is any nick or damage fault on a new
housing.
③
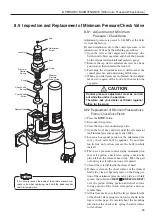
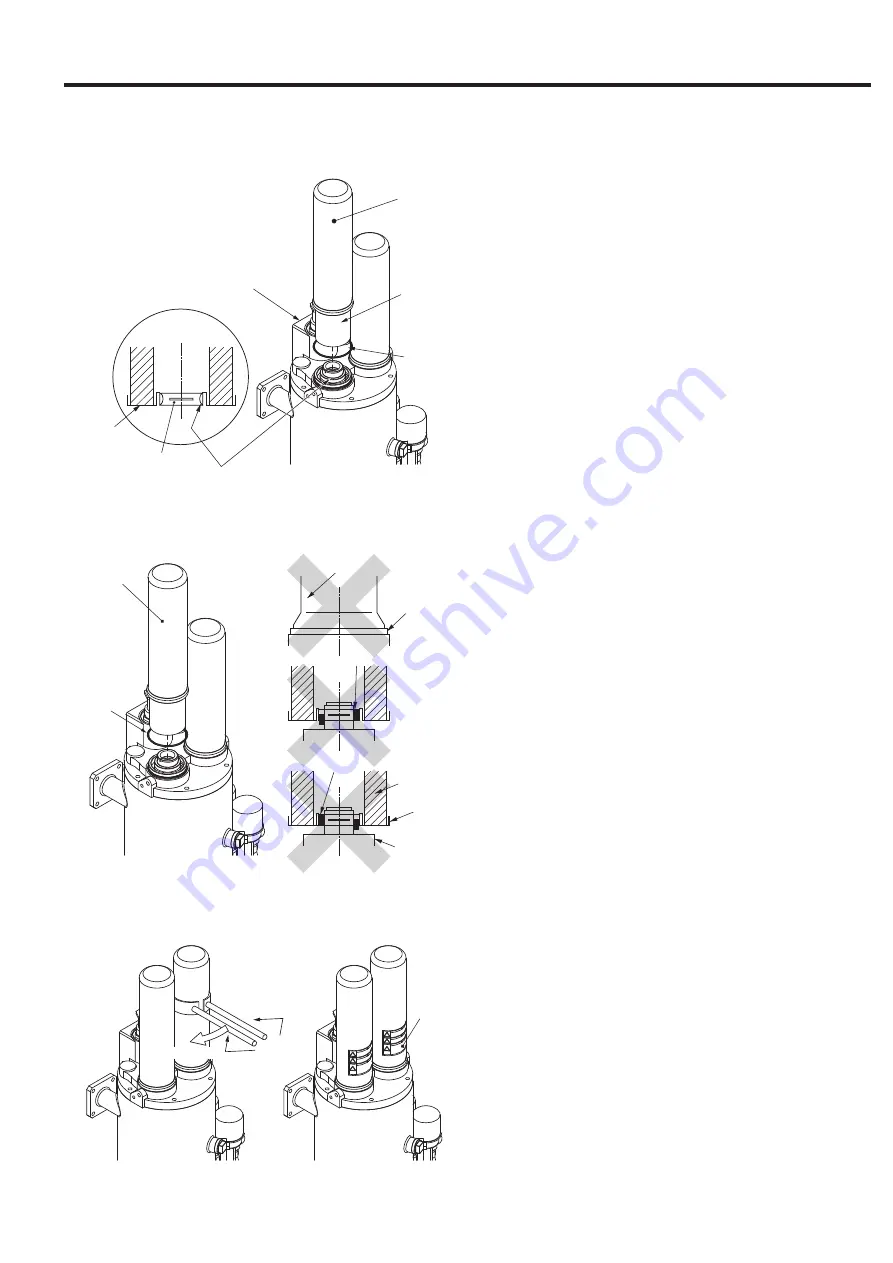
Spread enough lubricant (new oil of
NEW
HISCREW
OIL
NEXT
)on the thread portion and inner surface
of gasket part of the element.
[Figure C]
Check if the gasket is properly set up with the ele-
ment’s end plate.
[Figure C]
④
Silicon grease is spread on the square ring. Do not
wipe it of f and just set in a ditch on the element
head.
⑤
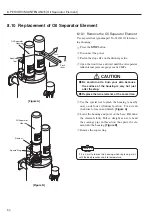
Contact the element’s end plate closely with the
head. Be careful not to let the gasket out of its prop-
er position in this action.
[Figure D]
⑥
Hold the housing with the both hands and contact
its end to the head’s threaded portion. Be careful
not to let the square ring out of the head.
⑦
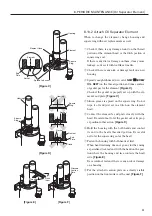
Fasten the housing with both hands at first.
When hand fastening does not go any further, using
a specialized tool, fasten it with the hand on the posi-
tion where the housing end face contacts the head
side.
[Figure E]
Be careful not fasten if there is any nick or damage
on a housing.
⑧
Put the attached caution plate on a clearly visible
position on the front surface of the unit.
[Figure F]
Element Head
Housing
Element
Square
Ring
Gasket
End
Plate
Spread Lubricant
Element
[Figure C]
[Figure D]
Square
Ring
Housing
Gasket
Housing
Square
Ring
Gasket
End
Plate
Element
Head
[Figure E]
[Figure F]
Turn here.
Pinch
them
Attached
Caution
Plate
51
8. PERIODIC MAINTENANCE [Oil Separator Element]

