background image

21

ENGLISH

To set the Parental Control

1

Select “Locks” menu, then press 

 or 

ENTER

.

2

Use 

Number buttons (0-9)

 to enter your password, then 

press 

ENTER

. Then Locks menu will appear.

3

Press 

 or 

 to select “Parental Control”, then press 

 or 

 to 

select “On” .

4

Press 

 or 

 to select “Ratings”, then press 

 or 

ENTER

.

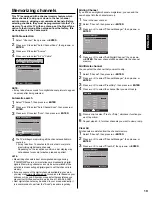
The Ratings Menu appears.

5

Press 

 or 

 to select which rating will be used, then press 


or 

ENTER

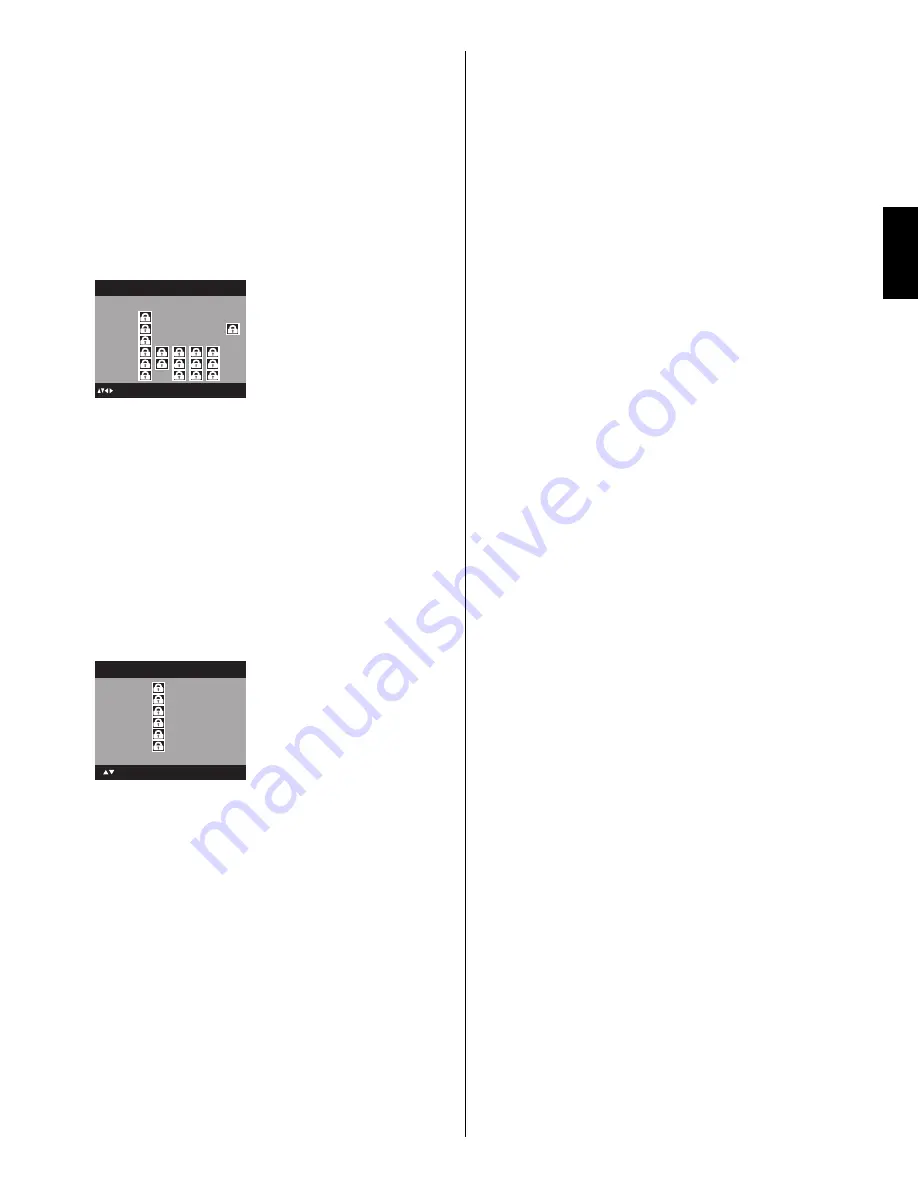
. Each rating below will appear.

TV Rating

ALL

D

L

S

V

FV

TV-Y

TV-Y7

TV-G

TV-PG

TV-14

TV-MA

ENTER:Select

TV

: Move

You can set  the rating using age level and genre.

Age:

TV-Y

   : All children

TV-Y7

   : 7 years old and above

TV-G 

  : General audience

TV-PG

   : Parental guidance

TV-14

   : 14 years old and above

TV-MA

  : 17 years old and above

Genre:

ALL


: All

D

   : 

Dialogue

L

   : 

Language

S

   : 

Sex

V

   : 

Violence

FV

   : Fantasy 

Violence

Movie Rating

G

PG

PG-13

R

NC-17

X

ENTER:Select

Movie

: Move

G


: All ages

PG


: Parental guidance

PG-13

  : Parental guidance less than 13 years old

R


: Under 17 years old  parental guidance suggested

NC-17

  : 17 years old and above

X


: Adult only

6

Press 

/

/

/

 to select the desired rating, then press 

ENTER

.

7

Press 

EXIT 

to return to the normal screen.

Parental Control function is activated now.

To use the TV after the TV is protected.

When a program is received that is blocked by the Parental 

Control, press 

MUTE

, then enter your password. 

The protection will be temporarily overridden. If the TV is turned off 

or the channel is changed, the Parental Control restriction will be 

reactivated.

NOTE:

The Parental Control function is activated only on programs and 

input sources that include a rating signal.

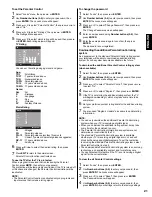
To change the password

1

Select “Locks”, then press 


or 

ENTER

.

2

Use 

Number buttons (0-9)

 to enter your password, then press 

ENTER

. The Locks menu will appear.

3

Press 

 or 

 to select “Change Password”, then press 

 or 

ENTER

.

The Change Password screen will appear.

4

Enter a new password using 

Number buttons (0-9)

, then 

press 

ENTER

.

5

Enter the same password again to confirm, then press 

ENTER

.

The password is now registered. 

Downloading the additional Parental Control rating 

system

As a supplement to the standard Parental Control rating system, 

your television will be able to download an additional rating 

system, if such a system becomes available in the future.

To download the additional Parental Control rating system 

(when available)

1

Select “Locks”, then press 

 or 

ENTER

2

Use 

Number buttons (0-9)

 to enter your password, then press 

ENTER

. The Locks menu will appear.

3

Press 

 or 


to select “Parental Control”, then press 

 or 


to select “On”. 

4

Press 

 or 


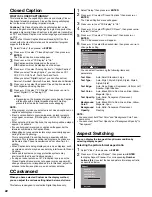
to select “Region 5”, then press 

 or 

ENTER

5

If the TV is not storing the additional rating system, the TV 

will begin downloading it, which may take some time to be 

completed.

6

Set your preferred content rating limits for the additional rating 

system.

7

You also need “Region 5 Update” procedure to update rating 

information.

NOTE:

You can only download the additional Parental Control rating 

system when your TV is receiving a digital signal.

When you download the additional rating system, it may take 

some time for the download to occur.

The Parental Control rating information and system are not 

determined or controlled by the TV.

The standard Parental Control rating system is available 

whether your TV is receiving a digital signal or not, and will 

block both analog and digital programs. To set the restriction 

level using the standard Parental Control rating system, select 

Parental Control Set in step 4.

The downloadable Parental Control rating system is an evolving 

technology, and availability, content, and format may vary.

You cannot select this feature if the TV is not receiving a digital 

signal for the current station.

To clear the all Parental Control settings

1

Select “Locks”, then press 

 or 

ENTER

.

2

Use 

Number buttons (0-9)

 to enter your password, then 

press 

ENTER

. The Locks menu will appear.

3

Press 

 or 


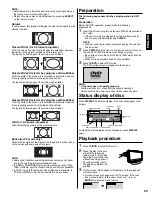
to select “Reset”, then press 

 or 

ENTER

.

The Password screen will appear.

4

Use 

Number buttons (0-9)

 to enter your password, then 

press 

ENTER

. All your settings return to the factory settings.

52C1221A_eng.indd   21

52C1221A_eng.indd   21

5/13/09   4:44:34 PM

5/13/09   4:44:34 PM

Summary of Contents for L19D103

Page 1: ... TIME USE 9 15 TV OPERATION 16 23 DVD OPERATION 23 31 CONNECTIONS TO OTHER EQUIPMENT 32 34 TROUBLE SHOOTING 35 37 TV STAND 39 LIMITED WARRANTY 40 LCD HDTV with Built in DVD Player Operating Guide for L19D103 ESPAÑOL ENGLISH NEED MORE INFO ON THE DTV TRANSITION See page 14 in this Operating Guide and please visit www dtvtransition org SERIAL NO This information is located on the back of the televis...

Page 2: ...PEN FLAMES AWAY FROM THIS PRODUCT AT ALL TIMES CAUTION TO PREVENT ELECTRIC SHOCK DO NOT USE THIS POLARIZED PLUG WITH AN EXTENSION CORD RECEPTACLE OR OTHER OUTLET UNLESS THE BLADES CAN BE FULLY INSERTED TO PREVENT BLADE EXPOSURE WARNING This equipment has been tested and found to comply with the limits for a Class B digital device pursuant to Part 15 of the FCC Rules These limits are designed to pr...

Page 3: ...touching such power lines or circuits as contact with them might be fatal 17 Do not overload wall outlets and extension cords as this can result in a risk of fire or electric shock 18 Do not push objects through any openings in this unit as they may touch dangerous voltage points or short out parts that could result in fire or electric shock Never spill or spray any type of liquid into the unit 19...

Page 4: ...l It may cause the LCD panel glass to break and injury may occur If the LCD panel is broken make absolutely sure that you do not touch the liquid in the panel This may cause skin inflammation If the liquid gets in your mouth immediately gargle and consult with your doctor Also if the liquid gets in your eyes or touches your skin consult with your doctor after rinsing for at least 15 minutes or lon...

Page 5: ...an easily be used as steps such as a chest of drawers Remember that children can become excited while watching a program especially on a larger than life flat panel display Care should be taken to place or install the display where it cannot be pushed pulled over or knocked down Care should be taken to route all cords and cables connected to the flat panel display so that they cannot be pulled or ...

Page 6: ... shown below 2 Keep the LCD TV DVD 4 inches away from the wall except when mounted using the wall mount bracket and secure to the wall as shown below Wire Clamp Screw Wire 4 inches Wire NOTICE FOR TV CABINET If the unit is to be mounted on a cabinet smaller than length of the unit it could result in an unstable location and the unit may tumble over making a risk of personal possibly fatal injury A...

Page 7: ...eeds audio CD sound Convenience Features Direct selection of your desired scenes using Title Chapter Time Track You can play back from the desired scene Recalling Up to 3 Scenes You can program up to 3 scenes in memory and recall the marked scenes Frame Advance The PAUSE moves one frame at a time Slow Motion The SLOW moves you back and forth through the program by 4 steps of 1 7 1 2 times Repeat P...

Page 8: ...disc 23 Playback procedure 23 Special playback 24 MP3 WMA JPEG and Audio CD playback 24 Setting the JPEG interval 25 Program playback CD 25 Repeat playback CD 26 Random playback CD 26 Zooming 26 Locating desired scene 26 Repeat playback 27 Marking desired scenes 27 Changing soundtrack language 27 Subtitles 28 Changing angles 28 Title selection 28 DVD menu 28 Setting the language 28 Setting the asp...

Page 9: ...n number 1 or ALL of DVD video discs can be used on this unit Title When two or more movies are recorded on a disc the disc is divided into two or more sections Each section is called a TITLE Chapter The titles can be subdivided into many sections Each section is called a CHAPTER Track An Audio CD can contain several items These are assigned to the tracks Removing Disc from Case Be sure to hold th...

Page 10: ...een CHANNEL buttons VOLUME buttons and INPUT ENTER button can be used to select the desired setting during the menu screen operations POWER button INPUT ENTER button VOLUME buttons CHANNEL 1 PLAY button MENU button Remote sensor POWER indicator EJECT button Left side CHANNEL 3 STOP button DISC slot ...

Page 11: ...tinued Rear side AC INPUT jack PC MONITOR IN jack HDMI IN jack HEADPHONE jack AUDIO L R jacks for COMPONENT IN LINE 1 IN jacks VIDEO S VIDEO AUDIO L R COMPONENT IN jacks RF ANT IN jack DIGITAL AUDIO COAXIAL OUT jack PC HDMI AUDIO IN jack ...

Page 12: ...rmation in the menu TOP MENU Select title SEARCH Fast Forward Review playback PLAY Playback SKIP Skip chapter to forward or reverse direction C C SUBTITLE Closed Caption Set subtitle STOP Stop SLOW Forward Reverse slow motion PAUSE Pause CD sound Still picture of DVD PLAY MODE Select playback mode AUDIO Change sound track language RETURN Remove DVD setup menu REPEAT A B Repeat playback between A a...

Page 13: ...age If the spring terminal in the remote control remains in contact with a side of a damaged battery it can cause a short circuit Never use damaged batteries as they can become very hot and are dangerous Power source TO USE AC POWER Connect the AC cord plug into this unit s AC IN jack Connect the AC cord into an AC outlet 1 2 NOTE Please make sure to insert the cord securely at both the LCD TV DVD...

Page 14: ...able 300 75 ohm Matching Transformer Antenna Jack Antenna Jack 300 75 ohm Matching Transformer UHF 300 ohm Antenna Jack Combiner VHF 300 ohm VHF 75 ohm Antenna Jack Combiner UHF 300 ohm IMPORTANT NOTICE The nationwide switch to digital television broadcasting will be complete on June 12 2009 but your local television stations may switch sooner After the switch analog only television sets that rece...

Page 15: ...s require the use of a Converter Descrambler box you may wish to use a signal Splitter and an A B Switch box available from the Cable TV company or an electronics supply store Follow the connections shown below With the switch in the B position you can directly tune any nonscrambled channels on your TV With the switch in the A position tune your TV to the output of the Converter Descrambler box us...

Page 16: ... select the channel If you press only channel number channel selection will be delayed for a few seconds TO SELECT ANALOG CHANNELS 1 9 Press 1 9 as needed Example to select channel 2 press 2 then press ENTER 10 99 Press the 2 digits in order Example to select channel 12 press 1 2 then press ENTER 100 135 Press the 3 digits in order Example to select channel 120 press 1 2 0 then press ENTER TO SELE...

Page 17: ...und The TV s sound will be silenced and Mute will appear on the screen The sound can be switched back on by pressing this button again or the VOL or SLEEP To set the TV to turn off after a preset amount of time press SLEEP on the remote control The clock will count up 10 minutes for each press of the SLEEP button Off 0h 10m 0h 20m 2h 0m After the sleep timer is programmed the display will appear b...

Page 18: ...provides high fidelity stereo sound MTS also can transmit a second audio program SAP containing a second language or other audio information When the TV receives a stereo or SAP broadcast the word Stereo or SAP displays on screen every time you press DISPLAY Surround On Off The dynamic presence and sound created offers a thoroughly enjoyable listening experience Audio Language When two or more aud...

Page 19: ...accomplished while a station is broadcasting a digital signal to set that channel into memory If you are unsure of the digital channels available in your area you may visit www antennaweb org to receive a list based on your address or zip code Should you require further assistance you may call our toll free customer service line at 1 800 289 0981 New digital channels may be added to your area peri...

Page 20: ... you finish inputting the label name press EXIT to return to the normal screen 6 Repeat steps 3 4 for other channel You can assign a label to each channel To clear a Channel Label After step 3 above press or to select Label Clear then press or ENTER NOTE The channel labels will be reset after Scan on page 19 Labeling video inputs The Video Label feature allows you to label each input source for yo...

Page 21: ... password again to confirm then press ENTER The password is now registered Downloading the additional Parental Control rating system As a supplement to the standard Parental Control rating system your television will be able to download an additional rating system if such a system becomes available in the future To download the additional Parental Control rating system when available 1 Select Lock...

Page 22: ...d live These transmissions do not allow time for editing When Captions are being displayed on screen displays such as volume and mute may be seen but may interfere with Closed Captions Some cable systems and copy protection systems may interfere with the Closed Captioned signal If using an indoor antenna or if TV reception is very poor the Closed Caption Decoder may not appear or may appear with s...

Page 23: ... only the Full and Native are available Preparation The following pages describe the setup operation in DVD mode Preparation Before DVD CD operation please make the following preparations 1 Insert the AC cord plug into a standard 120V 60Hz polarized AC outlet If the AC cord plug is plugged in for the first time wait for about 5 seconds before pressing POWER NOTE When connecting to other equipment ...

Page 24: ...IP Reverse during playback to locate a chapter that you want to watch Each time you press the button a chapter or track is skipped NOTE The unit is capable of holding a still video image or On screen display image on your television screen indefinitely If you leave the still video image or On screen display image displayed on your TV for an extended period of time you risk permanent damage to your...

Page 25: ... DVD MENU Press to select the desired file To return to the file browser press TOP MENU Picture 01 Picture 02 Picture 03 Picture 04 Picture 05 Picture 06 Picture 07 Picture 08 JPEG Preview Select Files Repeat Off Mode Off W 2048 H 1536 Picture 01 JPG 2 Press ENTER or PLAY The selected picture appears on the TV screen Rotating an image You can rotate an image by 90 degrees Press ANGLE during playba...

Page 26: ...3 1 MP3 2 MP3 3 WMA 1 WMA 2 WMA 3 JPEG Preview Select Files Repeat Track Mode Off 3 Press PLAY The unit automatically starts repeat playback after finishing the current track To resume normal playback select Repeat Off in step 2 NOTE The repeat or random function is canceled when you eject the disc or turn the power off The track repeat function is canceled when SKIP or is pressed In case of Audio...

Page 27: ...eat does not work with an interactive DVD MP3 WMA JPEG CD Marking desired scenes The TV DVD stores the points that you want to watch again You can resume playback from that scene Marking the scenes 1 Press MARKER during playback 2 Select the blank Marker using or then press ENTER at the desired scene Marker 2 Marker 1 00 27 54 Marker 3 Up to 3 scenes can be selected Repeat this procedure to set th...

Page 28: ... you may not be able to select the title Depending on the DVD a title menu may simply be called a menu or title in the instructions supplied with the disc DVD menu Some DVDs allow you to select the disc contents using the menu When you play back these DVDs you can select the subtitle language and soundtrack language etc using the DVD menu 1 Press DVD MENU during playback The DVD menu appears on th...

Page 29: ...ded from films at 24 frames per second and video content video signals recorded at 30 frames per second Make this selection according to the type of content being viewed 1 Press SETUP TV MENU in the stop mode or No Disc Press or to select Video then press or ENTER 2 Press or to select Picture Mode then press or ENTER 3 Press or to select your desired picture mode then press ENTER TV Screen On Disp...

Page 30: ...limit playback Some discs may not be encoded with specific rating level information though its disc jacket says adult For those discs the age restriction will not work After the rating is locked the setting cannot be changed unless you enter the correct password Setting the new password 1 Press SETUP TV MENU in the stop mode or No Disc Press or to select Locks then press or ENTER 2 Press or to sel...

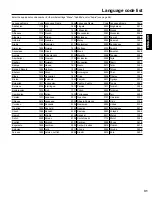
Page 31: ...tar 3030 Bengali Bangla 1224 Hebrew 1933 Nepali 2415 Telugu 3015 Bhutani 1436 Hindi 1819 Norwegian 2425 Thai 3018 Bihari 1218 Hungarian 1831 Oriya 2528 Tibetan 1225 Breton 1228 Icelandic 1929 Panjabi 2611 Tigrinya 3019 Bulgarian 1217 Indonesian 1924 Pashto Pushto 2629 Tonga 3025 Burmese 2335 Interlingua 1911 Persian 1611 Turkish 3028 Byelorussian 1215 Irish 1711 Polish 2622 Turkmen 3021 Cambodian ...

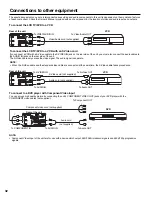
Page 32: ...ded with each component for the location of video and audio inputs and outputs To connect the LCD TV DVD to a VCR Connections to other equipment To connect to a DVD player with Component Video Input You can enjoy a high quality picture by connecting the unit s COMPONENT VIDEO OUT jacks of your DVD player with the COMPONENT video cables not supplied Rear of the unit To Video Audio OUT Video Audio c...

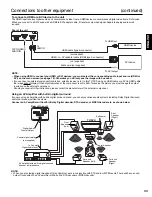
Page 33: ...aker Left Front Speaker Right Subwoofer Surround Speaker Left Surround Speaker Right TV DVD NOTE When you are viewing digital broadcast this unit will not work in conjunction with DTS audio or MPEG audio There will be no sound output if connected to an AV amplifier with a built in DTS decoder or MPEG decoder HDMI to DVI adapter cable HDMI type A connector not supplied Audio cord not supplied HDMI ...

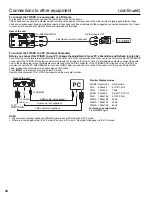
Page 34: ...r of the TV DVD Attach the connectors firmly with the screws on the plug In case of a Multimedia computer connect the audio cord to the audio output of your Multimedia computer and to the AUDIO connector of the PC HDMI AUDIO IN jack of the TV DVD You can also connect the PC with HDMI cable If you use HDMI cable you don t have to connect the audio cord If you use DVI to HDMI cable please connect au...

Page 35: ...of contrast in the picture PREVENTION OF AN OBSTACLE TO RADIO RECEIVERS This television has been designed pursuant to the FCC class B Rules This is to prevent a problem to Radio receivers If this television causes a problem to Radio receivers then take the following steps Keep the television away from Radio Adjust Radio antennas in order for the television not to receive interference The antenna c...

Page 36: ...on Make sure channels are set into memory Cable TV company is scrambling signal Check antenna orientation 16 16 14 No Cable TV reception Check all Cable TV connections Set Signal Type option to the Cable mode Station or Cable TV system problems try another station 15 16 16 Horizontal or diagonal bars on screen Check antenna connections reorient antenna Check for sources of possible interference 14...

Page 37: ...he unit and unplug the AC power cord for several minutes then replug it 13 Playback does not start when the title is selected Check the Parental setup 30 Audio soundtrack and or subtitle language is not changed when you play back a DVD Multilingual language is not recorded on the DVD disc 27 28 No subtitle Some discs have no subtitles Subtitles are cleared Press SUBTITLE 28 Angle cannot be changed...

Page 38: ... 1 0 V p p 75 ohms PB PR 0 7 V p p 75 ohms HDMI HDMI compliant type A connector HDCP compliant E EDID compliant Suggested scan rates 1080p 1080i 480p 480i 720p HDMI Audio 2 channel PCM 32 44 1 48 kHz sampling frequency 16 20 24 bits per sample PC Monitor Mini Dsub 15pin x 1 Antenna VHF UHF In 75 ohms coaxial Outputs Digital audio out 0 5 Vp p 75 ohms terminated Headphone ø 3 5 mm stereo mini jack ...

Page 39: ...ion of arrow until you hear a click How to remove the stand When you transport this product remove the stand and pack flat against the back of the unit in the carton To remove the stand remove the two 2 screws from the bottom see A and hold the stand on a flat surface lifting one side of the unit until stand disconnects see B For wall mounting the base must be removed To disconnect the base stand ...

Page 40: ...oes not cover a Damage to video disc b Damage to equipment not properly connected to the product c Costs incurred in the shipping of the product to an ORION authorized Independent Service Center or ORION Factory Service Center d Damage or improper operation of unit caused by customer abuse misuse negligence or failure to follow operating instructions provided with the product e Ordinary adjustment...

Reviews: