background image


31 


TV SETUP OPERATION (continued) 

Audio Switching (TV) 

NICAM / Sound Multiplex (including A2) (TV mode) 

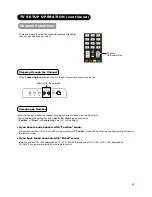
You can make optimum use of available audio by pressing I/II button of remote control. Audio can be switched only if 
receiving NICAM and sound multiplex signals; otherwise, pressing this button will have no effect, such as when only mono 
sound is received. 
These can be divided into two main categories: Bilingual/Dual Sound broadcast and Stereo broadcast. 


Bilingual/Dual Sound broadcast 


Bilingual broadcast is the broadcast available on the main and sub languages, while dual sound broadcast is available on the 
primary and secondary sounds; for example, some sports programs contain broadcast commentary on a game as primary 
sound, and a commentary about a team as the secondary. 
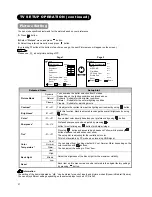
When bilingual program is received, sound mode display appears in yellow as shown. Also, when receiving NICAM signals, 
NICAM display will appear. 
Each time I/II button is pressed, the display is switched in the sequence of following. 

Green 

Yellow

Yellow

[I] 

[II]


Green 

Yellow

Yellow

[I] 

[II]

NICAM 

NICAM


[I]…Main language/Primary Sound 
[II]...Sub language/Secondary Sound 

…force mono: This selects main language or primary sound. 


Stereo broadcast   


With stereo broadcast, you can enjoy different sound from either side.     
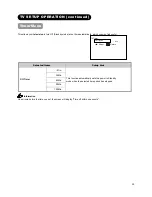
When a stereo program is received, sound mode display will appear in red as shown. 
Also, when receiving NICAM signals, NICAM display will appear. 

Press I/II button to switch between stereo and mono sound. 

Green

Red


Green

Red

NICAM 


NOTE 

z


Please select 

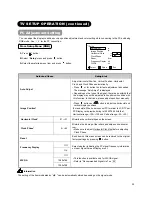
 (force mono) in case of poor reception, noise, poor stereo sound due to signal condition so that you can 

receive a clear mono sound. 

z


represents the Mono broadcast.


…Stereo 

…...Force Mono 

Sound multiplex signal received 

NICAM signal received 

Sound multiplex signal received 

NICAM signal received 

Summary of Contents for L26A01A

Page 1: ...of the model L37A01A LCD Television READ THE INSTRUCTIONS INSIDE CAREFULLY KEEP THIS USER S MANUAL FOR FUTURE REFERENCE For future reference record the serial number of your television SERIAL NO This serial number is located on the rear of the television ...

Page 2: ...ion Please read this user manual carefully before operating this product To ensure proper operation please read and follow ALL the instructions especially the IMPORTANT SAFETY INSTRUCTIONS and SAFETY PRECAUTIONS Please keep this user manual for future reference ...

Page 3: ...22 Main Menu List 23 Setup Menu TV mode 24 Channel Selections 26 Picture Setting 27 Audio Setting 29 Timer Menu 30 Audio Switching TV 31 PC Adjustment Setting 32 About Teletext 34 FUNCTION 36 Size Switching 36 Picture Freezing 37 Power Save Mode 38 TROUBLESHOOTING 39 When Following Messages Appear on the Screen 39 Symptom and Check List 39 PRODUCT SPECIFICATIONS 42 Signal Input 43 Recommended Sign...

Page 4: ...ducts and company names used in this manual are trademarks or registered trademarks of their respective owners The information in the manual included following models For 26 inch L26A01A including L26A01A NA and L26A01A CO For 32 inch L32A01A including L32A01A NA and L32A01A CO For 37 inch L37A01A including L37A01A NA and L37A01A CO Trademark Credits VGA and XGA are trademarks of International Bus...

Page 5: ...ompulsory action The contents will be clearly indicated in an illustration or nearby the symbol at the left indicates that the power plug should be disconnected from the power outlet WARNING There is a risk of fire electric shock or serious injury Unplug the power cord immediately when serious problems occur Serious problems such as Smoke abnormal odor or sound comes out from the product No pictur...

Page 6: ...cal shock do not touch the product when starts lightning Disconnect the plug from the power outlet Do not do anything that may damage the power cord Do not damage modify twist forcibly bend heat or pull excessively the power cord Do not place heavy objects including the unit itself on top of the power cord If the power cord is damaged contact your dealer for repairs or exchange Use only with desig...

Page 7: ...ing of the image on the CRT based television Disconnect all of the external connection cables and detach the anti tumble measures before moving the unit It may cause fire electrical shock or personal injuries Connect the power plug securely Improper connection will cause overheating and may result in fire Do not touch the blades of the plug while connecting it to the wall socket It could cause ele...

Page 8: ...e unit It is because of the communication failure Please note that this is not malfunction When you dispose this product at the end of its life follow the regulations in your residential area For more information contact the local authority or the dealer where you purchased the product Cleaning and Maintenance Please make sure to unplug the power cord before cleaning the unit How to clean the LCD ...

Page 9: ...he display surface In addition do not impact strongly on the surface of the panel because LCD panel is made with fine processing glass Residual image When a still image or menu is displayed on the screen for a short time about a minute and then switches to another image it may leave an after image on the screen The residual image will disappear on its own The Usage under the Low Temperature Enviro...

Page 10: ...3 CLE 994 i OK AA size batteries X2 Power Cord The type of power plug provided may be different from this drawing for some countries 2 Connection 14 18 Connect the power cord to the rear panel Connect to the aerial lead and external equipment Example Connecting aerial lead through DVD STB Connect the plug into the wall socket after all other connections are completed CAUTION Ensure that both ends ...

Page 11: ... automatically leads to the settings of Language and Auto Tuning 1 The first screen appeared will ask you to choose the language of your TV s display 2 Select the language you preferred from the list and press button 3 Once selecting the language Auto Tuning screen appears to start scanning channels NOTE If you want to change the setting after completing this first time setup press button and set ...

Page 12: ... top side Rear Panel L26A01A L32A01A L37A01A Side Input Power Cord Socket Terminal Board External Device Connection Control Panel see below for details Please refer to 14 18 for the detailed information for the connections Control Panel 1 2 3 6 7 4 5 Sub Power button Menu button Channel Up button Channel Down button Volume Up button Volume Down button Input Select OK button ...

Page 13: ...ht Cursor OK Off Timer This automatically sets the power to standby mode when the selected time period has elapsed 0 30 60 90 120min Input Select Press these buttons to change input mode HDMI2 HDMI3 input are not available Not Available Not Available Recall Press this button shows the input signal status Picture Mode Picture mode can be changed each time pressed in the following sequence Dynamic N...

Page 14: ... result in physical injury and or property damage including fire Never mix used and new batteries in the device Replace all the batteries in a device at the same time Remove the batteries if the remote control is not going to be used for an extended period of time To avoid possible failure read the following instructions and handle the remote control properly Do not drop or have an impact on the r...

Page 15: ... Do not install the television in the small space such as inside the rack closet or the box Leave more than 10cm of clearance from each side of television and 30cm from the top of television to wall Without Swivel function Leave at least 10cm of clearance behind rear unit With Swivel functrion Leave at least 35cm of clearance to obtain the maximum performance of Swivel Function for L32A01A L37A01A...

Page 16: ... equipment Connect the aerial lead directly into the socket at rear panel When you have one or more external devices to connect 1 Use RF cable to connect between each equipment and aerial 2 Connect the Aerial Lead to an equipment In socket marked 3 Connect the RF cable from the equipment Out to the other equipment In 4 Then connect from the equipment Out to ANT on the LCD screen socket Example Con...

Page 17: ...is recommended for higher quality picture AV3 can be connected to the equipment with S Video output and Composite output If your external device has a S Video terminal S Video connection is recommended for higher quality picture NOTE If both S Video and Composite Video input terminals of AV3 are connected at the same time S Video will have its priority OUT IN OUT VCR DVD player recorder Set Top Bo...

Page 18: ...ith HDMI output If the external device has DVI output this can be available with HDMI DVI cable In case of using the HDMI DVI cable connect analog audio signal to PC RGB HDMI Analog Audio Input terminal Information HDMI High Definition Multimedia Interface is next generation multimedia I O interface Only one cable is used to transmit all video audio control signals which creates easy connection Mo...

Page 19: ...d to the same external device About the out put format of an external device refer to Recomment Signal List on 44 45 Terminals on Side Since the following terminals are located on the side it is very convenient to use the extra device on a temporary basis after done the connections on the rear panel AV4 can be connected to the equipment with a composite output Headphone The audio from the speaker ...

Page 20: ...e pronged grounded outlet and make sure that the cord is properly grounded If you use a power source converter plug use an outlet with a ground terminal and screw down the ground line Ensure that both ends of power cord are easily accessible If you have to change the power cord please use the certified power cord that meets your region s safety standard Information z How to secure the power cord a...

Page 21: ...h to completely turn Off the power of the unit The Indicating Lamp Status Indicating Lamp Status Power Status Power Switch Status Off Off Main power Off Red Standby mode Main power On Sub Power button Off Green On Main power On Sub Power button On Orange Power Save mode Main power On Sub Power button On NOTE If the image does not appear on the screen at all or have any problem see TROUBLESHOOTING ...

Page 22: ...ut Select button you can switch the input To watch actual broadcast press Input Select button on the control panel the numeric buttons or Channel Up Down button on the remote control To display the image outputting from the external equipment connected to each terminal TV AV1 4 HDMI and RGB select corresponding mode 1 Press Input Select buttons on the remote control Use AV button to switch between...

Page 23: ...ear when changing the channels The display will go out in approximately 5 seconds TV 1 ABCDE OFF Min VIDEO AV1 Component OFF Min RGB RGB H 48 4 kHz V 60 1 Hz OFF Min 1 2 3 4 5 6 7 8 9 0 TV DTT AV TEXT P AV1 AV2 AV4 AV3 CLE 994 i OK Input Mode Input horizontal frequency Input vertical frequency Input mode Signal mode TV position Name Sound mode Off timer Off timer Off timer Recall button ...

Page 24: ...ection 5 Use buttons to adjust the item values or choose options Press button to set your selection 6 To exit from the menu press button NOTE The OSD menu screen will be closed automatically when no operation has been made for about 30 seconds If the item in menu is shown in gray it means that it cannot be selected or adjusted Select Language Select the language from the list so that you can displ...

Page 25: ...System 25 MPEG NR 28 Skip 25 Film Mode 28 Manual Tuning Antenna Att 25 3D Comb Filter 28 Fine Tuning 25 Picture Size 28 Sort 25 Picture TV AV Picture TV A V Reset 28 Setup TV Teletext Language 34 Contrast 33 Video Power Save 38 Brightness 33 Setup AV Reset Color Temperature 33 Auto Adjust 32 Back Light 33 Image Position 32 Picture RGB Reset 33 Horizontal Clock 32 Audio Mode 29 Clock Phase 32 Trebl...

Page 26: ...art searching Position Press channel up down buttons to input position number 1 125 or channel number C or S Search the frequency by using button when Auto Tuning Mode is set to position Frequency When Auto Tuning Mode is set to Direct this function is not available grayed out Name 1 Move the cursor to the first digit and select the letters with buttons 2 Move to the next digit with button 3 Press...

Page 27: ...hen you use channel up P down P buttons to select channels This function will automatically skip unavailable channels when set to on Manual Tuning Antenna Att This function is not available gray out Fine Tuning 56 56 Increase the frequency data for the main tuner Decrease the frequency data for the main tuner Sort You can change the order of channels as follows 1 Move the cursor to the channel row...

Page 28: ...trol The selectable channel number and method differ depending on the modes Position or Direct of Auto tuning See 24 for the details If you have tuned channels with Position mode The position number of 0 125 of which you have tuned with Position mode can be selected by using numeric buttons on the remote control If you have tuned channels with Direct mode Input the number 001 012 displayed as C1 C...

Page 29: ...adjusts the contrast to meet the lighting environment by using button Brightness 31 31 With this function black is adjusted to change the overall brightness by using button Color 31 31 It can adjust color density based on your preference by using button Sharpness 15 15 Preferred sharpness can be adjusted by pressing button for softer image or button for sharper image Tint 31 31 Pressing button enh...

Page 30: ...p for the gap But when display is no available in Cinema size This function only works for TV Composite Component and HDMI input Reset Each item on this menu screen can be restored to the original factory settings by pressing button Information The settings of the item indicated by can be automatically stored depending on the signal mode NOTE About Film Mode The image might not look natural depend...

Page 31: ...atrix Surround is enabled adjusting the Balance will not completely mute any one speaker Off Matrix Surround On The surround sound is mixed to left and right in order to create the illusion of virtual surround speakers Recommendation when the Matrix Surround is on ensure the Balance is set to 0 for optimum surround sound effect Off Dynamic bass On Dynamic Bass gives you the enhanced bass sound Low...

Page 32: ...which you may find useful Timer Off Timer Adjust Return Min Selected Items Setup hint Min 30Min 60Min 90Min Off Timer 120Min This function automatically sets the power to Standby mode when the selected time period has elapsed Information One minute before the time you set the screen will display Time off within one minute ...

Page 33: ...eived sound mode display appears in yellow as shown Also when receiving NICAM signals NICAM display will appear Each time I II button is pressed the display is switched in the sequence of following Green Yellow Yellow I II Green Yellow Yellow I II NICAM NICAM I Main language Primary Sound II Sub language Secondary Sound force mono This selects main language or primary sound Stereo broadcast With s...

Page 34: ...ition with this function In that case please adjust each item manually Image Position Press button and button to adjust the horizontal and vertical display positions For example When user connect PC terminal to LCD TV set PC Display card provide timing is 1024X768 60Hz that Horizontal range 100 100 and Vertical range 22 22 Horizontal Clock 31 31 Minimize the vertical stripes on the screen Clock Ph...

Page 35: ...ss 31 31 With this function black is adjusted to change the overall brightness by using button Cool Normal Warm Color Temperature User You can select from 3 settings default Cool Normal Warm depending on the color condition with buttons You can adjust the setting in User item High Middle Back Light Low Adjust the brightness of the Back Light for the maximum visibility Reset Each item on this menu ...

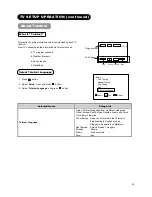
Page 36: ...ss button 2 Select Setup menu and press button 3 Select Teletext Language and press button Setup Auto Tuning Manual Tuning Fine Tuning Sort Teletext Language Select OK Set Return Selected Items Setup hint Teletext Language Select Teletext Language from 5 different categories West Europe East Europe Russian Arabic and Farsi According to the area West Europe Asian countries where the Teletext is bro...

Page 37: ...x The answers of the Quiz or the Game page Press again to close the revealed answer Reveal To return to actual broadcast temporarily while searching for the Teletext page you request When the search is done the designated page will be displayed on the upper left of the screen Press again to return to Teletext page Cancel To access the link pages which are displayed at the bottom of the page Select...

Page 38: ...cal size and horizontally squeezed Information Aspect ratio represents horizontal vertical ratio on screen Watching High Definition Picture 720p 1080i 1080p HDMI only AV1 2 HDMI Only Full mode signal output 9 16 3 16 or 21 9 4 NOTE The size will fix as Full mode and not change when receiving High Definition Picture 720p 1080i 1080p HDMI only If the images from High Difinition Picture has blacken g...

Page 39: ... 3 Display Area Selection Diagram Resolution Full 4 3 640x400 VGA 640x480 VGA 800x600 SVGA 1024x768 XGA 1280x768 WXGA 1280x1024 SXGA 1360x768 WXGA Picture Freezing By pressing button you can change to freeze mode easily anytime you like Press it again to return to normal picture 1 2 3 4 5 6 7 8 9 0 TV DTT AV TEXT i FREEZE button ...

Page 40: ...nge Turns On automatically Power Save that only control Back Light On Off Returning to operating status Press the Input Select button of the control panel or the remote control to restart the television When the RGB input is selected When this unit is connected to a VESA DPMS computer the Power Save mode Operation mode Off can be set to be activated automatically when the computer is not being use...

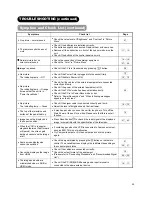
Page 41: ...he television 42 44 45 Not Available This shows when the selected operation is not available Symptom and Check List Symptoms Check list Page No picture no sound Check the Indicating lamp status Off Red Green or Orange Check the connection of the Power Cord and or other cables Check if the Main Power of the unit or external equipment is ON Check if the TV mode is selected Check if the TV is in Stan...

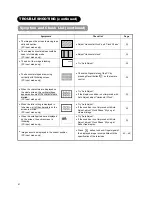
Page 42: ...ure The indicating lamp Green Check if the signal cable is connected correctly and firmly Adjust the level of Brightness and Contrast lower 14 18 The top of the television and surface of the panel heat up It may happen when you use the unit for long hours Turn off the Main Power of the unit for a while Please note that this is not all function 19 Image cannot be displayed in the correct position P...

Page 43: ...characters are blurred PC input mode only abcdefgABCDEFGabcd abcdefgABCDEFGabcd Try Auto Adjust If the display condition is not improved with Auto Adjust adjust Horizontal Clock 32 When the letter string is displayed in full screen all of the characters on the screen is blurred PC input mode only abcdefgABCDEFGabcd abcdefgABCDEFGabcd Try Auto Adjust If the condition is not improved with Auto Adjus...

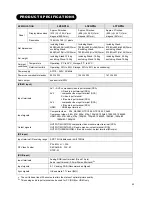
Page 44: ...nals AV1 AV2 component video input terminal RCA L R audio input terminal RCA AV3 composite video input terminal RCA S video input terminal L R audio input terminal RCA AV4 composite video input terminal RCA L R audio input terminal RCA HDMI HDMI input terminal Input signals Composite video PAL SECAM NTSC3 58 NTSC4 43 PAL60 Component video 480i 576i 480p 576p 720p 50 720p 60 1080i 50 1080i 60 HDMI ...

Page 45: ...ed N C 5 T M D S Data1 15 SCL 6 T M D S Data1 16 SDA 7 T M D S Data0 17 DDC CEC Ground 8 T M D S Data0 18 5V Power 9 T M D S Data0 19 Hot Plug Detect 10 T M D S Clock RGB terminal D sub 15 pin connector Pin Input signal 1 R 2 G 3 B 4 No connection 5 No connection 6 R GND 7 G GND 8 B GND 9 No connection 10 GND 11 No connection When different kinds of input signals are simultaneously input to the te...

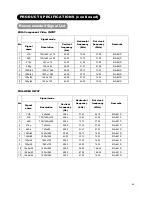
Page 46: ... 8 720p 60 1280 x 720 60 00 45 00 74 25 EIA 861D With HDMI INPUT Signal mode No Signal name Resolution Vertical frequency Hz Horizontal frequency kHz Dot clock frequency MHz Remarks 1 VGA 640x480 59 94 31 47 25 18 EIA 861D 2 576i 720 1440 x576 50 00 15 63 27 00 EIA 861D 3 480i 720 1440 x480 59 94 15 73 27 00 EIA 861D 4 576p 720x576 50 00 31 25 27 00 EIA 861D 5 480p 720x480 59 94 31 47 27 00 EIA 86...

Page 47: ... 50 7 VESA 1360 x 768 60 02 47 71 85 50 The type of video board or connecting cable used may not allow for correct displays adjustment of Horizontal Position Vertical Position Horizontal Clock and Clock Phase The unit differentiates the signal modes according to the horizontal and vertical frequencies and the horizontal and vertical sync signal polarities Note that different signals having all the...

Page 48: ......

Page 49: ......

Reviews: