background image

English   

- 16 -

you change the pin number make sure you write it 
down and keep it safe. 


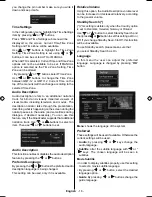
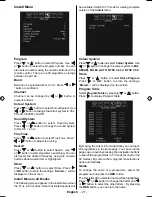
 Time Settings

In the configuration menu, highlight the Time Settings 
item by pressing “

” or “

” buttons.

Press “

OK

” and Time Settings sub menu will be

displayed on the screen. Current Time,Time Zone 
Setting and Time Zone will be available.

Use “

” or “

” buttons to highlight the Time Zone 

Setting. Time Zone Setting is set using “ ” or “ ” 
buttons. It can be set to AUTO or MANUAL.

When AUTO is selected, Current Time and Time Zone 
options will not be available to be set. If MANUAL 
option is selected as the Time Zone Setting, Time 
Zone can be altered:

• By pressing “

” or “

” buttons select Time Zone.

Use “ ” or “ ” buttons to change the Time Zone 
between GMT-12 or GMT+12. Current Time on the 
top of the menu list will then change according to the 
selected Time Zone.

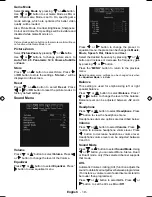
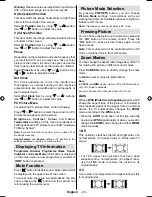
Audio Description

Audio description refers to an additional narration 
track for blind and visually impaired viewers of 
visual media, including television and movies. The 
description narrator talks through the presentation, 
describing what is happening on the screen during the 
natural pauses in the audio (and sometimes during 
dialogue, if deemed necessary). You can use this 
feature, only if the broadcaster supports that additional 
narration track. Use “

” or “

” buttons to select an 

item. Then use “ ” or “ ” buttons to set.

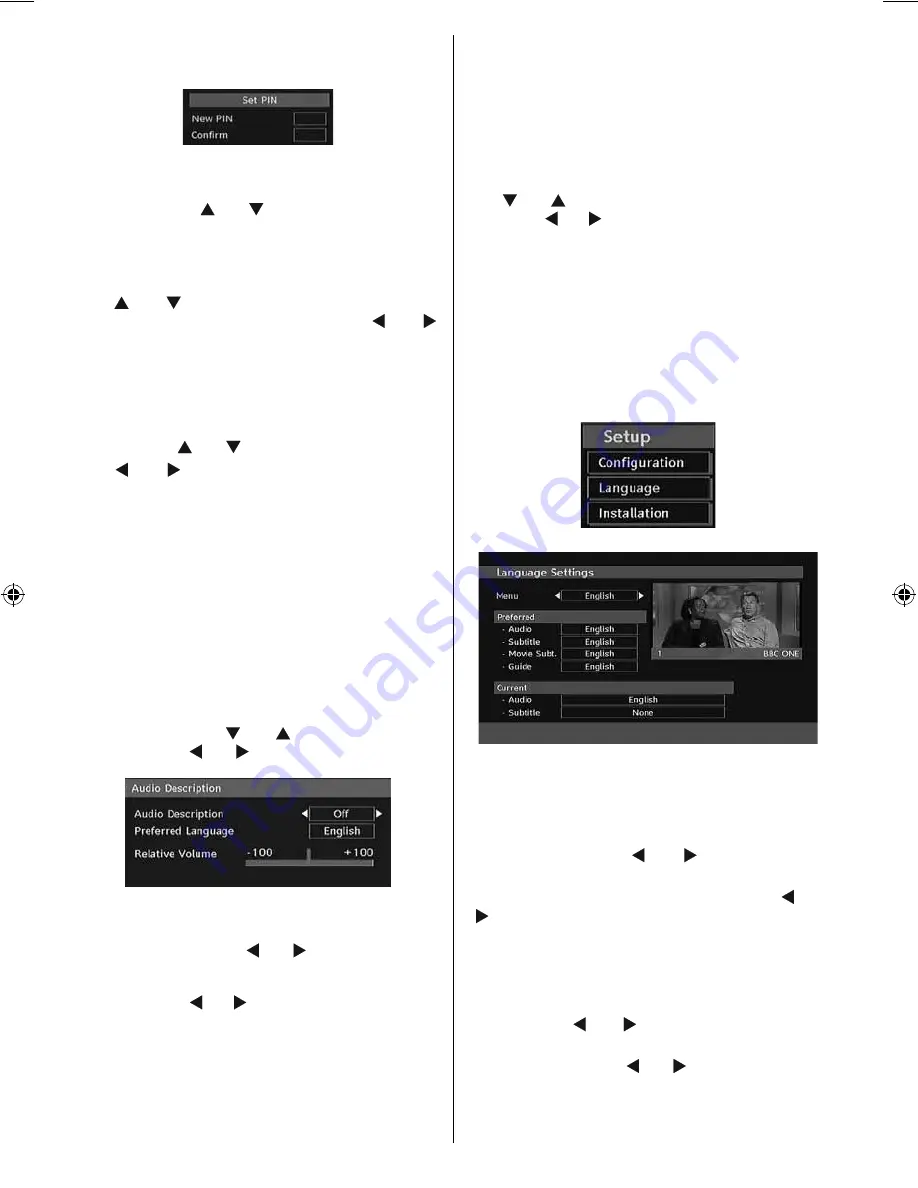
Audio Description

This function enables or disables the audio description 
feature by pressing the “ ” or “ ” buttons.

Preferred Language

By pressing the “ ” or “ ” buttons the preferred audio 
description language is being changed.

This setting can be used, only if it is available.

Relative Volume

Using this option, the Audio Description volume level 
can be increased or decreased relatively, according 
to the general volume.

Standby Search (*)

(*) This setting is visible only when the Country option 
is set to Denmark, Sweden, Norway or Finland.

Use “

” or “

” button to select Standby Search and 

then press “ ” or “ ” button to set this setting as On or 
Off. If you change Standby Search to Off, this function 
will be unavailable.

To use Standby search please make sure that

you select Standby Search as On.

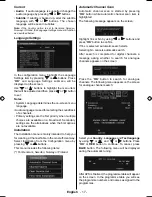
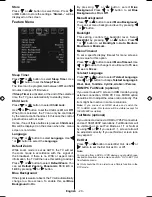
Language 

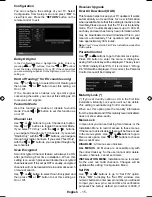
 In this menu the user can adjust the preferred 
language. Language is changed by pressing “

OK

” 

button. 


Menu

 : shows the language of the system 

 Preferred 

 These settings will be used if available. Otherwise the 
current settings will be used. 

 •  

Audio

 : by pressing “ ” or “ ” keys change the 

audio language.

•  

Subtitle

 : alter the subtitle language with “ ” or “

” keys. The chosen language will be seen in 

subtitles.

Movie Subtitle

• In order to display subtitles properly, use this setting 

to select a movie subtitle language.

• By pressing “ ” or “ ” button, select the desired 

language option.

•  

Guide

 : By pressing  “ ” or “ ” buttons change the 

guide language. 

00_MB45M_[GB]_1800UK_IDTV_NICKEL13_26856W_10065880_50157325.indd   16

00_MB45M_[GB]_1800UK_IDTV_NICKEL13_26856W_10065880_50157325.indd   16

11.12.2009   11:20:12

11.12.2009   11:20:12

Summary of Contents for L26HP04U

Page 1: ...GB Instructions for use L26HP04U 26 LCD Colour Television ...

Page 2: ...tions 2 Power Source 3 Power Cord 3 Warning 3 Disconnecting the Device 3 Moisture and Water 3 Cleaning 4 Heat and Flames 4 Lightning 4 Replacement Parts 4 Servicing 4 Waste Disposal 4 Information for Users in European Union Countries 4 Headphone Volume 4 Installation 4 LCD Screen 4 Overview of the Remote Control 5 LCD TV and Operating Buttons 6 Viewing the Connections Back Connectors 6 Viewing the...

Page 3: ...V please read this manual thoroughly Please do keep this manual in a safe place for future references Preparation For ventilation leave a free space of at least 10 cm all around the set To prevent any fault and unsafe situations please do not place any objects on top of the set Use this device in moderate climates 10 cm 10 cm 10 cm Safety Precautions Please read the following recommended safety pr...

Page 4: ...objects filled with liquids such as flower vases on top Avoid from dripping or splashing If any solid object or liquid falls into the cabinet unplug the TV and have it checked by qualified personnel before operating it any further DON T remove any fixed cover as this may expose dangerous voltages DON T obstruct the ventilation openings of the equipment with items such as newspapers tablecloths cur...

Page 5: ... away from children Batteries including those which are heavy metal free should not be disposed of with household waste Please dispose of used battery in an environment friendly manner Find out about the legal regulations which apply in your area Cold cathode fluorescent lamp in LCD PANEL contains a small amount of mercury please follow the local laws or regulations for disposal Information for Us...

Page 6: ...e in DTV mode 9 AV Source selection 10 Yellow Feature menu Current language in 11 DTV mode Blue Install menu Favourite mode in DTV 12 mode Subtitle on off TXT subtitle 13 Sleep timer 14 No function 15 Guide in DTV mode 16 Update in TXT mode 17 Teletext Mix Pat 18 Image size Expand in TXT mode 19 Mono Stereo Dual I II Current language in 20 DTV mode Red Sound menu Channel list in DTV mode 21 Green ...

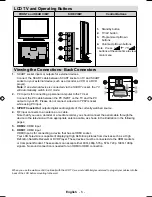
Page 7: ...ut S PDIF Coaxial Out 3 outputs digital audio signals of the currently watched source RF Input connects to an antenna or a cable 4 Note that if you use a decoder or a media recorder you should connect the aerial cable through the device to the television with an appropriate antenna cable as shown in the illustration in the following pages HDMI 5 2 HDMI input HDMI 6 1 HDMI input HDMI Input is for c...

Page 8: ...e used for connecting audio signals of external devices 4 Connect the audio cable between the AUDIO INPUTS on the TV and the AUDIO OUTPUT jacks on your device Also to enable YPbPr sound connection in such a case use an appropriate audio cable between the connected device s audio outputs and the TV s audio inputs Note If you connect a device to the TV via the VIDEO or YPbPr cable you should also co...

Page 9: ...of the TV set DVD players may have different connectors Please refer to your DVD player s instruction book for additional information Power off both the TV and the device before making any connections Note Cables shown in the illustration are not supplied If your DVD player has an HDMI socket you can connect via HDMI When you connect to DVD player as illustrated below switch to HDMI source See Inp...

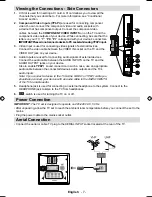
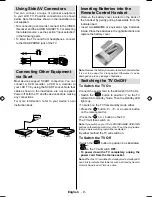
Page 10: ...g backwards from the indicated part Insert two AAA R3 or equivalent type batteries inside Place the batteries in the right directions and replace the battery cover Note Remove the battery from remote control handset when it is not to be used for a long period Otherwise it can be damaged due to any leakage of batteries Switching the TV On Off To Switch the TV On Connect the power cord to the 220 24...

Page 11: ...re described in the following sections Volume Setting Press button to increase the volume Press button to decrease the volume A volume level scale slider will be displayed on the screen Programme Selection Previous or Next Programme Press P button to select the previous programme Press P button to select the next programme Programme Selection Direct Access Press numeric buttons on the remote contr...

Page 12: ...uch a case Electronic Programme Guide EPG Some but not all channels send information about the current and next events Press EPG button to view the EPG menu EPG appears on the screen It is able to get Information of the channel programs weekly by means of 7 DAY EPG All programs of channels are displayed On the bottom of the screen info bar showing all the available commands will be displayed RED b...

Page 13: ...e format being displayed is determined by the picture being broadcasted PLEASE NOTE Menu size changes depending on the chosen image size Notice AC3 audio type is not supported In this case Tv sound will be muted If the broadcast includes AC3 stream the following warning message will be displayed on the screen If there is no audio available the following warning message will be displayed on the scr...

Page 14: ...e numeric buttons 0 9 replaces the highlighted character with the characters printed above the button one by one as the button is pressed Press the MENU button to cancel the editing or OK button to save the new name Adding Locks to Channels Channel locking provides a password protected access to channels selected by parents In order to lock a channel you should know the parental lock password defa...

Page 15: ...ccess Press the MENU button to display the main menu and use the or button to highlight the Conditional Access line and press the OK button Some Digital Terrestrial channels operate on a Pay Per View basis These require a subscription and a hardware decoder Obtain the Conditional Access Module CAM and the viewing card by subscribing to a pay channel company then insert those to the TV using the fo...

Page 16: ...omatically and searches for new information when available Note that this setting is inactive to be when available Note that this setting is inactive to be modified modified Please ensure that the TV is set to standby mode The TV automatically powers up at 3 00 A M each day and searches for any new information which may be broadcasted and will download this to your receiver automatically This oper...

Page 17: ...on track Use or buttons to select an item Then use or buttons to set Audio Description This function enables or disables the audio description feature by pressing the or buttons Preferred Language By pressing the or buttons the preferred audio description language is being changed This setting can be used only if it is available Relative Volume Using this option the Audio Description volume level ...

Page 18: ...s mainly intended to help you for creating a Channel Table in the most efficient way Select Installation from the Configuration menu by pressing or buttons This menu includes the following items For Denmark Sweden Norway or Finland Automatic Channel Scan Automatic channel scan is started by pressing OK button while Automatic channel scan item is highlighted The following message appears on the scr...

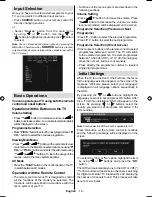
Page 19: ...me Installation menu will be displayed The menu which is displayed for language selection appears on the screen at first By using or buttons select the desired language option and press OK button to activate After then First time installation OSD will appear on the screen By pressing or buttons select the Country you want to set and press OK button only for EU countries Press the OK button to star...

Page 20: ...e preset can be changed to Music Movie Speech Flat Classic and User Select the desired frequency by pressing or button and increase or decrease the frequency gain by pressing or button Press the MENU button to return to the previous menu Note Equalizer menu settings can be changed only when the Equalizer Mode is in User Balance This setting is used for emphasizing left or right speaker balance Pre...

Page 21: ... Blue Background as On or Off Menu Background Press or button to select Menu Background You can set menu background level by pressing or button Backlight This setting controls the backlight level Select Backlight by pressing or button Press or button to set Backlight to Auto Medium Maximum or Minimum Menu Timeout To set a specific display timeout for menu screens set a value for this option Press ...

Page 22: ...red will be displayed on the screen Install Menu in AV Modes The following screen appears in the install menu when the TV is in AV modes Note that limited options will be available Switch to TV mode for viewing complete version of the Install menu Colour System Press or button to select Colour System Use or button to change the colour system to PAL SECAM PAL60 AUTO NTSC 4 43 or NTSC 3 58 Store Pre...

Page 23: ...rogram Table will be displayed with the programmes found and located Source Menu Press or button and select the sixth icon Then press or OK button Source menu appears on the screen In source menu highlight a source by pressing or button and switch to that mode by pressing button Source options are TV DTV EXT 1 FAV HDMI 1 HDMI 2 YPbPr and PC VGA Note Once you have connected optional equipment syste...

Page 24: ...red or INFO button is pressed Mute Function Press button to disable sound Mute indicator will be displayed in the upper side of the screen To cancel mute there are two alternatives the first one is pressing the button and the second one is increasing the volume level Picture Mode Selection By pressing PRESETS button you can change Picture Mode settings in accordance with your viewing requirements ...

Page 25: ...he current channel Pressing again will quit the teletext mode RETURN Index Selects the teletext index page Subcode Pages Selects subcode pages if available when the teletext is activated INFO Reveal Shows hidden information e g solutions of games SCREEN Expand Press once to enlarge top half of the page press again to enlarge the bottom half of the page Press again to revert back to normal size OK ...

Page 26: ...ay degrade when two peripherals are connected to the TV at the same time In such a case disconnect one of the peripherals No Picture Is the aerial connected properly Are the plugs connected tightly to the aerial socket Is the aerial cable damaged Are suitable plugs used to connect the aerial If you are in doubt consult your dealer No Picture means that your TV is not receiving a transmission Have ...

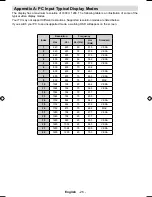
Page 27: ...x Resolution Frequency Standard Hor Ver Ver Hz Hor KHz 1 640 480 60 31 5 VESA 2 640 480 72 37 9 VESA 3 640 480 75 37 5 VESA 4 800 600 56 35 2 VESA 5 800 600 60 37 9 VESA 6 800 600 70 43 8 7 800 600 72 48 1 VESA 8 800 600 75 46 9 VESA 9 832 624 75 49 7 MAC 10 1024 768 60 48 4 VESA 11 1024 768 70 56 5 VESA 12 1024 768 72 57 7 13 1024 768 75 60 0 14 1152 864 70 64 2 VESA 15 1152 864 75 67 5 VESA 16 1...

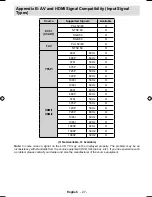
Page 28: ...z O 1080I 60Hz O HDMI1 HDMI2 480I 60Hz O 480P 60Hz O 576I 50Hz O 576P 50Hz O 720P 50Hz O 720P 60Hz O 1080I 50Hz O 1080I 60Hz O 1080P 24Hz O 1080P 50HZ O 1080P 60HZ O X Not Available O Available Note In some cases a signal on the LCD TV may not be displayed properly The problem may be an inconsistency with standards from the source equipment DVD Set top box etc If you do experience such a problem p...

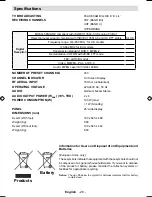
Page 29: ...on MHEG 5 ENGINE compliant with ISO IEC 13522 5 UK engine Profile 1 for UK Object carousel support compliant with ISO IEC 135818 6 and UK DTT profile Frequency range 474 850 MHz for UK models 170 862 MHz for EU models Transmission standard DVB T MPEG 2 Demodulation COFDM with 2K 8K FFT mode FEC all DVB modes Video MP ML PAL 4 3 16 9 Audio MPEG Layer I II 32 44 148kHz NUMBER OF PRESET CHANNELS 200 ...

Page 30: ... subject of unauthorised modifications or alterations or has been the subject of commercial use In the event of a problem with the product within the guarantee period please return it to your nearest store If the item is shown to have had an inherent defect present at the time of sale the store will provide you with a replacement Your statutory rights remain unaffected Guarantor Home Retail Group ...

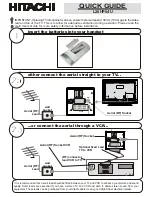
Page 31: ...erial RF Socket wall socket wall socket Aerial RF Lead Aerial RF Lead It is recommended that a scart lead should be fitted between your TV and VCR to enhance your picture and sound quality Scart leads are essential if you have a stereo TV and VCR and wish to obtain stereo sound from your equipment These leads can be purchased from your Hitachi dealer or any good High Street electrical retailer SPD...

Page 32: ... Lead Aerial RF Socket High Definition Your LCD Television is capable of displaying High Definition pictures from devices such as a High Definition Satellite Receiver or DVD Device These devices must be connected via the HDMI socket or Component Socket TFT LCD TV Scart Lead to AV 1 on TV Note These three methods of connection perform the same function but in different levels of quality It is not n...

Page 33: ...ed Press Operate Standby or channel up down P P or numeric buttons 1 2 3 to operate insert plug European plug and switch on insert plug UK plug Programme Up Programme Down To select a programme number For navigation of the menus Operate Standby TV DTV OK SELECT INFO 1 2 3 4 5 6 7 8 9 0 RETURN SOURCE EPG M MENU ABC DEF GHI JKL MNO PQR STU VWX YZ P P SWAP PRESETS FAV SCREEN LANG SUBTITLE SLEEP RC 18...

Page 34: ...ease refer to the Install Menu section of the instruction book When the TV is turned on for the first time the menu for the language selection appears on the screen The message Welcome please select your language is written in all language options sequentially in the menu on the screen By pressing or buttons highlight the language you want to set and press OK After then First time Installation Men...

Page 35: ...www hitachidigitalmedia com 50152118 ...

Reviews: