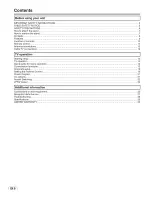
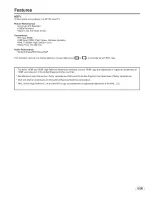
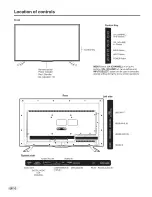
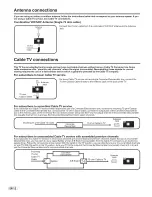
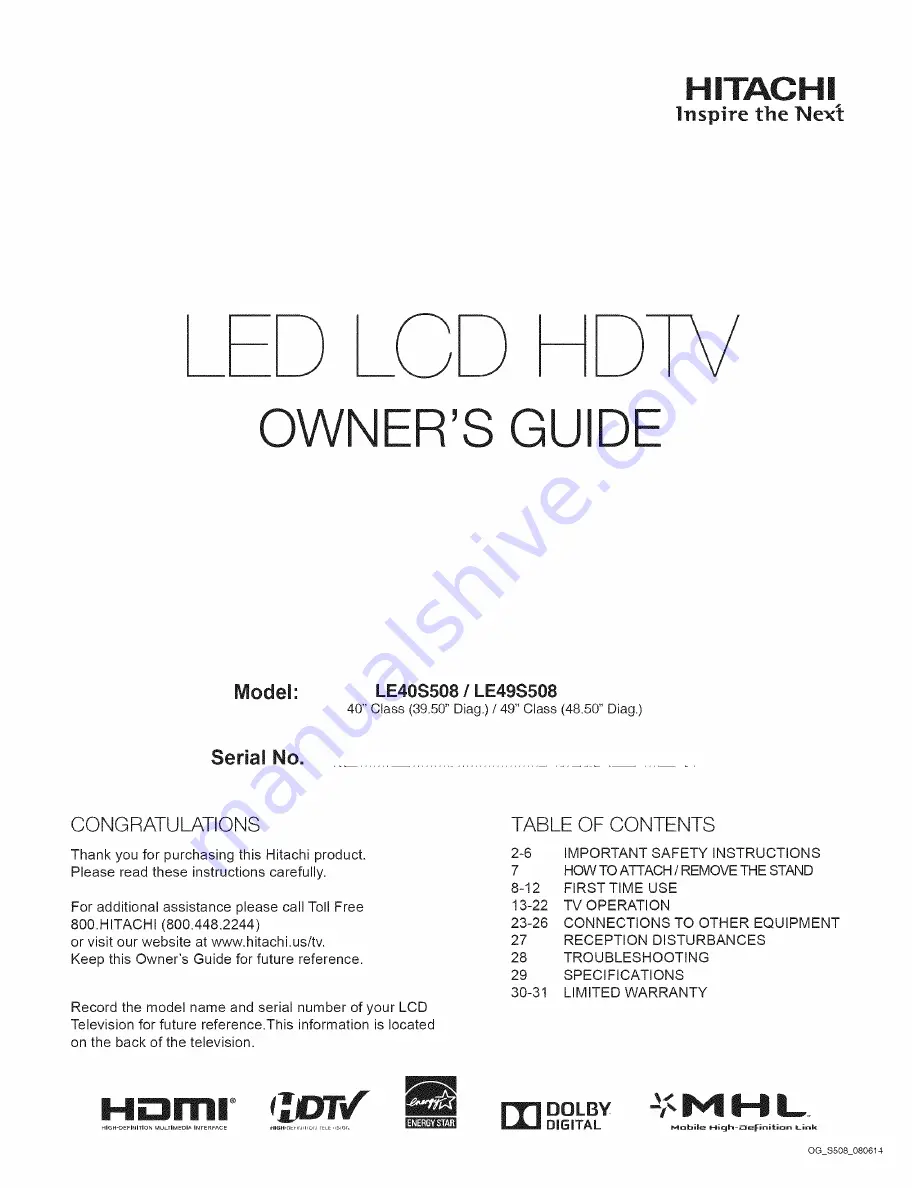
background image

Summary of Contents for LE40S508

Page 1: ...ide for future reference Record the model name and serial number of your LCD Television for future reference This information is located on the back of the television TABLE OF CONTENTS 2 6 7 8 12 13 22 23 26 27 28 29 30 31 IMPORTANT SAFETY INSTRUCTIONS HOWTO ATTACH REMOVETHE STAND FIRST TIME USE TV OPERATION CONNECTIONS TO OTHER EQUIPMENT RECEPTION DISTURBANCES TROUBLESHOOTING SPECIFICATIONS LIMIT...

Page 2: ...mful interference to radio communications However there is no guarantee that interference will not occur in a particular installation If this equipment does cause harmful interference to radio or television reception which can be determined by turning the equipment off and on the user is encouraged to try to correct the interference by one or more of the following measures Reorient or relocate the...

Page 3: ...in the vicinity of overhead power lines or other electric light or power circuits or where it can fall into such power lines or circuits When installing an outside antenna system extreme care should be taken to keep from touching such power lines or circuits as contact with them might be fatal Do not overload wall outlets and extension cords as this can result in a risk of fire or electric shock D...

Page 4: ... websites Special Formats that do not use the entire screen For example viewing letterbox style 16 9 media on a normal 4 3 display black bars at top and bottom of screen or viewing normal style 4 3 media on a widescreen 16 9 display black bars on left and right sides of screen The following symptoms are not signs of malfunction but technical limitation Therefore we disclaim any responsibility for ...

Page 5: ...t place flat panel displays on furniture that can easily be used as steps such as a chest of drawers Remember that children can become excited while watching a program especially on a larger than life flat panel display Care should be taken to place or install the display where it cannot be pushed pulled over or knocked down Care should be taken to route all cords and cables connected to the flat ...

Page 6: ...n length is less than 16mm for LE40S508 and 26mm for LE49S508 the weight can not be maintained If the insertion length is more than 16mm for LE40S508 and 26mm for LE49S508 a space is created between the Wall Mount Bracket and the Television insertion Length Screw Length Washers Thickness Mounting Bracket Thickness Securing to a Wall 1 Use metallic wire not provided screw and clamp on the rear of t...

Page 7: ...ure 1 R L Stand R _ _Stands Screws _J_ Figure 1 Be sure to follow the above instructions Insufficient tightening or incorrect installation of the stand will not support your TV correctly and could result in damage or injury from tip over How to remove the stand When you transport this product remove the stand and pack it flat against the back of the unit in the carton To remove the stand perform t...

Page 8: ...mote control 11 Antenna connections 12 Cable TV connections 12 Starting setup 13 TV operation 13 Quick guide for menu operation 14 Convenience functions 15 Channels setup 18 Setting the Parental Control 19 Closed Caption 21 CC options 21 Aspect Switching 22 JPEG Viewer 22 I Aclditional i_ation 1 Connections to other equipment 23 Reception disturbances 27 Troubleshooting 28 Specifications 29 LIMITE...

Page 9: ...ill display television closed captioning _ or Q in accordance with FCC rules The terms HDMI and HDMI High Definition Multimedia Interface and the HDMI Logo are trademarks or registered trademarks of HDMI Licensing LLC in the United States and other countries Manufactured under license from Dolby Laboratories Dolby and the double D symbol are trademarks of Dolby Laboratories VGA and XGA are tradema...

Page 10: ...PUT Button POWER Button MENU button CH CHANNEL tv AtT buttons VOL VOLUME _ t4 buttons and INPUT SELECT button can be used to select the desired setting during the menu screen operations Left side USBINPUT HDMI1 MHL IN HDMI2 ARC IN HDMi3 IN Bottom side AUDIO R L IN VIDEO IN AUDIO OUT COMPONENT IN AIR CABLE IN PC IN PC DVI AUDIO IN DIGITAL AUDIO Y Pb Pr OUT COAXIAL ...

Page 11: ...FAV CH Button Press to access the Favorite Channel list ASPECT Button Press to change the picture size C C Button Use to select Closed Caption to CC Off CC On Mute or CC On AUDIO Button Press to change the audio language USB Button Press to directly access the USB input HDMI Button Press to directly access the HDMI Inputs COMP Button Press to directly access the Component Input AV Button Press to ...

Page 12: ...ox connect the incoming 75 ohm Coaxial Cable to the Converter Descrambler box Using another 75 ohm Coaxial Cable connect the output jack of the Converter Descrambler box to the Antenna Jack on the TV Follow the connections shown below Set the TV to the output channel of the Converter Descrambler box usually channel 3 or 4 and use the Converter Descrambler box to select channels Antenna _ Jack Inco...

Page 13: ... on the TV press POWER It may take approx 10 seconds for a picture to appear on screen Adjust the volume level by pressing VOL VOLUME or The volume level will be indicated on the screen by a volume bar If the volume increases the number of bars also increases If the volume decreases the number of bars also decreases Set the Source option to the appropriate selection see Air Cable selection on page...

Page 14: ...UTE to switch off the sound The TV s sound will be silenced and MUTE icon will appear on the screen The sound can be switched back on by pressing this button again or by pressing the VOL VOLUME button Quick guide for menu operation Example Select Menu Language 1 Press INPUT to selectTV mode 2 Press MENU TheTV menu screen will appear 3 Press 4 or _ to select Setup then press SELECT 4 Press A or T t...

Page 15: ...htness saves energy This Picture Mode qualifies for ENERGY STAR Your personal preferences You can adjust the picture quality to your preference Cool Bluish Standard Neutral Warm Reddish Custom Red Green Blue See page 22 Set the level of decreasing noise included in the video signal Use this feature to change the black level automatically according to the bright ness of an image The black level wil...

Page 16: ...adjusted automatically to lower volume of loud scenes and to raise volume of quieter scenes The dynamic presence and sound created offers a thoroughly enjoyable listening experience Select the format for your digital audio output If you have connected an amplifier receiver to the digital audio jack on your TV Synchronizes audio with video signal on digital and analog sources This function is usefu...

Page 17: ...lay turn theTV on and the HDMI input that the device is connected to will become the active input device for the TV ARC To enable the audio through an AV receiver using HDMI ARC Device Lists Display devices that are connected to TV Connect To make a connection to a device shown on the device list Root Menu To access the device menu SW Version Time Clock Auto Clock On Off Year Month Date Hour Minut...

Page 18: ... channel scan will stop NOTE If you are unsure of the digital channels available in your area you may visit www antennaweb org to receive a list based on your address or zip code If you require further assistance you may call our toll free customer service line at 800 HITACHI 800 448 2244 USA CANADA New channels may be added to your area periodically it is recommended to perform the Auto Channel S...

Page 19: ...ion Buttons 0 9 to enter your password To set the Parental Control 1 Inthe Lock menu press A or T to select Parental Control then press SELECT to set to On 2 Press A or T to select US then press SELECT 3 Press A or T to select TV Rating then press SELECT 4 Press A T 4 _ to select which rating will be used then press SELECT Each rating below will appear TV 5 You can set the rating using age level a...

Page 20: ...s SELECT 2 3 4 Enter your old password using Direct Channel Selection Buttons 0 9 Enter your new password using Direct Channel Selection Buttons 0 9 Enter the new password again to confirm Your new password is now registered Downloading the additional Parental Control rating system Region 5 As a supplement to the standard Parental Control rating system your television is able to download an additi...

Page 21: ...r approx 10 seconds Misspellings or unusual characters may occasionally appear during Closed Captioning This is normal with Closed Captioning especially with live programs This is because during live programs captions are also entered live These transmissions do not allow time for editing When Captions are being displayed on screen displays such as volume may be seen but may interfere with Closed ...

Page 22: ... oO0oO I16 9 PC Mode The entire picture is uniformly enlarged and displayed at 100 This aspect mode is only available in the HDMI inputs JPEG Viewer You can enjoy viewing pictures from your USB storage device 1 Connect the USB storage device into the USB Input terminal 2 Press INPUT and press A or T to select USB then press SELECT NOTE Do not disconnect a USB storage device while it is being acces...

Page 23: ...io IN on the rear of the TV You can also connect the PC with HDMI cable If you use HDMI cable you don t have to connect the audio cable Ifyou use DVI to HDMI cable please connect audio cable as same way as VGA cable Press INPUT on the remote control to select PC input Switch on the computer The TV can operate as the computer monitor Bottom of the TV To PC IN PC _To PCAUDIOIN 1 1 Audio cable not su...

Page 24: ... the cable to the HDMI1 MHL jack on the side of yourTV 2 Press the INPUT button on the remote control and select HDMI1 input source D HDMI Micro USB Your device s menu opens You can use CURSOR left right down or up buttons to navigate on your device and press the SELECT button on the remote control to access its menu NOTE Your device s menu varies with the device and the apps you have loaded TM 4 ...

Page 25: ...To ViDEO AUDiO iN 1 i Camcorder 1 VCR t _ Video Audio cable not supplied To Video Audio OUT To connect the TV to a DVD player with Component Video input You can enjoy a high quality picture by connecting the unit s COMPONENT VIDEO OUT jacks of your DVD player with the component video cables not supplied Bottom of the TV DVD 1 1 1 i o MP NFNT N YJPbJPr _ _ _ C m_ ntsn_pip_ieed _able _ _ To Componen...

Page 26: ...f you are using an AV Amplifier with built in digital surround sound you can enjoy broadcast or cable programs that provide Dolby Digital sound Connect an AV amplifier with built in Dolby Digital decoder etc as shown below Bottom of the TV To DIGITAL AUDIO OUT COAXIAL A Coaxial digital cable not supplied To Coaxial Digital Audio Input _f _____ _s oom _ 1 AV Amplifier with built in digital surround...

Page 27: ...ripples or diagonal streaks and in some cases causes loss of contrast in the picture PREVENTION OF AN OBSTACLE TO RADIO RECEIVERS This television has been designed pursuant to the FCC class B Rules This is to prevent a problem to Radio receivers If this television causes a problem to Radio receivers then take the following steps Keep the television away from Radio Adjust Radio antennas in order fo...

Page 28: ...na or Cable TV connections adjust antenna Check for sources of possible interference Station or CableTV experiencing problems tune to another station Make sure channels are set into memory CableTV company is scrambling signal Adjust antenna SYMPTOMS Digital broadcasting screen problem No CATV reception Horizontal or diagonal bars on screen Noreception above channel13 No Remote operation TV shuts o...

Page 29: ... Antenna VHF UHF In 75 ohms coaxial Digital Terrestrial Broadcast 8VSB 2 69 Digital Cable QAM 1 135 Outputs Digital audio COAXIAL 0 5 V p p 75 ohms terminated Audio Out 3 5mm Stereo 470 mVrms 1k ohms Speakers Downfiring 157 5 mm x 40 mm x 37 mm 8 ohms x 2 Audio output power 8 0W 8 0W Power supply AC 120V 60Hz Power consumption Operation 70W Operation 110W Standby tW Standby t W Weight 8 1kg 17 91b...

Page 30: ...I 800 448 2244 Please be prepared to submit proof of purchase and or delivery receipts to your 800 HITACHI Customer Service Representative Warranty coverage will be provided in accordance with the provisions of your Limited Warranty see the Limited Warranty page in this operating guide Pour de plus amples renseignements sur le service durant la periode couverte par la garantie sur le fonctionnemen...

Page 31: ...ed by or resulting from hnproper or unauthorized service maintenance or repair D Damage resulting from abuse misuse mishandling neglect or damage caused by exposure to hostile operating environments such as areas containing dust and or smoke E Damage caused by power surges accidents natural disasters or any other events or circumstances outside Hitachi s control F Any Product used in any manner in...

Page 32: ...Memo ...

Page 33: ...Memo ...

Page 34: ...nes puede causar interferencias perjudiciales alas radiocomunicaciones Sin embargo no garantizamos que no ocurrirAn interferencias en una instalaci6n en particular Si este equipo causa interferencias perjudiciales a la recepcion radial o televisiva situacion que puede ser determinada apagando y encendiendo el equipo se sugiere al usuario que trate de corregir tal interferencia mediante una o mAs d...

Page 35: ...n tales lineas o circuitos AI instalar un sistema de antena exterior tenga mucho cuidado de no tocar tales lineas o circuitos de alimentaci6n ya que el contacto con ellos podria ser fatal 17 No sobrecargue los toma corrientes murales ni los cables de extension ya que esto podria causar incendios o descargas el6ctricas 18 Nunca introduzca objetos de ningQn tipo por las aberturas de la unidad ya que...

Page 36: ...n una pantalla normal 4 3 barras grises en la parte superior e inferior de pantalla o los medios de estilo normal 4 3 visualizados en una pantalla panora mica 16 9 barras grises a izquierdo y derecho Los sfntomas siguientes no indican real funcionamiento sino una lirnitaci6n t_cnica Por tanto no aceptarernos ninguna responsabilidad pot estos sfntomas Las pantalla de LCD est_ n fabricadas con una t...

Page 37: ...ueguen con los muebles y televisores No co oque las pantallas de panel delgado en muebles que pueden ser usados como escalones tales como un cofre de cajones Recuerde que los nidos pueden emocionarse f cilmente mientras ven un programa de televisi6n especialmente en una pantalla de panel delgada extra grande Se debe tener cuidado al colocar o instalar la pantatla donde no pueda ser empujada jalada...

Page 38: ...n es inferior a 8mm para LE40S508 y 17mm para LE49S508 el peso no puede ser mantenido Si la Iongitud de insercion es ma s de 16mm para LE40S508 y 26mm para LE49S508 se crea un espacio entre el soporte de montaje y la televisi6n Longitud de insercion Iongitud del tornillo Grosor de las rondanas Grosor del soporte de montaje Asegurar a una pared 1 Utilizando alambre metaJico sujete la unidad al torn...

Page 39: ...nillo suministrados M8x16mm cada lado como se muestra en la Figura 1 IR L Soporte Figura 1 AsegOrese de seguir las instrucciones La instalaci6n incorrecta del soporte no sujetar_ la unidad correctamente Io que podria dar come resultado da_os o lesiones C6rno quitar el soporte Cuando transporte este producto retire la base y empaque contra la parte trasera de la unidad en la caja Para quitar la bas...

Page 40: ...ones de la antena 12 Conexiones de TV por cable 12 ioperaci6ndelTv Configuraci6n inicial 13 Operaci6n del TV 13 Guia r_ pida para el manejo de menO 14 Otras funciones pr_ cticas 15 Canal configuraci6n 18 Ajuste del Parental Control 19 Subtitulos 21 Opciones de Subtitulos 21 Cambio de aspecto 22 Reproducci6n de medios 22 Conexiones a otros equipos 23 Disturbios de recepci6n 27 Soluci6n de problemas...

Page 41: ...staTV desplegara subtitulado de television _ o Q de acuerdo con el reglas de la FCC HDMI el Iogotipo HDMt y High Definition Multimedia Interface son marcas de f brica o marcas registradas de HDMI Licensing LLC en los Estados Unidos yen otros paises Fabricado con la autorizaci6n de Dolby Laboratories Dolby y el simbolo de doble D son marcas comerciales de Dolby Laboratories VGA y XGA son marcas com...

Page 42: ... VOL VOLUME Boton MENU Boton INPUT Boton POWER Botones CH CHANNEL A V A T botones VOL VOLUME i_ 4 y boton INPUT SELECT pueden emplearse para seleccionar la configuracion deseada en el menO Parte trasera Lado izquierdo USBINPUT HDMIt MHLIN HDMI2 ARC IN HDMI3 IN Lado Inferior AUDIO R L IN VIDEO IN AUDIO OUT COMPONENT IN AIR CABLE IN PC IN PC DVI AUDIO IN DIGITAL AUDIO Y Pb Pr OUT COAXIAL ...

Page 43: ...a lista de canales favoritos Bot6n ASPECT Presione para cambiar el tama_o de la imagen Bot6n C C Se utiliza para seleccionar la opcion Subtitulado oculto en CC Off CC on Mute o CC On Bot6n AUDIO Pulse para cambiar el idioma de audio Bot6n USB Presione para acceder directamente a la entrada de USB Bot6n HDMI Presione para acceder directamente alas entradas HDMI Bot6n COMP Presione para acceder dire...

Page 44: ... el uso de un convertidor caja decodificadora conecte el cable coaxial entrante de 75 ohmios al convertidor caja decodificadora Utilizando otro cable coaxial de 75 ohmios conecte el toma de salida del convertidor caja decodificadora al toma de la antena del aparato Vea las conexiones mostradas abajo Sintonice el aparato al canal de salida del convertidor caja decodificadora generalmente canal 3 6 ...

Page 45: ...ambios Operaci6n del TV 1 2 3 4 Para encender el aparato presione POWER 10 segundos para que aparezca una imagen en la pantalla Ajuste el nivel de volumen presionando VOL VOLUME o El nivel de volumen sera indicado en la pantalla por medio de barras A medida que el volumen aumenta se incrementan el nOmerode barras Si se reduce el volumen el nOmero de barras tambien disminuye Ajuste el Source a la p...

Page 46: ...ento MUTE Presione MUTE boton para silenciar el sonido El sonido del aparato sera silenciado yen la pantalla aparecer la indicacion _ El sonido puede ser devuelto a su nivel original presionando otra vez este botch o uno de los botch VOL VOLUME Gufa rapida para el manejo de menu Ejemplo Seleccionar Menu Language 1 Presione INPUT para seleccionar modoTV 2 Presione MENU Aparece la pantaNa del men 3 ...

Page 47: ... reducir el consumo energetico Este mode de imagen ester calificado para ENERGY STAR Sus preferencias personales Puede ajustar la calidad de imagen para adaptarla a sus preferencias Cool Azulada Standard Neutral Warm Rojiza Custom Red Green Blue Ver pb gina 22 Ajuste el nivel de reducci6n de ruido incluido en la sepal de video Use esta funcion para cambiar el nivel de negro automaticamente seg_n e...

Page 48: ... m_ s bajo en escenas con un volumen alto y a un nivel m_ s alto en escenas con un volumen m_ s bajo La presencia y sonido din_ micos creados ofrece una experiencia de escucha excelente Seleccione el formato de su salida de audio digital si ha conectado un amplificador o receptor a la toma de audio digital desu televisor Sincroniza el audio con la sepal de video de las fuentes digitales y analogic...

Page 49: ...cienda laTV La entrada HDMI a la que esta conectada el dispositivo se convertira en la fuente de entrada activa de laTV ARC Para habilitar el audio a traves de un receptor AV con HDMI ARC Device Lists Muestra los dispositivos que esta n conectados a la TV Connect Para realizar una conexion a un dispositivo que se muestra en la lista de dispositivos Root Menu Para acceder al menu del dispositivo SW...

Page 50: ... varios minutos sea paciente Si presiona EXIT durante la bQsqueda la bQsqueda de canales se detendrA NOTA Si no estA seguro de los canales digitales disponibles en su Area puede visitar www antennaweb org para recibir una lista basada en su direccion o codigo zip Si necesita mayor asistencia puede Ilamar a nuestra linea de servicio al cliente sin costo a1800 HITACHI 800 448 2244 USA CANADA Nuevos ...

Page 51: ...menQ Locks presione A o T para seleccionar Parental Control y a continuaci6n presione SELECT para ajustarlo en On Presione A o T para seleccionar US luego presione SELECT Presione A o T para seleccionar TV Rating luego presione SELECT Presione A _ 4 _ para seleccionar cual clasificaci6n se usar luego presione SELECT Aparecer_ cada clasificaci6n debajo TV Clasificaci6n TV Puede establecer la clasif...

Page 52: ...SELECT 2 Introduzca la contrase_a actual utilizando los Botones num_ricos 0 9 3 Ingrese la contrase_a nueva con los Botones num_ricos 0 9 4 Ingrese nuevamente la misma contrase_a para confirmar La contrase_a queda registrada Descargar el sistema de evaluaci6n adicional Parental Control Region 5 Como suplemento para el sistema de evaluaci6n Parental Control su televisor podra descargar un sistema d...

Page 53: ... especialmente con los programas en vivo Esto se debe a que durante los programas en vivo los textos son ingresados sin edicion ya que no hay tiempo para la misma Estas transmisiones no dan tiempo para ediciones Cuando las leyendas esten en pantalla puede ser que las indicaciones de funciones como volumen no aparezcan ya que interferirian con las leyendas AIgunos sistemas de TV cable y sistemas de...

Page 54: ...muestra al 100 Este modo de aspecto esta disponible s61oen las entradas HDMI Reproducci6n de medios Puede disfrutar viendo archivos de im_genes y pelfculas desde su dispositivo de almacenamiento USB 1 Conecte el dispositivo de almacenamiento USB en el terminal de entrada USB 2 Pulse INPUT luego pulse A o T para seleccionar USB y luego pulse SELECT NOTA No desconecte el dispositivo de almacenamient...

Page 55: ...r la PC con el cable HDMI Si utiliza el cable HDMI no tiene que conectar el cable de audio Si utiliza el cable DVI a HDMI por favor conecte el cable de audio de la misma manera que con el cable VGA Presione INPUT en el control remoto para seleccionar el modo PC Encienda el equipo LaTV se puede utilizar como monitor para PC A la izquierda de la TV Aentradade _ Aentrada PC MONITOR t t de AUDIO Cable...

Page 56: ... el costado de su TV 2 Presione el bot6n iNPUT en el control remote y seleccione ta fuente de entrada HDMI 1 HDMI Micro USB 3 Se abre el men0 de su dispositivo Usted puede utilizar CURSOR izquierda derecha abajo o arriba botones para desplazarse en su dispositivo y presione el bot6n SELECT en el control remote para acceder al men NOTA El menO de su dispositivo varia con cada dispositivo y las apli...

Page 57: ...o no suministrado Videoc_mara VCR 1 O A salida de _ _ Video Audio CONSOLA DE VIDEOJUEGOS Para conectar la TV a un reproductor de DVD con un cable de vl deo componente Si su reproductor de DVD tiene tomas de salida de video componente conecte el unidad al reproductor de DVD mediante el cable de video componente no suministrado Parte inferior de la TV A entrada de A entrada COMPONENT de AU DIO Y Vl ...

Page 58: ...on surround digital integrado puede disfrutar de los distintos sistemas de audio Escuchando programas de radio o de cable que ofrecen sonido digital dolby A continuacion se muestra como conectar un amplificador AV con decodificador Dolby Digital integrado etc Parte inferior de la TV A salida de COAXtAL _ Cable digital coaxial no suministrado 1 A la entrada de audio digital coaxial Am p if ila_ _A_...

Page 59: ...ndas o rayas diagonales yen algunos casos causa p dida de contraste en la imagen PREVENCION DE OBSTACULOS PARA RECEPTORES DE RADIO Esta televisi6n ha sido diseSada conforme a las normas de la FCC para aparatos de Clase B Esto para prevenir problemas a los receptores de Radio Siesta televisi6n causa problemas a un receptor de Radio siga los siguientes pasos Mantenga la television lejos del Radio Aj...

Page 60: ...cable reoriente la antena Determine si hay posibles fuentes de interferencia La estaci6n o el servicio de TV por Cable estb n con problemas sintonice otra estaci6n Verifique que haya canales almacenados en la memoria El servicio TV pot Cable esta transmitiendo una sepal codificada SJNTOMA POSJBLE SOLUCION Problemas con la pantalla Compruebe la potencia de la seSal digitak en emlslones digitales No...

Page 61: ...n HDCP Compatible con E EDID HDMI1 4a ARC CEC Velocidades de rastreo 480i 480p 720p 1080i 1080p MHL MHL 1 2 Monitor del PC Mini Dsub 15pin Antena Cable coaxial de entrada de VHF UHF 75 ohmios Audio Digital COAXIAL 0 5 V p p 75 ohmios terminados Salida de Audio 3 5mm Stereo 470 mVrms 1k ohms AItavoce boca bajo 157 5 mm x 40 mm x 37 mm 8 ohmios x 2 8 0 Vatios 8 0 Vatios AC 120V 60Hz En funcionamient...

Page 62: ...la ayuda necesaria y en caso de que sea necesario coordinaran el proceso de reparaci6n con el Centro de Servicio T6cnico Autorizado mas cercano a usted Tenga a mano los comprobantes de compra y o recibos de entrega para enviarlos a su representante de atenci6n al cliente 800 HITACHI La cobertura de la garantia se proporcionara de acuerdo con los t6rminos establecidos en la garantia limitada consul...

Page 63: ...Memo ...

Reviews: