background image

Projector installation

English-40

Setting an access password (security lock)

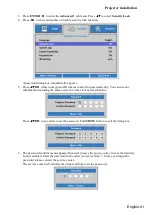
You can use the four (arrow) buttons to set a password and prevent unauthorized use of the projector. 
When enabled, the password must be entered after you power on the projector.

Note: Keep the password in a safe place. Without the password, you will not be able to use the 

projector. If you lose the password, contact your dealer for information on clearing the 

password.

1.  Press 

MENU

 to open the OSD menu.

2. 

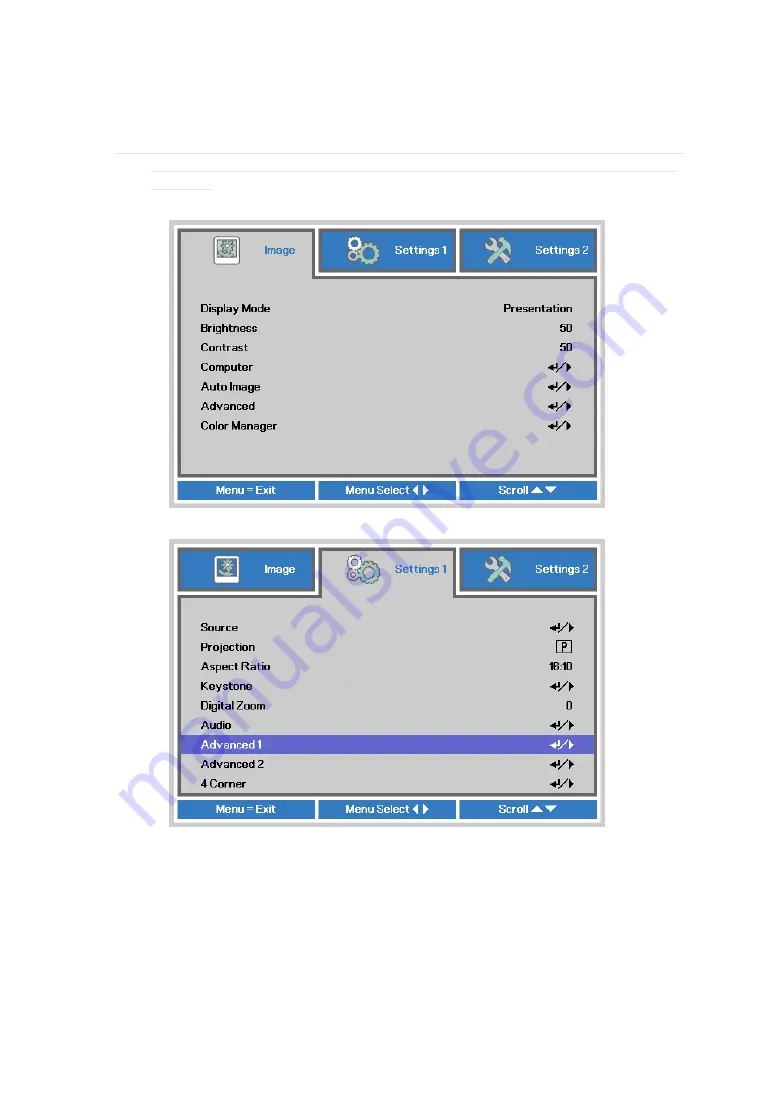
Press ◄► to move to the 

Settings 1

 menu and press ▲▼ to select 

Advanced 1

.

Summary of Contents for LP-WU6500

Page 1: ...Manual Projector LP WU6500 Thank you for purchasing this product Please read this manual before using the product Store it for future reference English Deutsch Português 繁體中文 Français Español 簡体中文 한국어 Русский ...

Page 2: ...ion 37 Powering the projector on or off 38 Powering on the projector 38 Connect the power cord to the projector 38 Turning off the projector 38 Selecting an input source 39 Setting an access password security lock 40 Choosing a location 42 Adjusting the projector s angle 43 Adjusting the projector s zoom and focus 43 Zoom 43 Focus 44 Correcting keystone 45 OSD menu tree 46 OSD description 50 Image...

Page 3: ...Command control via the network 83 Connection 83 Communication port 83 Command control settings 84 Communication command table 84 PJLink command 96 Projection distance vs projection size table 97 Copyright information 98 Copyright 98 Trademark 98 Warranty and after service 98 ...

Page 4: ...e measures This product may cause interference if used in residential areas Such use must be avoided unless the user takes special measures to reduce electromagnetic emissions to prevent interference to the reception of radio and television broadcasts Description pertaining to FCC Rules Part 15 This device complies with Part 15 of the FCC Rules Operation is subject to the following two conditions ...

Page 5: ...h this equipment display the chemical symbol Hg Cd or Pb then it means that the battery has a heavy metal content of more than 0 0005 Mercury or more than 0 002 Cadmium or more than 0 004 Lead Note for the battery symbol bottom symbol This symbol might be used in combination with a chemical symbol In this case it complies with the requirement set by the Directive for the chemical involved Sun ligh...

Page 6: ...g or operating the projector in the above mentioned environment could lead to discoloration mold formation grease or damages to the projector Do not place the projector where any oils such as cooking or machine oil are used Oil may harm the product resulting in malfunction or falling from the mounted position Do not use adhesive such as threadlocker lubricant and so on Ventilation The projector ca...

Page 7: ...qualified service personnel for assistance Damaged power cord or power plug If a foreign object has fallen into the projector or if you have spilled water or other liquid into the projector If the projector has been dropped accidentally or damaged If you experience noticeably poor performance or malfunctioning with the projector despite having followed instructions for normal operation Changing pa...

Page 8: ...he symbols displayed on the projector Les descriptions de ces symboles sont affichées sur le projecteur Beschreibungen der am Projektor angezeigten Symbole Descripciones de los símbolos mostrados en el proyector Descrições dos símbolos apresentados no projector Alternating Current Courant Alternatif Wechselstrom Corriente alterna Corrente alternada Standby Power Veille Alimentation Bereitschaft St...

Page 9: ...arnhinweis zum Laser Advertencia Relacionada con el Láser Aviso Relativo ao Laser 中文 한국어 РУССКИЙ 日本語 投影机上显示的标志符 号说明 프로젝터에 표시되 어 있는 기호에 대 한 설명 Описания символов отображаемых на проекторе 機器上に表示しているシ ンボル説明 交流电 교류 전류 Переменный ток 交流電流 待机 电源 스탠바이 전원 Ожидание питание スタンバイ 電源 开启 电源 온 전원 Включено питание オン 電源 关闭 电源 끄기 전원 выключено питание オフ 電源 警告 注意事项 경고 주의 ПРЕДУПРЕЖДЕНИЕ ВНИМАНИЕ 注意 警告 小心高温 고온 주의 В...

Page 10: ...gh altitudes When operating the projector at higher altitudes be sure to manually set the fan mode to High or it could shorten the life of the optical system in the projector High altitude is defined as places being 1520 meters 5000 feet or higher Please refer to Page 62 and Page 76 Protect the projector with care When placing the projector at a high position be sure to secure the projector firmly...

Page 11: ...he projector by the cooling fan is automatic And as such the sound of cooling fan changing its operating speed does not imply that a problem has occurred with the projector Positioning precautions This projector can be installed 360 range But life of optical parts will be shorten as portrait situation ...

Page 12: ...ied If the image is inversed and the left and right eye images are swapped the 3D effect does not work which could cause eye strain or cause you to feel unwell 3D content not suitable for below situation it could aggravate their pre existing conditions People with a history of photosensitive epilepsy People has heart disease Pregnant women People with serious illnesses People with a history of epi...

Page 13: ...toward other people or reflective objects Direct or scattered light can be hazardous to eyes and skin There is a potential hazard of eye exposure to laser radiation if the included instructions are not followed Caution use of controls or adjustments or performance of procedures other than those specified herein may result in hazardous radiation exposure Laser parameters Wavelength Mode of operatio...

Page 14: ...Warning Notices and Safety Instructions English 14 Product labels Below drawing show the label s location a Serial No b MAC Label ...

Page 15: ...Warning Notices and Safety Instructions English 15 Warning Notices and Safety Instructions a Hazard Warning Symbol b Aperture Label c Certification Statement Label d Explanatory Label ...

Page 16: ...of laser aperture Following drawing shows the laser aperture location Be careful not to see the light directly Interlock switches This machine has interlock switches to protect the laser light leakage Switch will power off the system when the Top cover is opened ...

Page 17: ...ble foot Adjust the height and angle of the projector with the adjustable foot 6 LED Indicator 7 Projector keypad 8 Ventilation inlet The internal cooling fan draws cool air from the ventilation inlet into the projector 9 Speaker 10 Focus Adjust the projected image s focus 11 Lens 1 POWER The indicator shows the power status The indicator lights when the projector is in standby state The indicator...

Page 18: ...just configuration on the menu Keystone can be adjusted when no other menu is displayed 4 Press to turn on or off the projector 5 Use this button to make your selection or configure adjust configuration on the menu Keystone can be adjusted when no other menu is displayed 6 ENTER Press to select items in the menu or confirm the settings you have changed 7 SOURCE Select input signal source 8 Use thi...

Page 19: ...15 pin mini shrink jack Connect to a PC Support RGB and component video signal input 8 VIDEO RCA jack Connect to the composite video device 9 3D SYNC VESA 3 pin Connect to 3D IR glasses receiver unit 10 SERVICE For service personnel only 11 USB POWER USB A type jack Connect a USB device Support 5V 1 5A output while the projector Power On 12 AC Connect a POWER cable 13 RS 232C 9 pin D sub socket Cr...

Page 20: ...Projector parts and functions English 20 Bottom view 135 0 135 0 130 0 160 0 ...

Page 21: ...other menu is displayed 8 MENU Displays or hides the menu 9 ENTER Press to select items in the menu or confirm the settings you have changed 10 Use this button to make your selection or configure adjust configuration on the menu Keystone can be adjusted when no other menu is displayed 11 Use this button to make your selection or configure adjust configuration on the menu Keystone can be adjusted w...

Page 22: ...n be adjusted when no other menu is displayed 30 MHL Change MHL Projector mode 31 Play the following item on the programming list for MHL 32 Forward in set increments for MHL 33 Volume 1 Displays the Volume setting bar Number for Remote ID setting used 34 Mute 3 Mutes the built in speaker Number for Remote ID setting used 35 3D 5 Open the 3D Setting menu Number for Remote ID setting used 36 Status...

Page 23: ...er is exposed to fluorescent lamp or strong sunlight the remote control may not operate normally Installing batteries in the remote control 1 Remove the cover by sliding it in the direction indicated by the arrow 2 Insert two new AAA batteries check the polarity 3 Replace the cover 2 3 Note Always handle the batteries with care and use them only as directed Improper use may result in battery explo...

Page 24: ...atteries from the remote control and store them in a safe place Note The liquid contents in the batteries is harmful to the skin do not touch the leakage with your bare hands directly When installing fresh batteries be sure to clean up the leakage thoroughly Note If the range of effective remote control signal reception decreases or if the remote control stops working replace the batteries Note Re...

Page 25: ...also depends on altitude Please refer to Page 62 and Page 76 The projector should be kept away from devices that emit electromagnetic energy such as motors or transformers Common devices that emit electromagnetic energy include slideshow system speakers power amplifiers and elevators If you choose to install the projector from the ceiling be sure to use the ceiling installation components verified...

Page 26: ... Page 43 Rear Ceiling Advantage the projector is completely hidden from plain view this setup usually offers better reduction of ambient noise Disadvantage requires an additional room for installation Stricter installation requirements and conditions care should be taken during the installation to ensure the projector has been securely mounted Operation of the projector becomes inconvenient withou...

Page 27: ...just the lens shift zoom focus after 30 minutes since the projector was turned on 2 Slight changes of the image position and or focus may occur within 30 minutes after the projector was turned on If the room temperature and humidity have changed after adjusting the lens shift zoom focus readjust them as necessary 3 Set the image size including the margin from the screen edge in anticipation of the...

Page 28: ...juster is turned to the opposite direction with a clicking sound and the lens shift does not work after the adjuster has been turned exceeding the lens shift range You need to turn the lens adjuster for a while until the lens shift starts 3 Do not turn the lens adjuster while pressing it downward out of the lens shift range The lens shift may be locked because a clutch mechanism does not work In s...

Page 29: ...the center of the screen Moving the lens horizontally The distance of horizontal lens movement is 2 5 of the screen width in both directions For instance if you are using a 2 15m 1 35m 100 screen you will be able to move the picture left or right by no more than 5 4cm This illustration shows normal horizontal lens shift without the use of special specification lens or projector Note Please make su...

Page 30: ...h 30 Connecting the projector HDMI MHL DVI connection Signals from picture source offer the best projection picture quality when sent through HDMI DVI Therefore try to use input devices with HDMI DVI output as the source of picture ...

Page 31: ...GB connection Connect your PC or other devices with RGB output to the RGB input connectors COMPUTER in OSD we say VGA on the projector to be used as the source of picture input Connect a monitor to MONITOR OUT for through COMPUTER signal ...

Page 32: ...internet RS 232 Function When the projector connects to HDBaseT by RS 232 communication the projector can be controlled with RS 232 commands from the computer For details of RS 232 commands refer to RS 232 Communication command table Please turn On the HDBase T IR RS232 RJ45 in the OSD menu when using LAN function RS232 function Note RJ45 port and RS 232C port are disabled when HDBaseT IR RS 232 R...

Page 33: ...b Key in the correct IP Address or the computer host name which is the same as the projector s host name then you can remote control the projector by internet USB POWER 5V 1 5A connection Connect a USB cable for USB device Support 5V 1 5A output as long as the projector is powered on ...

Page 34: ...Projector installation English 34 3D SYNC connection Connect 3D IR glasses receiver unit Connect 3D IR glasses receiver unit VIDEO connection Connect the composite cable from a video device ...

Page 35: ...r installation English 35 SERVICE connection For service personnel only RS232C connection Connects to the computer by RS 232 communication the projector can be controlled with RS 232 commands from the computer ...

Page 36: ...Projector installation English 36 Audio IN L R connection Connect an audio source input Available for video source Audio OUT Mini jack connection Connect to an audio amplifier device ...

Page 37: ...Projector installation English 37 Audio IN Mini jack connection Connect an audio source input Available for computer BNC DVI source ...

Page 38: ... select your preferred language from the quick menu after the startup screen display If security lock is enabled refer to Page 40 Setting an access password security lock Connect the power cord to the projector Turning off the projector Press on the projector or on the remote control The message Power Off Press Power again will appear on the screen Press the button again while the message appears ...

Page 39: ...inition Multimedia Interface compatible HDMI 3 MHL High Definition Multimedia Interface and Mobile High Definition Link compatible VGA Analog RGB DVD input YCbCr YPbPr or HDTV input YPbPr via D sub connector Composite Video Traditional composite video HDBaseT Digital Video trough the HDBaseT transmitter Note It is recommended to use a certified TX box for the HDBaseT function Using a single HDBase...

Page 40: ...ctor When enabled the password must be entered after you power on the projector Note Keep the password in a safe place Without the password you will not be able to use the projector If you lose the password contact your dealer for information on clearing the password 1 Press MENU to open the OSD menu 2 Press to move to the Settings 1 menu and press to select Advanced 1 ...

Page 41: ...ord entry You can use any combination including the same arrow five times but not less than five Press in any order to set the password Push MENU button to exit the dialog box 6 The password confirm menu appears when user presses the power on key in case the Security Lock is enabled Enter the password in the order you set it at step 5 In case you forget the password please contact the service cent...

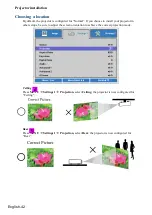
Page 42: ...ose to install your projector in other setups be sure to adjust the screen orientation to achieve the correct projection mode Ceiling Press MENU Settings 1 Projection select Ceiling the projector is now configured for Ceiling Rear Press MENU Settings 1 Projection select Rear the projector is now configured for Rear ...

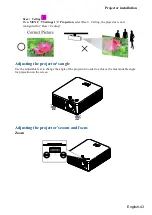
Page 43: ... select Rear Ceiling the projector is now configured for Rear Ceiling Adjusting the projector s angle Use the adjustable feet to change the angle of the projector in order to achieve the most suitable angle for projection on the screen Adjusting the projector s zoom and focus Zoom ...

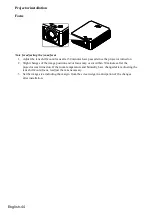
Page 44: ...r turned on 2 Slight changes of the image position and or focus may occur within 30 minutes after the projector was turned on If the room temperature and humidity have changed after adjusting the lens shift zoom focus readjust them as necessary 3 Set the image size including the margin from the screen edge in anticipation of the changes after installation ...

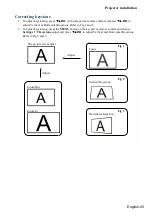
Page 45: ... Horizontal Keystone Refer to Fig 2 and 3 2 To adjust keystoning press the MENU button on the keypad or remote control and choose Settings 1 Keystone adjust and press to adjust Vertical and Horizontal Keystone Refer to Fig 2 and 3 The picture after adjust Adjust Adjust Zoom Out Fig 1 Focus Fig 2 Vertical Keystone Fig 3 Horizontal Keystone Zoom In ...

Page 46: ...Barcelona SPAIN Tel 0 93 266 4747 34 93 266 4747 Email tech assist hitachi eu com Hitachi Europe AB Frösundaviks Alle 15 169 29 Solna SWEDEN Sweden Tel 46 36 16 16 90 Finland Tel 358 9 8494 133 Norway Tel 47 2290 1930 Denmark Tel 45 7562 4577 Email tech assist hitachi eu com http www hitachidigitalmedia com Hitachi Australia Pty Ltd Suite 801 Level 8 123 Epping Road North Ryde N S W 2113 AUSTRALIA...

Reviews: