

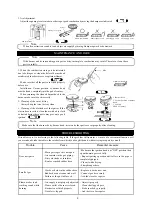

1. Installation of rubber legs.
Attach the rubber legs to the table by screwing them into the
openings on the table bottom.
2. Installation of ON/OFF knobs, burner heads and trivet &
trays.
Place the ON/OFF knob on the gas cook axis and push it
firmly inwards. Set the burner head on the burner body, then
place the trivet & trays on the top plate.
Ignition (ON/OFF)
knob
Trivet &tray
1. Install the gas table securing a minimum clearance of
15 cm from the side/back wall and 100cm from the
ceiling.
2. Connect the rubber hose to the gas cylinder
3. Make sure there is no dust on the gas inlet pipe and fit
the rubber hose over the gas inlet pipe, making sure the
end of the hose reaches the line as shown. Fasten the
hose securely with a hose clamp.
Gas inlet pipe
Rubber hose
Hose clamp
l
Do not route the rubber hose under
the gas table.
Do not place any objects that may
easily be blown away by the wind on
the gas table.
l
l
Never use one single rubber hose
for two gas tables.
Keep away flammable material/
liquid from the gas table.
l
Make sure that all knobs of the gas table are at the “OFF” position, and open fully the gas stopcock of gas cylinder.
1. Ignition and Flame Adjustment
Push the knob fully and turn counterclockwise to “ON”.
Flame is adjustable between “ON” and “OFF” position
by turning the knob slowly.
Push fully
Small
Max
Igniting the burner for the first time may be difficult because of air trapped in the gas hose. Repeat the ignition
procedure several times until the air is purged and the burner is ignited.
2. Extinction
Turn the ignition knob to the “OFF” position. In this position, no gas is supplied and the flame goes out.
Burner head
Rubber leg
Note
Note
Note
Turn counter-clockwise
3
15 cm.
15 cm.
100 cm.


