background image


4-58


Chapter 4 

For  parameter  configuration 

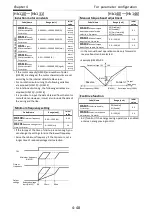
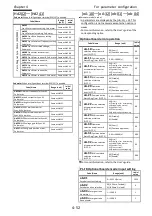
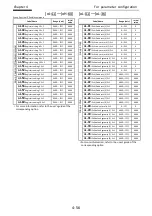
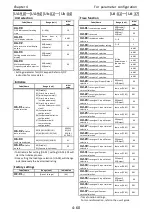
  [PA-01]

[PA-09]


Parameter mode (P code) 

  Em-force mode settings


Code/Name 

Range (unit) 

Initial 

value 

Em

-f

or

ce

 m

od

e


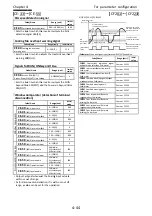
PA-01

 Mode selection 

for emergency force drive 

00(Disable)/ 
01(Enable) 

00 

PA-02 

Frequency 

reference setting oat 
emergency force drive 

00(Speed control)/ 
01(PID control) 

00 

PA-03 

Direction 

command at 
Emergency-force drive 

0.00

590.00(Hz) 

0.00 

By

pa

ss

 m

od

PA-04 

Commercial 

power supply bypass 
function selection 

00(Disable)/ 
01(Enable) 

00 

PA-05 

Delay time of 

bypass function 

0.0

1000.0(s) 

5.0 

Settings for EM-force in case of abnormality. 
For more information, refer to the user’s guide. 


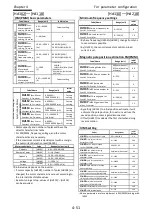
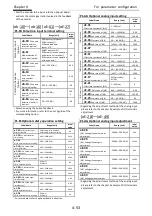
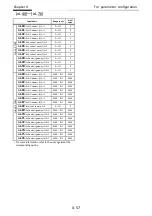
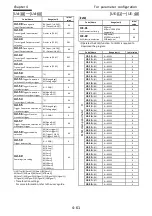
[PA-20]

[PA-29]


  Simulation mode settings


Code/Name 

Range (unit) 

Initial 

value 

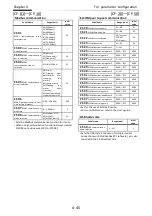
PA-20 

Simulation 

mode enable 

00(Disable)/01(Enable) 

00 

PA-21 

Error  code  selection 
for Alarm test 

001

255 

000 

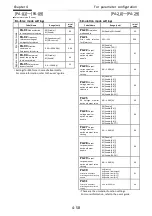
PA-22 

Output 

current monitor 
optional output 
enable 

00(Disable)/ 
01(Enable: [Ai1])/ 
02(Enable:[Ai2])/ 
03(Enable:[Ai3])/ 
04(Enable:[Ai4])/ 
05(Enable:[Ai5])/ 
06(Enable:[Ai6])/ 
09(Enable:[PA-23]) 

01 

PA-23 

Output 

current monitor 
optional output value 
setting 

0.0

300.0(%) 

0.0 

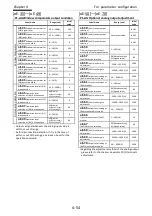
PA-24 

DC-bus 

voltage monitor 
optional output value 
selection 

00(Disable)/ 
01(Enable:[Ai1])/ 
02(Enable:[Ai2])/ 
03(Enable:[Ai3])/ 
04(Enable:[Ai4])/ 
05(Enable:[Ai5])/ 
06(Enable:[Ai6])/ 
09(Enable:[PA-25]) 

00 

PA-25 

DC  voltage  monitor 
optional output value 

0.0

300.0(%) 

0.0 

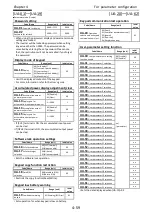
PA-26 

Output 

voltage monitor 
optional output 
enable 

00(Disable)/ 
01(Enable:[Ai1])/ 
02(Enable:[Ai2])/ 
03(Enable:[Ai3])/ 
04(Enable:[Ai4])/ 
05(Enable:[Ai5])/ 
06(Enable:[Ai6])/ 
09(Enable:[PA-27]) 

00 

PA-27 

Output 

voltage monitor 
optional output value 
setting 

0.0

300.0(%) 

0.0 

PA-28 

Output 

torque monitor 
optional output 
enable 

00(Disable)/ 
01(Enable:[Ai1])/ 
02(Enable:[Ai2])/ 
03(Enable:[Ai3])/ 
04(Enable:[Ai4])/ 
05(Enable:[Ai5])/ 
06(Enable:[Ai6])/ 
09(Enable:[PA-29]) 

00 

PA-29 

Output 

torque monitor 
optional output value 
setting 

0.0

300.0(%) 

0.0 

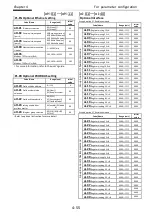
PA-30


Start with frequency 
matching optional setting 
enable 

00(Disable)/ 
01(Enable: from Keypad) 
02(Enable: from [Ai1])/ 
03(Enable: from [Ai2])/ 
04(Enable: from [Ai3]) 

01 

PA-31


Start with frequency 
matching optional value 
setting 

-500.0

500.0(%) 

0.0 

These are the simulation function settings.   
For more information, refer to the user’s guide. 


Summary of Contents for P1-00041HFEF

Page 1: ...tion NT Safety Instructions Installation and Wiring Settings Operation Setting and Examples of I O Adjustment Troubleshooting Maintenance and Inspection Specifications and keep it handy for future reference inquiry or problem Chapter 5 Troubleshooting the Technical Inquiry Service List of contact information When making a contact inform the reference number on below NT2511B NT2511 Safety Instructi...

Page 2: ...er with optional products also you should read the instruction enclosed in those products Cautions Proper use of the inverter Please read the Basic Guide User s Guide and optional products instruction before handling Read carefully the Basic Guide User s Guide or optional product instruction before handling or performing maintenance of the product Before attempting installation operation maintenan...

Page 3: ...od In order to receive warranty service you should present the recipe issued by product supplier or any other document that permit to check the purchase date However any defects damage malfunction or any other failure caused by one of the following facts will not be covered by warranty service 1 Cannot confirm the purchase date 2 The damage or fault resulted from improper usage or inadequate handl...

Page 4: ... aircraft spacecraft nuclear electric power passenger transportation medical submarine repeater etc 2 For application such as elevator amusement equipment medical equipment which might have a big effect on human life and property Even for above application in case there is an agreement for the limitation of the purpose and quality please contact to our sales office Further study will be carried ou...

Page 5: ...3 Operation Setting and Examples of IO Adjustment Chapter 5 Troubleshooting Chapter 7 Specifications Inspection and Maintenance and Test Running wire gauges accessories etc Operation Setting and Examples of IO Adjustment 4 Cautions for Maintenance Inspection Method of Checking the Inverter and Converter index Appendix Chapter 2 Installation and Wiring Chapter 3 Operation Setting and Examples of IO...

Page 6: ...0 5 Contents Contents Memo ...

Page 7: ...hysical loss or damage CAUTION Indicates that incorrect handling may cause hazardous which may result in moderate or slight injury or damage and may result only physical level description may lead to a serious risk depend on the circumstances Be sure to follow the instruction because whichever contains 1 1 DANGER Indicates that incorrect handling may cause hazardous and may result in major physica...

Page 8: ...n their original positions before starting operation follow all instructions when operating the inverter You run the risk of injury due to the inverter falling Do not hold its cover parts w inverter Install the inverter on a structure able to bear the weight specified in this Basic Install the inverter on a vertical wall that is free of vibrations You run the risk of failure of the inverter The in...

Page 9: ...ter If an operation command has been input to the inverter before the inverter enters alarm status the inverter will restart suddenly when the alarm status is reset make sure that no operation command input WARNING Fire Prohibited Injury Damage Prohibited Injury Prohibited Practice Practice DANGER Safety Instructions You run the risk of fire Do not use a single Do not connect a resistor directly t...

Page 10: ...tice You run the risk of burn injury Inverter heat sink will heat up during operation Do not touch the heat sink You run the risk of injury Install an external brake system Commit only a designated person to maintenance of parts metal accessories e g bracelets maintenance and inspection work and to use insulated tools A qualified waste disposer includes industr ind the the cleansing You run the ri...

Page 11: ...cations to European Directive Caution for EMC Electromagnetic The SJ series P1 inverter conforms to requirements of Electromagnetic Compatibility EMC Directive 2014 30 EU inverter in Europe you must comply with the following specifications and requirements to meet the EMC Directive and other standards in Europe WARNING This equipment must be installed adjusted and maintained by qualified engineers...

Page 12: ... P1 00175 H P1 055H C3 5 2 P1 00460 L P1 075L C3 5 2 P1 00250 H P1 075H C3 5 2 P1 00600 L P1 110L C3 5 2 P1 00310 H P1 110H C3 5 2 P1 00800 L P1 150L C3 10 1 P1 00400 H P1 150H C3 10 2 P1 00930 L P1 185L C3 10 1 P1 00470 H P1 185H C3 10 2 P1 01240 L P1 220L C3 10 1 P1 00620 H P1 220H C3 10 2 P1 01530 L P1 300L C3 5 2 P1 00770 H P1 300H C3 5 2 P1 01850 L P1 370L C3 5 2 P1 00930 H P1 370H C3 5 2 P1 ...

Page 13: ...ge Environment rating 65degC for transportation Instruction for installation Pollution degree 2 environment and Overvoltage category III Electrical Connections See 7 5 Main circuit terminal wiring of user s guide Interconnection and wiring diagrams See 7 7 Control circuit terminal wiring of user s guide Short circuit rating and overcurrent protection device rating P1 L series models Suitable for u...

Page 14: ... ND ND P1 00460 L P1 075L VLD 3 6 P1 00250 H P1 075H VLD 3 8 LD 8 LD 10 ND ND P1 00600 L P1 110L VLD 4 4 P1 00310 H P1 110H VLD 4 8 LD LD ND 6 ND P1 00800 L P1 150L VLD 2 5 3 0 3 P1 00400 H P1 150H VLD 4 8 LD LD ND 4 ND P1 00930 L P1 185L VLD 2 5 3 0 1 P1 00470 H P1 185H VLD 4 6 LD 2 LD ND 3 ND 8 P1 01240 L P1 220L VLD 5 5 6 6 2 0 P1 00620 H P1 220H VLD 4 4 LD 1 0 LD ND 1 ND 6 P1 01530 L P1 300L V...

Page 15: ...5L Class J or T 600 50 P1 00156 L P1 022L Class J or T 600 50 P1 00228 L P1 037L Class J or T 600 50 P1 00330 L P1 055L Class J or T 600 100 P1 00460 L P1 075L Class J or T 600 150 P1 00600 L P1 110L Class J or T 600 150 P1 00800 L P1 150L Class J or T 600 150 P1 00930 L P1 185L Class J or T 600 200 P1 01240 L P1 220L Class J or T 600 200 P1 01530 L P1 300L Class J or T 600 300 P1 01850 L P1 370L ...

Page 16: ...H Class J or T 600 30 P1 00126 H P1 037H Class J or T 600 30 P1 00175 H P1 055H Class J or T 600 75 P1 00250 H P1 075H Class J or T 600 75 P1 00310 H P1 110H Class J or T 600 75 P1 00400 H P1 150H Class J or T 600 100 P1 00470 H P1 185H Class J or T 600 100 P1 00620 H P1 220H Class J or T 600 100 P1 00770 H P1 300H Class J or T 600 200 P1 00930 H P1 370H Class J or T 600 200 P1 01160 H P1 450H Cla...

Page 17: ...en both F and CB are equipped it is indicated as example 00228 LFF L F 4 5 Frequency voltage No of Frequency voltage No of phases Rate current MFG No factory serial No Basic This Installation and Wiring confirm the specification label Applicable motor capacity for ND rating is 3 7kW d current at VLD rated current In case of None blank field is omitted When both F and CB are equipped it is indicate...

Page 18: ...rd inverter specification Avoid a place where the inverter is subject to condensation Condensation inside the inverter will result in ause damage to the Also avoid places where the inverter is 2 2 When carrying the inverter handle it carefully to prevent Do not carry the inverter by holding the front or cause the Do not install and operate the inverter if it is Avoid installing the inverter in a p...

Page 19: ...sure with a ventilation fan carefully design the layout of the ventilation fan air intake port and inverters An inappropriate layout will reduce t raise the ambient properly so that the inverter ambient temperature will remain within the range specified in the specification table below ventilation fan the inverter Place in Unacceptable Ventilation Inverter Position of ventilation fan Screw Screw 2...

Page 20: ...erter some extra space is required in the direction of the depth of the epending on the wiring layout Keep For details refer to the instruction manual for each optional product L 022L 00228 L 037L 00083 H 022H H mm D mm 140 L 075L 00600 L 110L 00310 H 110H H mm D mm 170 2 4 If you add optional parts to the inverter some extra space is required in the direction of the depth of the Keep a to the D m...

Page 21: ...01470 H 550H Dimension W mm H mm D mm 550 390 250 Model P1 P1 200V class 02950 L 550L Dimension W mm H mm D mm 700 480 250 Model P1 P1 400V class 01760 H 750H 02130 H 900H Dimension W mm H mm D mm 700 390 270 in preparation Model P1 P1 400V class 02520 H 1100H 03160 H 1320H Dimension W mm H mm D mm 740 480 270 in preparation ...

Page 22: ... or more or 500 kVA or more or when the power voltage may change rapidly This reactor also improves the power factor This noise filter reduces the conductive noise that is generated by the inverter and transmitted in cables Connect this noise filter to the primary side input side of the inverter The inverter may generate radio noise through power supply wiring during operation Use this noise filte...

Page 23: ...connected when using a regenerative converter U V W T1 T2 T3 Inverter output Connect a Three phase motor PD P 1 DC choke connection terminal Remove the PD P jumper from terminals and connect the optional DC choke for power factor improvement P RB RB External chopper braking resistor connection terminal Connect the optional external braking resistor See Chapter 7 Specifications for built in braking...

Page 24: ...M4 2 4 2 4 1 4 LD VLD P1 00156 L P1 022L ND 14 2 1 14 2 1 14 2 1 M4 2 4 2 4 1 4 LD VLD 10 5 3 10 5 3 10 5 3 5 5 4 5 5 4 P1 00228 L P1 037L ND 10 5 3 10 5 3 10 5 3 M4 5 5 4 5 5 4 1 4 LD VLD P1 00330 L P1 055L ND 8 8 4 8 8 4 8 8 4 M5 8 5 8 5 3 0 LD VLD P1 00460 L P1 075L ND 8 8 4 6 13 3 8 8 4 M5 8 5 8 5 3 0 LD VLD 4 21 2 6 13 3 14 5 8 5 P1 00600 L P1 110L ND 6 13 3 6 13 3 6 13 3 M6 14 6 14 6 4 0 LD ...

Page 25: ... M4 2 4 2 4 1 4 LD VLD P1 00126 H P1 037H ND 14 2 1 14 2 1 14 2 1 M4 2 4 2 4 1 4 LD 12 3 3 12 3 3 12 3 3 5 5 4 5 5 4 VLD P1 00175 H P1 055H ND 12 3 3 12 3 3 12 3 3 M5 5 5 5 5 5 5 3 0 LD 10 5 3 10 5 3 10 5 3 VLD P1 00250 H P1 075H ND 10 5 3 10 5 3 10 5 3 M5 5 5 5 5 5 5 3 0 LD 8 8 4 8 8 4 8 8 4 8 5 8 5 VLD P1 00310 H P1 110H ND 8 8 4 8 8 4 8 8 4 M6 8 6 8 6 4 0 LD VLD P1 00400 H P1 150H ND 8 8 4 8 8 ...

Page 26: ...0L 11 EB 100E 75 HS50 H65C EB 100E 60 HS35 HS50 P1 00800 L P1 150L 15 RXK125 S 125 H65C H80C EB 100E 100 HS50 H65C P1 00930 L P1 185L 18 5 RXK125 S 125 H80C H100C EB 100E 100 HS50 H65C P1 01240 L P1 220L 22 EXK225 150 H80C H125C RXK125 S 125 H65C H80C P1 01530 L P1 300L 30 EXK225 200 H125C H150C EXK225 150 H80C H125C P1 01850 L P1 370L 37 RXK250 S 250 H150C H200C EXK225 200 H100C H125C P1 02290 L ...

Page 27: ...H80C H80C P1 00930 H P1 370H 37 RXK125 S 125 H80C H100C EXK100 C 100 H80C H100C P1 01160 H P1 450H 45 EXK225 150 H80C H125C RXK125 S 125 H100C H125C P1 01470 H P1 550H 55 EXK225 200 H100C H125C EXK225 150 H150C H125C P1 01760 H P1 750H 75 RXK250 S 250 H150C H200C EXK225 200 H200C H200C P1 02130 H P1 900H 90 EX400 300 H200C H250C EXK225 225 H200C H250C P1 02520 H P1 1100H 110 EX400 400 H200C H300C ...

Page 28: ... desired a built in chopper braking circuit in models below P1 01160 H 450H to P1 01470 H 550H Using optional braking unit or regenerative unit permit to use on high regenerative load application even for models without built in chopp er braking circuit The table below shows an example selection of braking resistor to output 100 of braking torque for each motor rating on list 400V Model P1 P1 Appl...

Page 29: ...ase make sure that power is off safety make sure to power U T1 V T2 W T3 P N G PD P Jumper Charge lamp Turn on while energized Motor output line ain circuit terminal disable the EMC filter L 110L H 075H 00310 H 110H U T1 V T2 W T3 RB RB G PD P Jumper Charge lamp Turn on while energized N Motor output line disable the EMC filter L 015L 083 H 022H Main circuit terminal 2 13 When J51 connector is rem...

Page 30: ... W T3 PD 1 P N RB RB PD P Jumper Power input line Motor output line G G Switch the jumper bar to enable or disable the EMC filter Model P1 P1 200V class 01850 L 370L R0 EMC filter short bar T0 Screw Size R0 T0 M4 Ground terminal M8 Other Terminal M8 Charge Lamp enables disabled R L1 S L2 T L3 U T1 V T2 W T3 PD 1 P N PD Pshort bar Power Line Input Line Motor Output Line G G Switch the jumper bar to...

Page 31: ...D P Jumper Input power line Motor output line G G Switch the jumper bar to enable or disable the EMC filter Disable Switching screw Enable Model P1 P1 200V class 02590 L 550L R L1 S L2 T L3 U T1 V T2 W T3 PD 1 P N PD P Jumper Input power line Motor output line G G R0 Jumper bar for EMC filter T0 Enable Disable Screw size R0 T0 M4 Ground terminal M8 Other terminals M8 Switch the jumper bar to enabl...

Page 32: ...lation and Wiring Model P1 P1 200V class 01760 H 750H In preparation Model P1 P1 400V class 02130 H 900H In preparation Model P1 P1 200V class 02520 H 1100H In preparation Model P1 P1 400V class 03160 H 1320H In preparation ...

Page 33: ...RC SINK SW6 Input terminal Sink Source logic switching It changes the sink or source logic for input terminal Is enabled when SW5 is in IN position SINK Switch to Sink logic SRC Switch to Source logic SW4 SW3 SW2 SW1 SW5 SW6 10V 20mA 10V 20mA 10V 20mA 10V 20mA IN EX SINK SRC Ao2 Ao1 Ai2 Ai1 P SEL SW4 SW3 SW2 SW1 SW5 SW6 Control circuit terminal Make sure to power off previous to change any switche...

Page 34: ...he wire insertion hole round while pressing the gray part with a slotted screwdriver 3 The wire is connected when release the screw driver Crimping tool CRIMPFOX UD 6 4 or CRIMPFOX ZA 3 Even for pulling out the wire from the socket press the gray part with a slotted screwdriver the insertion hole will be opened while pressing Power cable size mm2 AWG Ferrule terminal model L1 mm L2 mm φ d mm φ D m...

Page 35: ...Ab 11 is enabled OFF ON The frequency source of Ab 12 is enabled ON ON The frequency source of Ab 13 is enabled Setting CF3 and 4 allows you to set up to 16 speed USP 034 Unattended start protection In a USP ON state if an operation command has been input before the power supply is ON Trip Er013 is issued Terminal label Terminal name Description Electric characteristics Intelligent input terminal ...

Page 36: ...operation Closed Open ON Tripping Open Closed OFF Open Closed Terminal label Terminal name Description Electric characteristics Intelligent output terminals Digital output Open collector 15 14 13 12 11 Output terminal Terminal functions are selectable according to the parameter settings for each terminal This is available for both SINK and Source logics Open collector output Between each terminal ...

Page 37: ...input voltage DC 0 3V to 12V For current input Input impedance Approx 100Ω Max allowable input current 24mA Ai2 Analog input terminal 2 Voltage current selector SW2 Ai3 Analog input terminal 3 DC 10 to 10V voltage input is available Used as speed input and feedback input Voltage input only Input impedance Approx 10kΩ Allowable voltage input DC 12V to 12V Analog output Ao1 Analog output terminal 1 ...

Page 38: ...ut1 ST2 STO input2 ED Output terminal for monitoring ED Output COM terminal for monitoring Terminal label Terminal name Description Electric characteristics FM output terminal FM output Monitor output FM Digital monitor voltage Digital monitor output is selectable from PWM output with 6 4ms cycle or pulse output with a variable duty cycle of approx 50 Pulse train output DC0 to 10V Max allowable ou...

Page 39: ...minals which are connected internally The maximum baud rate is 115 2kbps Termination resistor 120Ω integrated Enabled RP SN shorted Disabled RP SN opened Terminal label Terminal name Description Electric characteristics 24V power supply Power input P24 24V output power source terminal This terminal supplies DC24V power for contact signals Max output 100mA CM1 Reference terminal for 24V output This...

Page 40: ...in places where the product is exposed to direct sunlight or the temperature is not within the specified range circuit failure due to the use in places where the temperature is not within the specified range or A cooling fan reaching a high temperature exceeding 150 C causes a fire on a Damage to parts due to entry of dust and Shortened lifetime of parts due to reduced cooling capability by placin...

Page 41: ...e due to continue ran in open phase on motor output line Verify the motor output line that not being in open phase 12 e Use Maintenance Setting DANGER Motor damage due high current on motor caused by inadequate parameter setting Set adequate value for related function parameter of motor electronic thermal level bC 01 to bC125 Set adequate value for base frequency motor rated current control mode m...

Page 42: ...2 26 Chapter 2 Installation and Wiring Memo ...

Page 43: ...l Duty ND The underlined value is set by default See Chapter 4 Settings for detailed operating instructions Basic settings 2 3 2 Set the motor data Set the parameters listed in the table below on the parameter setting screen according to the motor you use e g induction motor and permanent magnet motor Menu Option 60 00 AA121 Control mode_M1 oFW STOP M1 H03 0 VFC VC 1 VFC VP 2 VFC FREE 3 VFC A bst ...

Page 44: ...he frequency source and run command source are keypad Frequency source from parameter setting from each source for frequency setting from keypad or multispeed profile Option 0 00 Hz H03 60 00 Hz Change the frequency source setting Ab110 to 0 speed No 1 by using the up and down Setting data setting 07 Main speed command 0 00Hz 0 speed No 1 0 00Hz a change made in either FA ically reflected in the W...

Page 45: ...OFF CF2 ON 0 00Hz Ab 13 2 Multispeed 3 setting CF1 ON CF2 ON 0 00Hz CA 06 The terminal 6 for CF1 001 CA 07 The terminal 7 for CF2 002 1 While AA101 07 a change made in either FA 01 or Ab110 will be automatically reflected in the other When no change can be made or is reflected in FA 01 the operator keypad is not specified as a command source by the terminal function or AA101 2 Set the frequency va...

Page 46: ...rminal Select AA111 01 to 3WIRE function from parameter setting screen In this section 3WIRE functions are assigned into the input terminals Terminal 7 CA 07 016 terminal 8 CA 08 017 terminal 9 CA 09 018 Run stop command To run turn ON STA terminal and turn ON STP terminal to stop Select the rotation direction with FR terminal Parameter Parameter Details Setting data AA111 Set the operation comman...

Page 47: ... current input 20mA Use the switch on control circuit terminal board to change for voltage current input Example for adjusting I O terminals 2 3 10 Adjust the analog output Ao1 Ao2 FM E g Adjust operation E g for Ao1 Set a value equivalent to 0 output first Then adjust a value equivalent to 100 output Parameter Parameter Details Ao1 Ao2 FM Cd 23 Cd 33 Adjust the zero point reference line for volta...

Page 48: ...vent a malfunction due to noise input Parameter Input terminal Response time Input terminal Response time 1 CA 41 7 CA 47 2 CA 42 8 CA 48 3 CA 43 9 CA 49 4 CA 44 A CA 50 5 CA 45 B CA 51 6 CA 46 Example of adjusted I O terminals 5 3 13 Stabilize an output terminal Set the delay time to stabilize an output terminal from a sensitive reaction of internal functions Parameter Output terminal On delay ti...

Page 49: ...ction assigned to F2 key Type of power supply Input SET terminal for 1st 2nd motor setting Parameter display mode Screen number Functional Safety Control mode EzSQ program Special functions For more detail refer to C users guide For parameter configuration Description Transition to home cancel etc Function of the key indicated at the bottom of the screen Save data etc Function the key is indicated...

Page 50: ...N FW M1 H03 FA 01 Main Speed Reference panel 29 51 Hz 0 00 60 00 Menu Option 46 49Hz oFW RUN FW M1 H04 dA 01 Output frequency 29 51 Hz Detail 46 49Hz Trip History TRotal Count 18 回 oFW RUN FW M1 H06 1 E001 16 12 25 22 15 2 E007 16 12 25 20 33 3 E009 16 12 02 17 24 4 E012 16 10 10 08 50 5 E001 16 09 21 14 43 3 Large monitor screen Huge monitor Menu Home 1 1 5 Retry history screen why retry history ...

Page 51: ... If SEL O key is pressed the parameter code can be Option 29 51 Hz H03 Keypad 29 5 1 Hz keys the function code to be monitored can be changed pressing again the SEL O key give access to the function parameter Press 4 3 select either parameter or If SEL O key is pressed the parameter code can be keys the function code to be monitored can be changed pressing again the Press 1 In the case of a numeri...

Page 52: ...onfirm the 4 1 3 3 On tripping event With UP DOWN confirmed Trip history In the Trip history screen press the SEL UP DOWN O For more details to Put a battery f For parameter configuration 4 1 3 3 Trip history screen On tripping event Menu Trip event Overcurrent error TRIP E001 16 12 25 22 15 Output frequency Output current DC voltage Status 1 With UP DOWN confirmed Also the background will become ...

Page 53: ... when values the frequency reference is displayed is necessary to frequency reference In the analog input and requency command selection must be by pressing the RUN and the motor will accelerate When the motor does not rotate please refer to the 4 5 This explains the method to how to do a test run using when is to operate or want to change the RUN command is necessary to change the 1 4 4 Run Comma...

Page 54: ...the SEL O key the parameter section of the parameter setting screen will Option 0 00 Hz H03 0 00 Hz keys change Main speed reference displayed the frequency setting can If the displayed screen is different change the key with UP DOWN LEFT RIGHT value 0 00 Hz H03 46 49Hz SEL O key and after in the position F should be displayed the set F1 key and will go to Home screen 4 6 after moving to the setti...

Page 55: ...ction Change the language Date function 1 Time setting display format and the settings for the battery warning Read lock Limits the reading property of the data R W write mode Change the R W data parameters Home automatic transition timer Sets the time for the automatic home screen return function Initial home screen selection Sets which screen is displayed at the home screen when turns on Brightn...

Page 56: ...1Main Speed AA102 Sub AA104 Press the SEL select parameters to change 1 When the parameter is to be set as alternative Press UP DOWN Save key to store Return AA101 Main Speed STOP 7 Keypad 8 RS485 Setting 9 Option 1 10 Option 2 2When the parameter is to be set Press UP DOWN LEFT RIGHT data and press F2 parameter list Return Output Frequency STOP AA104 Sub Speed Reference Tips Press F1 Return key t...

Page 57: ...ing Conversion 1 00 03 Multispeed Operation 00 Binary 16Speed 0 M1 0 00Hz Menu oFW STOP A Opertion Function AC 01 Accel Decel time 00 Parameter Setting AC 02 Multispeed Accel Decel AC 03 Accel Curve Selection Next Group 2 For parameter configuration When to jump to the detailed subgroup AA Ab etc in parameter group press F2 key A group for example Menu oFW STOP b Protection Function bA102 Frequenc...

Page 58: ...0 00 kW dA 36 Accumulated output power monitor 0 00 100000 00 kWh dA 40 DC bus voltage monitor 0 0 1000 0 V dA 41 BRD load rating monitor 0 00 100 00 dA 42 dA 83 db 01 db 20 Code Name Range unit dA 42 Electronic thermal load rating monitor MTR 0 00 100 00 dA 43 Electronic thermal load rating monitor CTL dA 45 Safety STO monitor 00 no input 01 P 1A 02 P 2A 03 P 1b 04 P 2b 05 P 1C 06 P 2C 07 STO dA ...

Page 59: ...ID2 Output monitor 100 00 100 00 db 56 PID2 deviation monitor 100 00 100 00 db 57 PID3 Output monitor 100 00 100 00 db 58 PID3 deviation monitor 100 00 100 00 db 59 PID4 Output monitor 100 00 100 00 db 60 PID4 deviation monitor 100 00 100 00 db 61 Current PID P Gain monitor 0 0 100 0 db 62 Current PID I Gain monitor 0 0 3600 0 s db 63 Current PID D Gain monitor 0 0 100 0 s db 64 PID feedforward mo...

Page 60: ...monitor FA 10 Acceleration time monitor 0 00 3600 00 s FA 12 Deceleration time monitor FA 15 Torque reference monitor 500 0 500 0 FA 16 Torque bias monitor 500 0 500 0 FA 20 Position reference monitor When AA123 02 268435455 268435455 pulse When AA123 03 1073741823 1073741823 pulse FA 30 PID1 set value 1 monitor 100 00 100 00 FA 32 PID1 set value 2 monitor FA 34 PID1 set value 3 monitor FA 36 PID2...

Page 61: ...lass P1 00054 HFEF Voltage rating The voltage class is L 200V H 400V Other formats Area None JPN E EU ASIA U USA C CHN When option is connected parameters to display or setting range may be added Refer to user s gude for detail Parameter mode A code Frequency reference selection Code Name Range unit Initial value AA101 Main speed input source selection 1st motor 01 16 1 09 JPN 01 EU USA ASIA CHN A...

Page 62: ...tage error occurs during deceleration The torque will be lost AA121 AA223 Control mode selection Code Name Range unit Initial value AA121 Control mode selection 1st motor 00 03 08 09 11 2 00 2 IM control 00 V f constant torque 01 V f reduced torque 02 V f Free V f 03 V f constant torque with Automatic trq boost 08 Sensorless vector control 09 0Hz area sensorless vector control SM PMM control 11 Se...

Page 63: ...F OFF Speed 5 OFF ON OFF ON Speed 6 OFF ON ON OFF Speed 7 OFF ON ON ON Speed 8 ON OFF OFF OFF Speed 9 ON OFF OFF ON Speed 10 ON OFF ON OFF Speed 11 ON OFF ON ON Speed 12 ON ON OFF OFF Speed 13 ON ON OFF ON Speed 14 ON ON ON OFF Speed 15 ON ON ON ON Ab210 AC 01 AC 02 For the 8 speeds selection set Ab 03 01 assigning the intelligent terminals 007 SF1 to 013 SF7 makes available the use of the speeds ...

Page 64: ...ng and the end of the acceleration and deceleration AC 08 AC 11 should be adjusted Two stage Acc Decel change Code Name Range unit Initial value AC115 Select method to switch to Acc2 Decel2 profile 1st motor 00 2CH terminal 01 Set by parameter 02 Switch only when rotation is inverted 00 AC116 Acc1 to Acc2 frequency transition point 1st motor 0 00 590 00 Hz 0 00 AC117 Decel1 to Decel2 frequency tra...

Page 65: ...7 AC220 Acceleration time 1 2nd motor Same as AC120 AC222 Deceleration time 1 2nd motor Same as AC122 AC224 Acceleration time 2 2nd motor Same as AC124 AC226 Deceleration time 2 2nd motor Same as AC126 Torque control function setting Code Name Range unit Initial value Ad 01 Torque reference input source selection 01 06 09 18 1 07 Ad 02 Torque reference value setting 500 0 500 0 0 0 Ad 03 Polarity ...

Page 66: ...ference 1 0 AE 24 Position reference 2 0 AE 26 Position reference 3 0 AE 28 Position reference 4 0 AE 30 Position reference 5 0 AE 32 Position reference 6 0 AE 34 Position reference 7 0 AE 36 Position reference 8 0 AE 38 Position reference 9 0 AE 40 Position reference 10 0 AE 42 Position reference 11 0 AE 44 Position reference 12 0 AE 46 Position reference 13 0 AE 48 Position reference 14 0 AE 50 ...

Page 67: ... Disable 01 Enable 02 Frequency reference 00 AF102 Braking type selection 1st motor 00 DC braking 01 Speed servo lock 02 Position servo lock 00 AF103 DC braking frequency 1st motor 0 00 590 00 Hz 0 00 AF104 DC braking delay time 1st motor 0 00 5 00 s 0 00 AF105 DC braking force setting 1st motor 0 100 30 AF106 DC braking active time at stop 1st motor 0 00 60 00 s 0 00 AF107 DC braking operation me...

Page 68: ...ntrol For more information refer to the User s guide 2nd motor When Intelligent Input terminal 024 SET is enabled Code Name Range unit Initial value AF201 DC braking enable 2nd motor Same as AF101 AF202 Braking type selection 2nd motor Same as AF102 AF203 DC braking frequency 1st motor Same as AF103 AF204 DC braking delay time 2nd motor Same as AF104 AF205 DC braking force while stopping 2nd motor...

Page 69: ...ivation AG 20 AG213 Jogging function Code Name Range unit Initial value AG 20 Jogging frequency 0 00 10 00 Hz 0 00 AG 21 Jogging stop selection 00 free running disabled during operation 01 decel stop disabled during operation 02 DC braking disabled during operation 03 free running enabled during operation 04 decel stop enabled during operation 05 DC braking enabled during operation 00 When Input t...

Page 70: ...t point 11 0 00 AH 34 PID1 Multistage set point 12 0 00 AH 36 PID1 Multistage set point 13 0 00 AH 38 PID1 Multistage set point 14 0 00 AH 40 PID1 Multistage set point 15 0 00 AH 42 Input source selection of Set point 3 for PID1 00 13 2 00 AH 44 PID1 target value 2 0 00 100 00 0 00 AH 46 Target value 3 reference selection for PID1 00 13 2 0 00 AH 48 PID1 target value 3 0 00 100 00 0 00 AH 50Math o...

Page 71: ... 61 PID1 proportional gain 1 0 0 100 0 1 0 AH 62 PID1 integral time constant 1 0 0 3600 0 s 1 0 AH 63 PID1 derivative gain 1 0 0 100 0 s 0 0 AH 64 PID1 proportional gain 2 0 0 100 0 0 0 AH 65 PID1 integral time constant 2 0 0 3600 0 s 0 0 AH 66 PID1 derivative gain 2 0 0 100 0 s 0 0 AH 67 PID1 gain change time 0 10000 ms 100 If PIDC terminal is active ON the value of the integral constant is purge...

Page 72: ...operation AH For parameter configuration Code Name AH 75 PID soft start function enable AH 76 PID soft start target level AH 78 Acceleration time setting for PID soft start AH 80 PID soft start time AH 81 PID soft start detection enable AH 76 PID soft start level For a shockless made the target value In the case of a soft start the acceleration time can be set with AH 78 Code Name AH 85 PID sleep ...

Page 73: ...it Initial value AJ 03 PID2 unit selection unit table at the end of the document can be consulted 03 AJ 04 PID2 scale adjustment 0 10000 10000 0 AJ 05 PID2 scale adjustment 100 10000 10000 10000 AJ 06 PID2 scale adjustment decimal point 0 4 2 You can switch the display data and the display unit involved in the output of the PID control by the calculation Code Name Range unit Initial value AJ 07 In...

Page 74: ... value the PID output l By activating the PID3 terminal the PID3 output becomes 0 Code Name AJ 22PID3 deviation PID3 deviation can be reversed Code Name AJ 23 PID3 unit selection AJ 24 PID3 scale adjustment AJ 25 PID3 scale adjustment AJ 26 PID3 scale adjustment decimal point You can switch the display data and the display unit involved in the output of the calculation Code Name AJ 27 Input source...

Page 75: ...s the PID If AJ 41 01 when the PID output reaches a negative value the PID output is limited to 0 If AJ 41 02 when the PID output reaches a negative value the PID output lets out an inverted output By activating the PID becomes 0 Code Name AJ 42 PID4 deviation PID4 deviation can be reversed Code Name AJ 43 PID4 unit selection AJ 44 PID4 scale adjustment AJ 45 PID4 scale adjustment AJ 46 PID4 scale...

Page 76: ...put range of the PID If AJ 56 0 00 the Range unit Initial value 100 00 3 00 When the PID deviation pass over AJ 57 the output terminal function 091 OD4 is activated Range unit Initial value 100 00 100 00 100 00 0 00 When the PID feedback cross over the AJ 58 level the output terminal function 092 FBV4 is deactivated 59 level is activated Time s AJ 36 PID output range AJ 36 Time s AJ 37 AJ 37 Time ...

Page 77: ... 200V class 220 0 400V class 440 0 bA 32 Overvoltage threshold during power loss 200V class 0 0 400 0 Vdc 400V class 0 0 800 0 Vdc 200V class 360 0 400V class 720 0 bA 34 Deceleration time during power loss 0 01 3600 00 s 1 00 bA 36 Initial output frequency decrease during power loss 0 00 10 00 Hz 0 00 bA 37 Proportional gain for operation at power loss 0 00 2 55 0 20 bA 38 Integral time for opera...

Page 78: ...ange the cooling fan assigning bA 71 01 you will be able to clear the accumulated operation time 2nd motor When Intelligent Input terminal 024 SET is enabled Code Name Range unit Initial value bA202 Frequency upper limit 2nd motor Same as bA102 bA203 Frequency lower limit 2nd motor Same as bA103 bA210 Torque limit selection 2nd motor Same as bA110 bA211 Torque limit LADSTOP enable 2nd motor Same a...

Page 79: ...y count assign any value other than 0 bb 45 bb 59 Code Name Range unit Initial value bb 24 Selection of restart mode at Instantaneous power failure under voltage trip 3 00 bb 25 Allowable under voltage power failure time 0 3 25 0 s 1 0 bb 26 Retry wait time before motor restart 0 3 100 0 s 1 0 bb 27 Instantaneous power failure under voltage trip alarm enable 00 Disable 01 Enable 02 Disable at Stop...

Page 80: ...connection of the supply RST input line and UVW output line Thermistor error detection Code Name Range unit Initial value bb 70 Thermistor error level 0 10000 Ω 3000 Cb 40 Thermistor type selection 00 Disable 01 PTC 02 NTC 00 In TH terminal must be attached the kind of thermistor specified in CA 60 If CA 60 01 or 02 error level must be set in bb 70 Overspeed control Code Name Range unit Initial va...

Page 81: ...Example When bC111 01 Inverter rated current 64A bC110 64 A Base frequency Hb103 60Hz Output frequency 2 5Hz In case of output frequency 2 5Hz the reduction scale is x0 9 then the inverter will trip when the output current of 135 150 0 9 flows continuously within 60s according to the curve Example When bC111 02 and there is Output frequency bC122 2nd motor When Intelligent Input terminal 024 SET i...

Page 82: ...input display selection 00 Display 01 No display 02 Trip 00 bd 02 STO input change time 0 00 60 00 s 1 00 bd 03 Display selection at STO input change time 00 Display 01 No display 00 bd 04 Action selection after STO input change time 00 Trip 01 Maintain current status 02 Disable 00 For more information refer to the user s guide ...

Page 83: ...ve state 00 CA 26Input terminal 6 active state 00 CA 27Input terminal 7 active state 00 CA 28Input terminal 8 active state 00 CA 29Input terminal 9 active state 00 CA 30Input terminal A active state 00 CA 31Input terminal B active state 00 The functions for the Intelligent input terminals 1 9 A B are assigned in CA 21 CA 29 CA 30 CA 31 However in the case of RS assignment the NO NC will not apply ...

Page 84: ...or Tripping E013 035 CS Commercial Supply change When changing to the public electric grid if it is ON will cut the output 036 SFT Soft Lock If ON disables parameter changes UA 21 037 BOK Answer back from Brake Here is inputted the brake confirmation signal for the brake control Input terminal function list Function code Symbol Function name Description 038 OLR Accumulation input power clearance S...

Page 85: ...RG Start signal of Homing function 082 FOT Forward Over Travel Limits forward motion by forward limit torque 083 ROT Reserve Over Travel Limits reverse motion by reverse limit torque 084 SPD speed position switching Switches position control OFF and speed control ON 085 PSET Position data presetting If ON sets the actual position as the origin point 086 MI1 General purpose input 8 To be set if you...

Page 86: ...r input Code Name Range unit Initial value CA 81 Encoder constant setting 0 65535 Pls 1024 CA 82 Encoder phase selection 00 Phase A precedent 01 Phase B precedent 00 CA 83 Numerator of the motor gear ratio 1 10000 1 CA 84 Denominator of the motor gear ratio 1 10000 1 Sets the main encoder input and the motor gear ratio involved in the encoder feedback CA 90 CA 99 Pulse train input terminal Code Na...

Page 87: ...0 200 00 100 00 Regarding the adjustment method of the Analog input please refer to the chapter 3 example of I O terminals adjustment The thermistor adjustment when recognizes an increase in the adjustment value reduces the resistor value CA 40 Cb 41 CC 01 CC 17 Thermistor error detection Code Name Range unit Initial value CA 40 Thermistor type selection 00 Disable 01 PTC 02 NTC 00 Cb 41 Thermisto...

Page 88: ...R Forward rotation ON while in forward drive 009 RVR Reverse rotation ON while in reverse drive 010 FREF Speed referenc Keypad is selected ON if the frequency reference is from keypad 011 REF Run command Keypad is selected ON if the motion operation is from operation keypad 012 SETM 2nd control is selcted ON if 2nd motor selected 016 OPO Option output Controlled by the Option 017 AL Alarm ON when ...

Page 89: ...059 WCAi4 Window comparator Ai4 ON if Analog input 4 is within range 060 WCAi5 Window comparator Ai5 ON if Analog input 5 is within range 061 WCAi6 Window comparator Ai6 ON if Analog input 6 is within range 062 LOG1 Logical operation result 1 Determined by the calculation results of two output terminals 063 LOG2 Logical operation result 2 064 LOG3 Logical operation result 3 065 LOG4 Logical operat...

Page 90: ... 2 selection of LOG6 Intelligent output terminal function list reference 00 CC 57Logical calculation Symbol selection of LOG6 00 AND 01 OR 02 XOR 00 CC 58 Logical calculation target 1 selection of LOG7 Intelligent output terminal function list reference 00 CC 59Logical calculation target 2 selection of LOG7 Intelligent output terminal function list reference 00 CC 60Logical calculation Symbol sele...

Page 91: ... arrival for deceleration 1 0 00 CE 12 Arrival frequency for acceleration 2 0 00 CE 13 Frequency arrival for deceleration 2 0 00 Sets the operation of the arrival signal Example In FA2 FA4 case Example In FA3 FA5 case Over torque signal Code Name Range unit Initial value CE120 Over torque level Forward during 1st motor 0 0 300 0 100 0 CE121 Over torque level Reverse driving 1st motor 100 0 CE122 O...

Page 92: ...the Heat sink overheat time Range unit Initial value 100000 hour Sets the level in which the Inverter outputs the RUN on beyond time detection of terminal Range unit Initial value 100 100 100 0 10 0 100 100 100 0 10 0 100 100 100 100 10 0 100 0 Disable Inside range Out of range 00 100 0 Disable Inside range Out of range 00 100 0 Disable Inside range Out of range 00 Analog input value is As for dis...

Page 93: ...OM peer to peer communication Code Name Range unit Initial value CF 20 EzCOM Start node No 01 08 01 CF 21 EzCOM End node No 01 08 01 CF 22 EzCOM Start selection 00 Terminal ECOM 01 Always 00 CF 23 EzCOM data size 01 05 05 CF 24 EzCOM destination address 1 1 247 1 CF 25 EzCOM destination register 1 0000 FFFF 0000 CF 26 EzCOM source register 1 0000 FFFF 0000 CF 27 EzCOM destination address 2 1 247 2...

Page 94: ...e speed response in the operation control of the inverter AA121 control mode HA140 HA154 Control response gain Code Name Range unit Initial value HA120 ASR gain switching mode selection 1st motor 00 CAS terminal 01 Change set 00 HA121 Gain switching time 1st motor 0 10000 ms 100 HA122 ASR gain mapping intermediate speed 1 1st motor 0 00 590 00 Hz 0 00 HA123 ASR gain mapping intermediate speed 2 1s...

Page 95: ...4 Hb102 Hb108 Basic parameters for Induction motor Code Name Range unit Initial value Induction motor IM Hb102 Async Motor capacity setting 1st motor 0 01 630 00 kW Motor capacity setting Hb103 Async Motor poles setting 1st motor 2 48 Pole 4 Hb104 Async Motor Base frequency setting 1st motor 10 00 590 00 Hz 60 00 JPN USA 50 00 EU ASIA CHN Hb105 Async Motor Maximum frequency setting 1st motor 10 00...

Page 96: ...e Name Range unit Initial value Hb130 Minimum frequency 1st motor 0 00 10 00 Hz 0 50 Hb131 Reduced voltage start time 1st motor 0 2000 ms 36 If the torque at the time of start up is not enough you can change the settings to raise the lowest frequency Raise the minimum frequency if the trip occurs set a longer time of reduced voltage start selection Hb140 Hb146 Manual torque boost adjustment Code N...

Page 97: ...r Same as Hb105 Hb206 Rated voltage 2nd motor Same as Hb106 Hb208 Rated current 2nd motor Same as Hb108 Hb210 Constant R1 2nd motor Same as Hb110 Hb212 Constant R2 2nd motor Same as Hb112 Hb214 Constant L 2nd motor Same as Hb114 Hb216 Constant Io 2nd motor Same as Hb116 Hb218 Constant J 2nd motor Same as Hb118 2nd motor When Intelligent Input terminal 024 SET is enabled Code Name Range unit Initia...

Page 98: ...4 Reverse run protection enable 1st motor 00 Disable 01 Enable 00 This function is to prevent reverse output in a low frequency range for vector control such as SLV 0Hz SLV CLV Motor control adjustment gain Code Name Range unit Initial value HC120 Time constant of torque current reference filter 1st motor 0 100 ms 2 HC121 Feedforward gain compensation adjustment for speed 1st motor 0 1000 0 HC120 ...

Page 99: ...cs are set according to the internal Hitachi table values By auto tuning at stop values of Hd110 Hd114 can be acquired Hd130 Hd218 Minimum frequency settings Code Name Range unit Initial value Hd130 Minimum Frequency for Sync M 1st motor 0 50 8 Hd131 No Load current for Sync M 1st motor 0 100 10 By base frequency Hd104 Hd130 change from Sync to sensorless is possible By Hd131 the sensorless vector...

Page 100: ... For more information refer to the User s guide of the corresponding option Optional board error operation Code Name Range unit Initial value Slot 1 oA 10 Operation selection on option card error SLOT 1 00 Error 01 Continue operation 00 oA 11 Communication Watch Dog Timer SLOT 1 0 00 100 00 s 0 00 oA 12 Action selection at communication error SLOT 1 00 Error 01 Tripping after decelerating and stop...

Page 101: ...ng 0 00 3600 00 s 30 00 oC 24 SLS B Speed upper limit Forward 0 00 590 00 Hz 0 00 oC 25 SLS B Speed upper limit Reverse 0 00 590 00 Hz 0 00 oC 26 SDI B deceleration time 0 00 3600 00 s 30 00 oC 28 SDI B deceleration time setting 00 Limit 01 Invert 00 For more detail refer to optional board instruction P1 AG Optional analog input setting Code Name Range unit Initial value Ai4 terminal oE 01 Filter ...

Page 102: ...ange As for disconnection detection if it is in the case of within or out of the range a value can be set for the operation command oE 50 oE 70 P1 AG Optional analog output adjustment Code Name Range unit Initial value oE 50 Ao3 monitor output selection Set monitor code dA 01 oE 51 Ao4 monitor output selection dA 01 oE 52 Ao5 monitor output selection dA 01 oE 56 Filter time constant of Ao3 monitor...

Page 103: ... Gr A 0000 FFFF 0000 oJ 08Register writing 8 Gr A 0000 FFFF 0000 oJ 09Register writing 9 Gr A 0000 FFFF 0000 oJ 10Register writing 10 Gr A 0000 FFFF 0000 oJ 11Register reading 1 Gr A 0000 FFFF 0000 oJ 12Register reading 2 Gr A 0000 FFFF 0000 oJ 13Register reading 3 Gr A 0000 FFFF 0000 oJ 14Register reading 4 Gr A 0000 FFFF 0000 oJ 15Register reading 5 Gr A 0000 FFFF 0000 oJ 16Register reading 6 Gr...

Page 104: ...nit Initial value Group 1 IPv4 oL 01IPv4 IP address 1 Gr 1 0 255 0 oL 02IPv4 IP address 2 Gr 1 0 255 0 oL 03IPv4 IP address 3 Gr 1 0 255 0 oL 04IPv4 IP address 4 Gr 1 0 255 0 oL 05 IPv4 sub net mask 1 Gr 1 0 255 0 oL 06 IPv4 sub net mask 2 Gr 1 0 255 0 oL 07 IPv4 sub net mask 3 Gr 1 0 255 0 oL 08 IPv4 sub net mask 4 Gr 1 0 255 0 oL 09IPv4 default gateway 1 Gr 1 0 255 0 oL 10IPv4 default gateway 2 ...

Page 105: ...00 FFFF 0000 oL 61IPv6 IP address 2 Gr 2 0000 FFFF 0000 oL 62IPv6 IP address 3 Gr 2 0000 FFFF 0000 oL 63IPv6 IP address 4 Gr 2 0000 FFFF 0000 oL 64IPv6 IP address 5 Gr 2 0000 FFFF 0000 oL 65IPv6 IP address 6 Gr 2 0000 FFFF 0000 oL 66IPv6 IP address 7 Gr 2 0000 FFFF 0000 oL 67IPv6 IP address 8 Gr 2 0000 FFFF 0000 oL 68 IPv6 Sub net prefix Gr 2 0 127 0 oL 69IPv6 default gateway 1 Gr 2 0000 FFFF 0000...

Page 106: ...6 Enable Ai6 09 Enable PA 23 01 PA 23 Output current monitor optional output value setting 0 0 300 0 0 0 PA 24 DC bus voltage monitor optional output value selection 00 Disable 01 Enable Ai1 02 Enable Ai2 03 Enable Ai3 04 Enable Ai4 05 Enable Ai5 06 Enable Ai6 09 Enable PA 25 00 PA 25 DC voltage monitor optional output value 0 0 300 0 0 0 PA 26 Output voltage monitor optional output enable 00 Disa...

Page 107: ... to R W 01 Able to R W 00 Restricts the copy function Read Write Keypad low battery warning Code Name Range unit Initial value UA 19 Low battery warning enable 01 Warning 02 Error 01 Sets operation for when keypad is low on battery UA 20 UA 62 Keypad communication lost operation Code Name Range unit Initial value UA 20 Operation selection when keypad communication is lost 00 Error 01 Error after d...

Page 108: ...0 Ud 02 Trace start 00 Stop 01 Start 00 Ud 03 Trace data number selection 1 8 1 Ud 04 Trace signal number setting 1 8 1 Ud 10Trace data 0 selection All the parameters of the monitor mode dA 01 Ud 11Trace data 1 selection dA 01 Ud 12Trace data 2 selection dA 01 Ud 13Trace data 3 selection dA 01 Ud 14Trace data 4 selection dA 01 Ud 15Trace data 5 selection dA 01 Ud 16Trace data 6 selection dA 01 Ud ...

Page 109: ... 04 2ms 05 5ms 06 10ms 07 50ms 08 100ms 09 500ms 10 1000ms 03 1 00 Trip 01 Data 0 02 Data 1 03 Data 2 04 Data 3 05 Data 4 06 Data 5 07 Data 6 08 Data 7 09 Signal 0 10 Signal 1 11 Signal 2 12 Signal 3 13 Signal 4 14 Signal 5 15 Signal 6 16 Signal 7 Trace function settings For more information refer to the user s guide UE 01 UE 48 EzSQ Code Name Range unit Initial value UE 01 EzSQ execution timing 0...

Page 110: ...F 06 UL 05 2147483647 2147483647 0 UF 08 UL 03 2147483647 2147483647 0 UF 10 UL 04 2147483647 2147483647 0 UF 12 UL 05 2147483647 2147483647 0 UF 14 UL 06 2147483647 2147483647 0 UF 16 UL 07 2147483647 2147483647 0 UF 18 UL 08 2147483647 2147483647 0 UF 20 UL 09 2147483647 2147483647 0 UF 22 UL 10 2147483647 2147483647 0 UF 24 UL 11 2147483647 2147483647 0 UF 26 UL 12 2147483647 2147483647 0 UF 28...

Page 111: ...crease the deceleration time Reselection of the braking resistor is necessary If the deceleration is fast increase the deceleration time Use the overvoltage suppression functions Use the overvoltage retry function Use a braking option out counter measures for the inverter noise Consecutive errors may cause a failure To disable the undervoltage error change setting Use the undervoltage retry functi...

Page 112: ...he 3 phases are correctly inserted E030 Suddenly current increase Output wiring ground fault Disconnection confirm Check that the motor is not locked E034 Disconnection of the wiring in the motor side has occurred Check the output wiring disconnection motor insulation failure etc Check that the 3 phases are correctly inserted E035 Abnormal motor temperature Improve the motor cooling circumstances ...

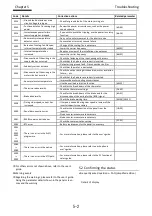
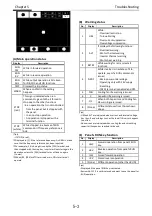
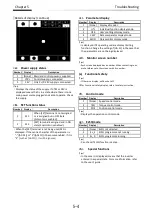
Page 113: ...verload restriction Torque limiting Overcurrent suppression Overvoltage suppression 2 ALT If displays the following functions Overload warning Motor thermal warning Inverter thermal warning Motor heat warning 3 RETRY While waiting for retry or restart functions 4 NRDY While inverter is in a state unfit to operate even if a RUN command is issued Main power undervoltage Operating only with 24V suppl...

Page 114: ... UTL Individual function display mode 3 USR User s settings display mode 4 CMP Data comparator display mode 5 MON Only monitor display mode Tips Is displayed if it operating under a display limiting function Change the setting of UA 10 in the case that the parameters are not being displayed d Monitor screen number Tips Each screen displayed has a number When contacting to us make reference to the ...

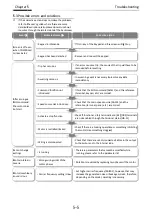
Page 115: ...t up Recover and reinsert the keypad In a warning event is necessary to resolve any data inconsistency If an error causes a trip the cause of the trip will have to be removed before resetting Check if functional safety terminals and RS FRS terminals are not enabled through the terminal status Check that the main speed source reference terminal panel etc are correct Check that the RUN command AA111...

Page 116: ...ng from the TV and radio Put a zero phase reactor either in the main supply input or in the output Corrective action If output current is high the overload restriction function bA122 lowers the frequency To increase the acceleration time AC120 it is necessary to suppress the current Increase the frequency source or cancel any other high priority frequency command such as jogging bA102 setting may ...

Page 117: ...cessories such as bracelets and isolated tools 6 1 3 Cleaning Keep the inverter in a clean condition No Details 1 When cleaning cloth soaked in neutral detergent wipe up the dirtied part 2 Do not use toluene or alcohol to clean the inverter as it can melt its surface or peel off the coating 3 For the display detergent or alcohol to clean it 6 1 4 Periodic Check the parts that are is stopped The pe...

Page 118: ...s Check visually Without abnormalities 2 Check for cable coating damage Terminal block Check for any damage Check visually Without abnormalities Inverter and converter circuits Including resistors Check the resistance between all the terminals Remove the inverter main circuit terminal wiring and measure the following Resistance between terminals RST and PN Resistance between terminals UVW and PN C...

Page 119: ...carry out a withstand voltage test for the inverter The test may damage its internal parts deteriorating the inverter To perform an insulation resistance test of the inverter main circuit start by removing the inverter internal filter short circuit jumper after that R S T U V W P PD N RB R0 T0 terminals are short circuited with an electric cable as shown in the sketch below After the insulation re...

Page 120: ...onduction N V No conduction TR6 W N Conduction N W No conduction BRD part TR7 RB P No conduction P RB Conduction RB N No conduction N RB No conduction 1 Before checking the circuits measure the voltage across terminals P and N with the multimeter in DC voltage range mode to confirm that the smoothing capacitor has been fully discharged 2 When not conducting it shows an infinite value Due to the in...

Page 121: ...tor dC 16 and the output terminal function selection CC 01 CC 07 It should be noted that the warning itself is based on the design lifespan and thus is not a guaranteed measurement Depending on the environment the operation conditions etc problems may arise to avoid that is recommended an early maintenance 80 of the ND rated current value for continuous drive 2 The smoothing capacitor has a limite...

Page 122: ... the input supply IIN IR IS IT 3 Input power WIN R S S T T R WI1 WI2 WI3 Electrodynamometer type wattmeter Effective value of full waves Three wattmeter method Input power factor PfIN Is calculated from the measured values of the input voltage EIN input current IIN and supply power WIN Output voltage EOUT U V V W W U EU EV EW Moving iron voltmeter or Rectifier type voltmeter Effective value of fun...

Page 123: ...2 5 0 8 0 11 0 17 5 25 0 32 0 46 0 64 0 76 0 95 0 122 146 182 220 Overload current rating VLD 110 60sec 120 3sec LD 120 60sec 150 3sec ND 150 60sec 200 3sec Rated output voltage Three phase 3 wire 200 240V Corresponding to the incoming voltage Rated capacity kVA 200V VLD 1 5 2 8 3 6 5 4 7 9 11 4 15 9 20 8 27 7 32 2 43 0 53 0 64 1 79 3 102 2 LD 1 3 2 2 3 3 4 2 6 8 10 4 13 9 19 4 25 3 29 4 39 1 48 5...

Page 124: ...2 0 29 0 37 0 43 0 57 0 70 0 85 0 105 135 160 195 230 290 ND 2 5 4 0 5 5 9 2 14 8 19 0 25 0 32 0 39 0 48 0 61 0 75 0 91 0 112 150 180 217 260 Overload current rating VLD 110 60sec 120 3sec LD 120 60sec 150 3sec ND 150 60sec 200 3sec Rated output voltage Three phase 3 wire 380 500V Corresponding to the incoming voltage Rated capac ity kVA 400V VLD 2 8 3 7 5 8 8 7 12 1 17 3 21 5 27 7 32 6 43 0 53 3 ...

Page 125: ...utput adjustment minimun speed carrier frequency adjustment motor electronic thermal function free is possible inverter thermal function external start end speed and rate frequency input selection trip retry restart stop various signal output inilization setting PID control auto decel at shut off brake control function commercial switching function auto tuning on offline the rest is described in t...

Page 126: ... deviation POK Positioning completed PCMP Pulse counter compare output OD OD2 Output deviation for PID control FBV FBV2 PID feedback comparison NDc Communication disconnection Ai1Dc Ai2Dc Ai3Dc Analogue Ai1 Ai2 Ai3 disconnection WCAi1 WCAi2 WCAi3 Window comparator Ai1 Ai2 Ai3 LOG1 7 logical operation result 1 7 MO1 7 General output 1 7 WFT Trace waiting signal TRA Trace running signal LBK Low batt...

Page 127: ... 4 18 energy saving operation 4 48 external DC braking 4 36 external thermistor 2 21 external trip 4 36 ezCOM 4 45 F FA1 FA2 FA3 FA4 FA5 4 40 FBV 4 41 FM 2 22 FOC 4 37 forcible operation 4 36 forcing 4 37 FOT 4 37 free setting of electronic thermal characteristic 4 33 free V f characteristic 4 49 free run stop 4 14 frequency addition 4 36 frequency arrival setting for accel 4 43 frequency arrival ...

Page 128: ...command selection 4 14 Run command direction restriction 4 14 running signal 4 41 RV 5 3 RVR 4 40 S scaled output frequency monitoring 4 15 sensorless vector control 4 14 servo on 4 112 SET SET3 4 51 SFT 4 36 SF1 SF2 SF3 SF4 SF5 SF6 SF7 4 36 SLV 4 50 software lock 4 59 SPD 4 37 Speed limit for torque control 4 17 speed position switching 4 37 STA 4 37 STP 4 58 T Temporary frequency addition 4 3 te...

Page 129: ...Index Index 3 memo ...

Page 130: ...Index Index 4 memo ...

Page 131: ...er right corner of the screen e g Data memory RUN key Runs when the key is enabled STOP RESET key Selects Deceleration stop and Trip Selects data on the screen by using the right left and the up down arrow keys and confirms the selection incoming command for the power is supplied to How to read the display screen 6 Display screen No Command control h Special status F2 function Frequency Data param...

Reviews: