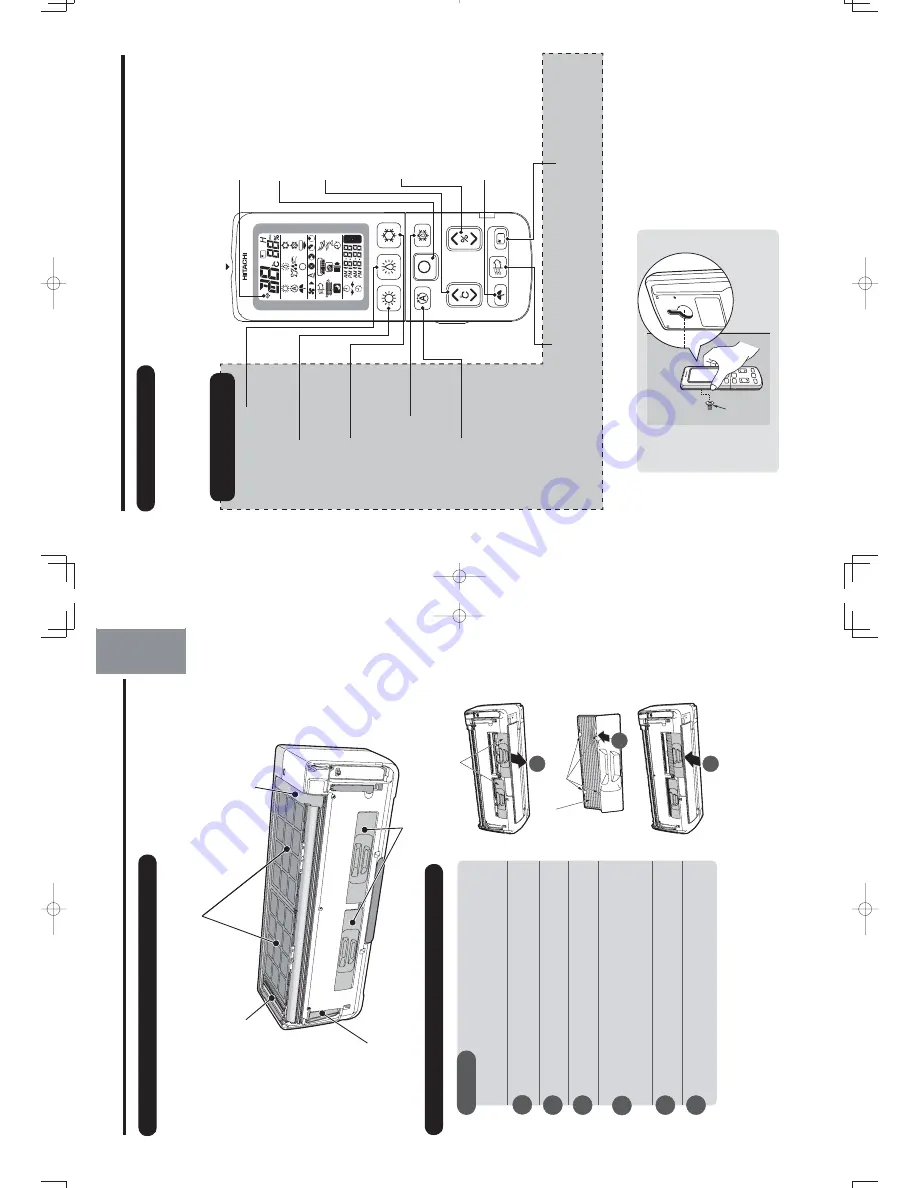
Air Cleaning Mesh Box
DEUTSCH
FRANÇAIS
ITALIANO
SPANISH
PORTUGUÊS
∂ÏÏËÓÈο
«®¬¬¥£¤
Replace the air cleaning mesh box.
Dž
“Make sure that it clicks into place.”
Dž
“If it dose not click into place, abnormal sounds
may be heard or the box may fall off.”
Close the front panel.
Ą
INDOOR UNIT CONTROL
P
ANEL
/ CLEANING UNIT
Open the front panel to operate.
(How to open the front panel, page 8)
Dust Catcher
Collects the dust swept by
the cleaning unit. (At front
and top.) (Page 37)
Cleaning Unit
Cleans the dust
caught by the
Dust Box
Collects and keeps the dust
that has been cleaned.
(Page 34)
Stainless Mesh Filter
(inside)
Collects particulates and dusts in the air. (Page 35)
Air Cleaning Mesh Box
Preparation
Stop the air conditioner, and disconnect
the power supply (or turn off the circuit breaker).
Open the front panel.
Pull out the air cleaning mesh box as illustrated to
remove it.
Insert the air cleaning mesh into the slot as illustrated.
Connect the power cord (or turn on the circuit breaker).
Jaw
Wasabi-Nano Titanium Air Cleaning Mesh
With the air cleaning mesh used, the air-conditioning capability will fall slightly.
Remove dust from the surface with a vacuum cleaner, and DO NOT clean it with water.
(We recommend you clean it once every 6 months and replace it once every 2 years.)
– 5 –
ENGLISH
stainless mesh
filter.
How to Attach the Wasabi-Nano Titanium Air Cleaning Mesh
10_14SH3_OM.indd 5
10_14SH3_OM.indd 5
2012-2-21 14:51:352012-2-21 14:51:35
T
ransmission Indicator
The transmission indicator
ROOM TEMPERA
TURE
Button
Press this button to set the
room temperature. Keep
pressing and the value will
change more quickly
.
STOP Button
HEA
T Button
Press this button to start
heating operation.
(Page 14)
DEHUMIDIFY
Button
Press this button to start
dehumidifying operation.
(Page 14)
COOL
Button
Press this button to start
cooling operation.
(Page 15)
DR
Y
COOL
Button
Press this button to start dry
cool operation. (Page 16)
AUTO Button
Press this button to
start
automatic
operation.
(Page 13)
BUTT
ONS T
O
ST
ART OPERA
TIONS
Remote controller can be used when it is fixed on a wall or pillar using the remote controller holder
.
Before fixing it, make sure the indoor unit can be controlled from the remote controller fixing point.
SLEEP
TIMER Operation Button
Press this button to start sleep timer
operation. (Page 29)
REMOTE CONTROLLER
T
ransmits the operation and timer settings to the indoor unit.
The LCD shown in the illustration below is the display immediately after the reset switch is pressed. Usually not
all the data are displayed. On the LCD shown below
, the functions not available for this room air conditioner are
also displayed.
NAMES AND FUNCTIONS OF EACH P
AR
T (continued)
T
ransmission Part
HUMIDITY
Button
Press this button to set the
humidity for dehumidify and
dry cool operations.
Screw
INFRARED HUMAN-PRESENCE
SENSING Button
Press this button to enter
the dynamic air deflection mode.
(Page 19, 20)
Press this button to start I
on mist
operation.
– 6 –
Press this button to stop any
operation except the preset timer.
lit when a signal is sent.
ION MIST Button
(Page
18)
10_14SH3_OM.indd 6
10_14SH3_OM.indd 6
2012-2-21 14:51:352012-2-21 14:51:35
Summary of Contents for RAC-10SH3
Page 57: ... 55 MODEL RAC 18SH3 Unit mm 580 5 600 345 299 19 5 ...
Page 60: ... 8 5 WIRING DIAGRAM MODEL RAS 10SH3 3 H S 4 1 S A R 3 H S 8 1 S A R INDOOR UNIT ...
Page 62: ... 0 6 MODEL RAC 18SH3 OUTDOOR UNIT WHT YEL RED INDOOR UNIT ...
Page 64: ... 2 6 3 H S 8 1 S A R 3 H S 4 1 S A R 3 H S 0 1 S A R L E D O M ...
Page 150: ... 8 4 1 MODEL RAC 18SH3 ...
Page 153: ...HHAW NO 0060E RAS 10SH3 RAC 10SH3 RAS 14SH3 RAC 10SH3 RAS 18SH3 RAC 18SH3 ...


