background image

- 10 -

- 11 -

E

N

G

L

IS

H

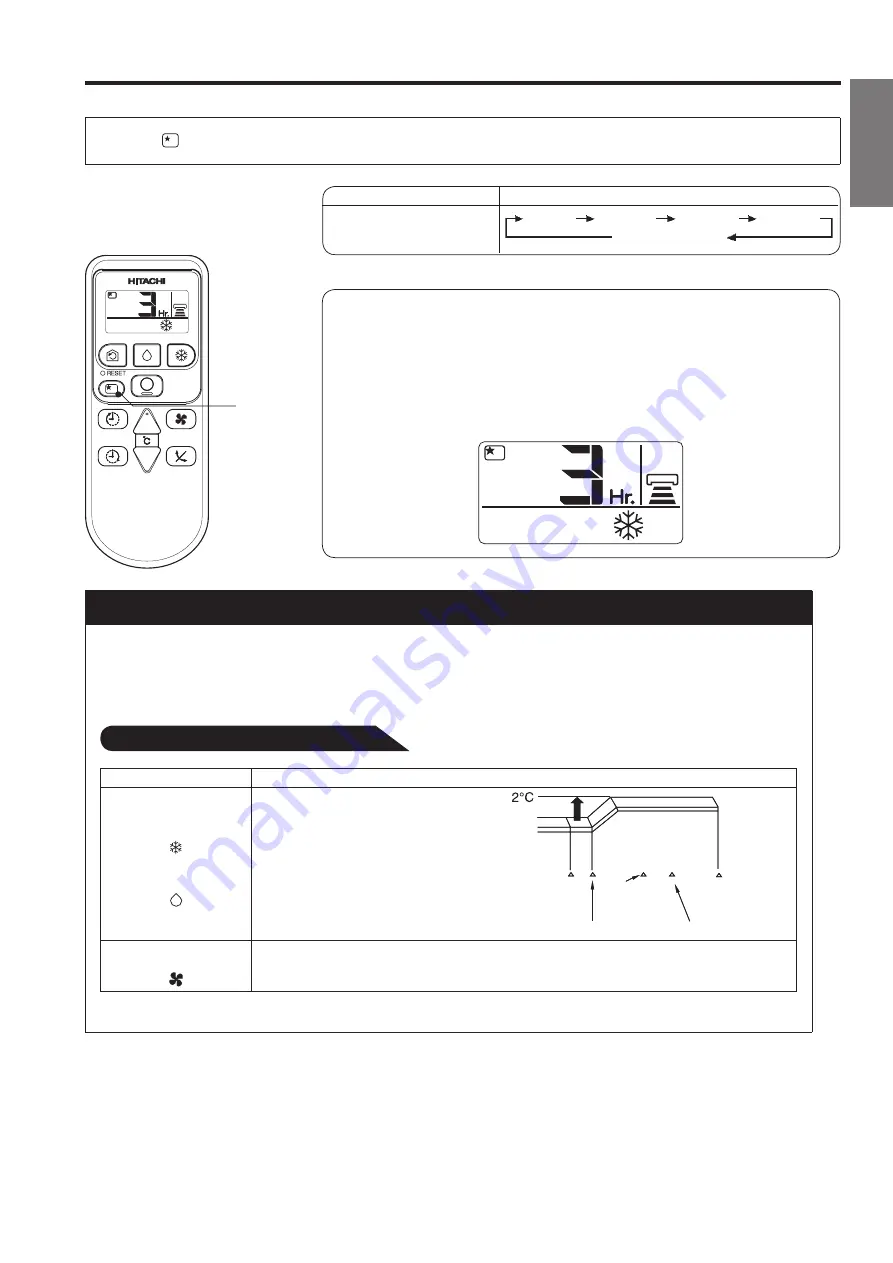
HOW TO SET THE SLEEP TIMER

Press the 

 (SLEEP) button, and the display changes as shown below.

SLEEP


Mode

Indication

Sleep timer

1 hour        2 hours        3 hours        7 hours

Sleep timer off

Sleep Timer: 

The device will continue working for the designated number 

of hours and then turn off.
Point the signal window of the remote controller toward the indoor unit,  
and press the SLEEP button.
The timer information will be displayed on the remote controller.
The TIMER lamp lights with a beep from the indoor unit. When the sleep 
timer has been set, the display indicates the turn-off time.

Explanation of the sleep timer

The device will control the FAN SPEED and room temperature automatically so as to 
be quiet and good for people’s health.
You can set the sleep timer to turn off after 1, ,  or  hours. The FAN SPEED and 
room temperature will be controlled as shown below.

Operation with the sleep timer

Function

Operation

Cooling 

“ ”

and  

dehumidifying  

“ ”

The room temperature will be 
controlled °C above the setting 
temperature and the FAN SPEED 
will be set to LOW setting 0 minutes 
after the setting of the sleep timer.

Sleep  
timer set

0 minutes later  hours later

 hours later

 hours  
later

Fan

“ ”

The settings of room temperature and circulation are varied.

Summary of Contents for RAC-D10CDK

Page 1: ...NDITIONER MODEL RAS D10CDK RAC D10CDK RAS D13CDK RAC D13CDK Instruction manual Page 1 20 To obtain the best performance and ensure years of trouble free use please read this instruction manual completely 21 40 OUTDOOR UNIT INDOOR UNIT RAS D10CDK RAS D13CDK RAC D10CDK RAC D13CDK ...

Page 2: ...TION A circuit breaker should be installed depending on the mounting site of the unit Without a circuit breaker the danger of electric shock exists Do not install near location where there is flammable gas The outdoor unit may catch fire if flammable gas leaks around it Please ensure smooth flow of water when installing the drain hose PRECAUTIONS DURING SHIFTING OR MAINTENANCE W A R N I N G Should abn...

Page 3: ...cleaning the high speed fan inside the unit may cause danger Turn off the circuit breaker if the unit is not to be operated for a long period Do not climb on the outdoor unit or put objects on it Do not put water container like vase on the indoor unit to avoid water dripping into the unit Dripping water will damage the insulator inside the unit and causes short circuit Do not place plants directly...

Page 4: ...m allows better and smoother air fl ows that will provide a quiet and refreshing environment Sleep mode with automatic adjustable temperature controls After adjusting the sleep mode timer before sleep the temperature will be automatically controlled and adjusted accordingly to the lowering or body temperature during sleep and lower temperature throughout the night to provide a conducive environment...

Page 5: ...EL SUPPORT PANEL HORIZONTAL DEFLECTOR VERTICAL DEFLECTOR AIR OUTLET Refer page 13 REMOTE CONTROL Send out operation signal to the indoor unit So as to operate the whole unit Refer page 7 OUTDOOR UNIT DRAIN PIPE Condensed water drain to outside CONNECTING CORD AIR INLET BACK LEFT SIDE AIR OUTLET MODEL NAME AND DIMENSIONS MODEL WIDTH mm HEIGHT mm DEPTH mm RAS D10CDK RAS D13CDK 780 280 211 RAC D10CDK...

Page 6: ... operating in to minutes Timer Lamp ORANGE This lamp lights when the timer is working The lamp flashes periodically when any abnormality occurs in the indoor unit Temporary Switch OPERATION INDICATOR TEMPORARY SWITCH When the remote control device is not functioning use the Temporary Switch mode 1 When the Temporary Switch is pressed the unit will operate as per the previous setting Press the Tempo...

Page 7: ...ion RESET button STOP button Press this button to stop operation only SLEEP button Use this button to set the sleep timer FAN SPEED selector This determines the fan speed Every time you press this button the intensity of circulation will change from AUTO to HI to MED to LOW during the AIR CIRCULATION mode from HI to MED to LOW AUTO SWING button Controls the angle of the horizontal air deflector and...

Page 8: ...e with the TEMPERATURE button the display indicates the setting C The range of C is recommended as the room temperature for cooling If the temperature setting is C the room temperature will be controlled at around C The temperature setting and the actual room temperature may vary somewhat depending on conditions Press the COOLING button Cooling operation starts with a beep Press the STOP button to...

Page 9: ...idifying operation starts with a beep Press the STOP button to stop operation As the settings are stored in memory in the remote controller you only have to press the DEHUMIDIFY button next time Dehumidifying Function When the room temperature is higher than the temperature setting The device will dehumidify the room reducing the room temperature to the preset level When the room temperature is lo...

Page 10: ... with a beep Press the STOP button to stop operation Press the button so that the display indicates CIRCULATE As the settings are stored in memory in the remote controller you only have to press the CIRCULATION button next time Circulation Function During circulation operation compressor will not be running and there is no cooling operation with only indoor fan running When the setting temperature...

Page 11: ...eep timer has been set the display indicates the turn off time Explanation of the sleep timer The device will control the FAN SPEED and room temperature automatically so as to be quiet and good for people s health You can set the sleep timer to turn off after 1 or hours The FAN SPEED and room temperature will be controlled as shown below Operation with the sleep timer Function Operation Cooling an...

Page 12: ...ress the button 1 2 3 9 10 11 12 1 hour interval Operation stop at setting time ON Timer Reservation ON TIME setting Select the ON TIMER by pressing the ON Button Setting time will change according to the below sequence 1 2 3 9 10 11 12 1 hour interval O p e ra t i o n w i l l s t a r t fo r s e t t i n g temperature at setting time The starting time may different depend on the room temperature an...

Page 13: ... louvers to move within the range as recommended in the illustration Adjusting the air flow louvers will direct air flows to assist in reducing the room temperature and to correct any temperature imbalance During the Cooling operating mode do not adjust the horizontal air flow louvers to swing outside the range as indicated by arrows in the illustration Do not operate the horizontal air flow louvers ...

Page 14: ...rent kinds of batteries together Take out the batteries when you do not use the remote controller for or months Use high quality and high performance AAA batteries to avoid short operating life and electrolyte leakages NOTE Remove the air cleansing filters from the front cover gently press both sides of the air cleansing frame to park it securely at the hooks six places and reattach the filters wi...

Page 15: ...er operation mode together with your wake up time in the morning This will enable you to enjoy a comfortable room temperature Please use the timer effectively Do Not ForgetTo CleanThe Air Filter Dusty air filter will reduce the air volume and the cooling efficiency To prevent from wasting electric energy please clean the filter every weeks Temperature n Please Adjust SuitableTemperature For Baby An...

Page 16: ...be used for a long period of time please pull out the power plug Or the indoor unit still consumes about W in the operation control circuit even if it is in OFF mode OFF When Lightning Occurs Warning To protect the whole unit during lightning please stop operating the unit and remove the plug from the socket Interference From Electrical Products Caution To avoid noise interference please place the...

Page 17: ...ean the dust accumulated at the dust filter screen If the accumulated dust is too much to be removed by vacuum cleaning apply mild detergent and fl ush the dust from the dust fi lter screen with water After thorough rinsing leave the dust filter screen at a cool shaded place to dry Re install the dust filter screen to its original position With FRONT marker facing front Slightly lift up the opened fron...

Page 18: ...of the front panel CAUTION Please disconnect the power plug before cleaning the front panel 1 Hot water 50 C Volatile liquid acid and others TROUBLE SHOOTING THE UNIT BEFORE CONTACTING SERVICE STAFF TO CHECK AND RECTIFY The air conditioner unit is not operating Check whether the power supply plug is properly plugged in Abnormal air conditioning effects Is the dust fi lter screen clogged with dust a...

Page 19: ... abnormal for the operation 1 Slight fl owing noise of refrigerant in the refrigerating cycle Slight rubbing noise from the fan casing which is cooled and then gradually warmed as operation stops The odor will possibly be emitted from the room air conditioner because the various odor emitted by smoke foodstuffs cosmetics and so on sticks to it So please clean the air fi lter and the evaporator regul...

Page 20: ...when the room light is dimmed a slight brightness flsuctuation may occur This is of no consequence The conditions of the local Power Supply Companies are to be observed Note Avoid to use the room air conditioner for cooling operation when the outside temperature is below 1 C 0 F The recommended maximum and minimum operating temperatures of the hot and cold sides should be as below Minimum Maximum I...

Page 21: ...RAS D10CDK RAC D10CDK RAS D13CDK RAC D13CDK RAS D10CDK RAS D13CDK RAC D10CDK RAC D13CDK ...

Page 22: ......

Page 23: ...不要讓小孩單獨操作使用機器 除非在監督責任人的指導下 確保他們能安全正確的使用機器 請確保小孩遠離機體 不要機體玩耍 以免發生危險 ...

Page 24: ...1 1 ...

Page 25: ...隔塵網 吹 吹 RAS D10CDK RAS D13CDK 780 280 211 RAC D10CDK RAC D13CDK 420 299 792 ...

Page 26: ......

Page 27: ...搖擺 ...

Page 28: ......

Page 29: ......

Page 30: ...2 1 3 ...

Page 31: ......

Page 32: ......

Page 33: ......

Page 34: ......

Page 35: ......

Page 36: ......

Page 37: ......

Page 38: ......

Page 39: ......

Page 40: ......

Reviews: