background image

3

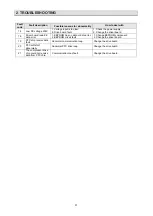
.

CHECKING COMPONENTS

See  -----    Tube defrost. 

Feel  -----    The difference between tube’s temperature. 

Test  -----    Test pressure. 

3. Checking components

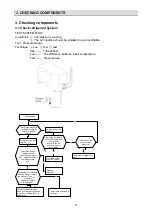
3.1 Check refrigerant system

TEST SYSTEM FLOW 
Conditions:  

 Compressor is running. 

The air condition should be installed in good ventilation.

Tool:  Pressure Gauge 

Technique:  

 see   

 feel  

 test 

Cooling mode 

Test system pressure. 

Is the low pressure 

normal at service 

part ?

The pressure on the 

high side. 

The pressure on the 

low side. 

Recharge refrigerant 

after air purging with 

the vacuum 

pump. Is the low 

pressure normal 

over again? 

Air remains at the 

refrigerant system.

yes

The system needs 

refrigerant.The 

service people must 

add  refrigerant. Does 

the low pressure 

rise ? 

NO

Recharge 

refrigerant. 

yes

The refrigerant system is 

blocked. Please check 

the Capillary Tube

or 

electronic 

expansion valve). 

Is it blocked?

Unsolder the capillary tube 

ASS'Y(or electronic expansion 

valve). The capillary tube1 is 

blown by N

2

Check check valve and 4-

way valve.

If the pressure is 

close to static 

pressure? 

NO

NO

4-way valve collude or 

compressor exhaust very 

ebb.

yes

NO

yes

3

3

Summary of Contents for RAS-1.0PNNBDH1

Page 1: ...21393HA SM 210131 INDOOR UNITS OUTDOOR UNITS DUCTED RPIL 1 0PNN1DH RPIL 1 5PNN1DH RPIL 2 0PNN1DH RPIM 3 0PNN1DH RPIM 4 0PNN1DH CASSETTE RCIM 1 0PNN1DH RCIM 1 5PNN1DH RCI 2 0PNN1DH RCI 3 0PNN1DH RCI 4 0PNN1DH RAS 1 0PNNBDH1 RAS 1 5PNNBDH1 RAS 2 0PNNBDH1 RAS 3 0PNNBDH1 RAS 4 0PNNBDH1 ...

Page 2: ...Fault codes 23 3 Checking components 33 3 1 Check refrigerant system 33 3 2 Check parts unit 34 4 Disassembly precedure 38 5 Control logic description 49 5 1 Fan only mode 49 5 2 Cooling mode 49 5 3 Heating mode 50 5 4 Auto mode 51 5 5 Evaporator low temperature protection 51 5 6 Condenser high temperature protection 52 Table of Contents ...

Page 3: ...troller with indoor unit with attached controlling cable 4 pin Group control Connect wired controller with indoor unit with attached controlling cable 4 pin and connect with adaptor with RS485 controlling cable 2 pin attached with adaptor The quantity of adaptor required which need to be prepared separately is the same with that of the secondary controller B B B B B B A A A A A A RS485 shielded tw...

Page 4: ...r connection A BK B BN attached with the adaptor YL YL WT RD RD BK BK Controlling cable WT Controlling cable Note Symbol indicates the position of the dip switch OFF ON S1 Dip switch Description Setting method S1 1 S1 2 Setting for pull up pull down resistor Need to set the switch to ON when wired controller as a primary controller S1 3 Setting for terminal resistor Be sure to set the position of ...

Page 5: ...in heating mode above which the unit will start automatically 5 35 and not higher than parameter code 20 20 SET BACK start temperature in cooling mode above which the unit will start automatically 5 35 and not lower than parameter code 19 21 Set back function 0 Not permitted 1 Permitted Default 0 22 Interval of set back power off 1 10min 2 20min 3 30min Custom setting parameter code Function code ...

Page 6: ...ust the highest heating temp value Press button to confirm the setting or wait for 30s save the setting and exit How to quit button to exit without settings Press the During OFF conditions press the or until icon appears then press SET SE button until heating mode appears icon and temp values will flicker on the display T 1 1 2 3 Setting method button for 3s to enter parameter setting During OFF c...

Page 7: ...rful mode Down Button Used to lower the set temperature It lowers the values when setting Press it for more than 3s to enter mute mode Timer Button Press this button lightly to set sleep mode Press it for more than 3s to set time or simple timer Function Button Press this button lightly to set special functions purifier set back Press it for more than 3s to set special functions revise ambient tem...

Page 8: ...the or button to enter the temperature setting state Each time or button is pressed temperature setting increases decreases by 1 1 Temperature setting range COOLING HEATING DRY AUTO HCWA21NEHH 16 30 61 86 HCWA22NEHH 20 28 68 82 4 FAN ONLY Unavailable for setting Heating mode is invalid for cooling only air conditioners 1 2 The default setting range depends on the indoor unit 3 Setting range can be...

Page 9: ...will change in the following sequence by default Function setting How to active Press and hold button for 3s with the working unit to activate the super mode and the icon AUTO If you operate the Super mode under COOLING DRY and FAN ONLY modes the unit will automatically go into forced cooling mode with lowest set temperature or go into forced heating mode with highest set temperature under the hea...

Page 10: ... by authorized personnel according to custom setting part in installation manual Set back function only can be set during the ON conditions or OFF conditions with timer set Set back function will also be cancelled if switch to ON OFF set fan speed temperature mode sleep Set back function Set back function is an operation that allows you to record your favorite set temperature and air flow rate The...

Page 11: ...o select the desired Days of week press button to set next item Set Hour Minute by the same method as setting DAYS OF WEEK 3Press s utton to save setting or wait for 30s without operation to quit and without being saved 1 2 3 How to activate 1 During OFF condition press and ho button for 3s until icon and clock setting are flickering 2Press button to adjust the timer hou 3 Each time button is pres...

Page 12: ...IMER ON MINUTE TIMEROFF HOUR TIMER OFF MINUTE DAY SELECT TIMER OFF set TIMER day select 2 3 4 5 6 When Timer on hour flickers press add button or minus button to select the desired time Each time button is pressed time increases decresases 1 After timer ON hour has been set press button to return to timer ON minute setting If you don t need timer OFF Setting press button to cancel After TIMER ON O...

Page 13: ...s temperature sensor fitted in remote instead of machine Advice to use IFEEL mode and put the remote controller where the indoor unit receive signal easily SLEEP Used to set or cancel Sleep Mode operation SWING Used to stop or start vertical adjustment louver swinging and set the desired left right airflow direction DIMMER When you press this button all the display of indoor unit will be closed Pr...

Page 14: ...remote controller will operate the air conditioner at a distance of up to 7m when pointing at signal receptor of indoor unit Note Use 2 LR03 AAA 1 5volt batteries Do not use rechargeable batteries Replace batteries with new ones of the same type when the display becomes dim CAUTIONS For appropriate signal transmission between remote controller and indoor unit keep the signal receiver away from the...

Page 15: ...e discharged until temperature of indoor heat exchanger rises Wait 3 minutes before restarting the appliance 16 30 61 F 86 F Range of available set temperature HEATING COOLING DRY 7 deg C unable to set FAN ONLY Operation modes Note s and hold button and Press and hold button together will alternate the temperature display between the and F scale Note Heating mode is NOT available for cooling only ...

Page 16: ...e How to cancel the SMART mode Press the Result Indoor fan speed alternates among Auto High Medium and Low each time this button is pressed Press it once the horizontal adjustment louver vertical adjustment louver swings to change vertical airflow direction horizontal airflow direction Press it again swings stop button The SMART mode will be cancelled PRESS PRESS QUIET mode In this mode and will b...

Page 17: ...ginal mode Escape from SUPER mode Cancel PRESS PRESS 1 OPTION LIST Timer mode It is convenient to set the timer on with TIMER button when you go out in the morning to achieve a comfortable room temperature at the time you get home You can also set timer off at night to enjoy a good sleep button Press the Once to increase or decrease the time setting by 1 minute One and a half seconds to increase o...

Page 18: ...celled Press the Result How to cancel TIMER ON 3 4 PRESS PRESS 1 OPTION LIST IFEEL mode The temperature sensor built in remote controller is activated It can sense its surrounding temperature and transmit the signal back to the unit the unit can adjust the temperature so as to provide maximum comfort How to set IFEEL mode Note The default setting is IFEEL inactiving Press the How to cancel IFEEL m...

Page 19: ...ase or decrease the time by 1 hour PRESS PRESS PRESS 1 OPTION LIST SLEEP mode can be set in COOLING HEATING or DRYING mode This function gives you a more comfortable environment for sleep The appliance will stop operation automatically after operating for 8 hours Fan speed is automatically set at low speed SLEEP mode button is pressed How to set SLEEP mode Each time Result SLEEP function will be s...

Page 20: ...g it close to the fluorescent lamp The figures in this manual are based on the external view of a standard model Consequently the shape may differ for the air conditioner you have selected Operation 5 Max permission distance up to 8m Indoor Unit IR Receiver Wireless Remote Controller Virtual Line between Transmitter and Receiver Sending commands from controller The operation commands are sent by p...

Page 21: ...er supply circuit 4 Check and set remote controller again 5 Change batteries The compressor starts or stops frequently The airinlet and outlet have been blocked Remove obstacles Poor cooling heating 1 The outdoor heat exchanger is dirty such as condenser 2 There are heating devices indoors 3 The airtightness is not enough and people come in and out too frequently 4 Block of outdoor heate xchanger ...

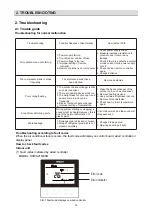
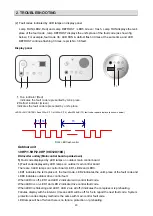
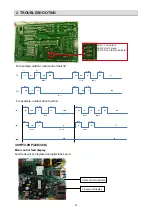
Page 22: ... 2 1 Fault code displayed by LED lamps on outdoor main control board There are 3 LED lamps on control board LED1 LED2 and LED3 LED1 indicates the ten s place of the fault code LED2 indicates the unit s place of the fault code and LED3 indicates outdoor drive control fault When LED3 is off LED1 and LED 2 indicate main control fault code When LED3 is on LED1 and LED 2 indicate drive control fault co...

Page 23: ...trol fault 32 For example outdoor drive fault 32 LED1 Ten s place LED2 Unit s place LED3 Drive failure indicator 7 Segment Display Outdoor Control Board 3 0HP 4 0HP 24K 36K Main control fault display Fault code will be displayed on digital tube board ...

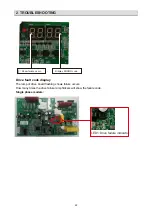
Page 24: ...failure indicator Drive fault code display The lamp of drive board flashing shows failure occurs How many times the drive failure lamp flickers will show the failure code Single phase models 22 Show failure occur Display ERROR code ...

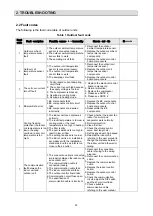
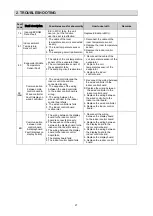
Page 25: ...ard components 3 Reassemble the EE components 5 Cooling freezing protection the indoor coil temperature is too low or heating overload indoor coil temperature is too high 1 The indoor unit can not blow air normally 2 The room temperature is too low in cooling mode or the room temperature is too high in heating 3 The filter is dirty 4 The duct resistance is too high to result in low air flow 5 The ...

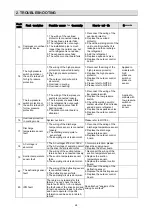
Page 26: ...e switch 2 Replace the low pressure switch 3 Check the welding point to confirm whether the unit leaks and add some refrigerant 4 Replace the expansion valve 5 Replace the outdoor control board Applied to models with low pressure switch or pressure sensor 16 Overload protection in cooling mode System overload Please refer to NOTE 3 17 Discharge temperature sensor fault 1 The wiring of the discharg...

Page 27: ...otor 3 Replace the upper DC fan motor 4 Replace the driver board of the fan motor 5 Check the outdoor fan and ensure the outdoor fan can run normally 49 The outdoor DC fan motor fault down fan motor 1 2 The connecting wiring of the down DC fan motor is loose The cord of the down DC fan motor fails 3 The down DC fan motor fails 4 The drive circuit of the down DC fan motor fails 5 The outdoor fan ha...

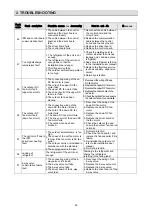
Page 28: ... the outdoor control board to the terminal fails 4 The indoor control board fails 5 The outdoor control board fails 1 Reconnect the connection cable referring to the indoor and outdoor wiring diagram 2 Reconnect the communication cable referring to the indoor and outdoor wiring diagram 3 Replace the communication cable referring to the indoor and outdoor wiring diagram 4 Replace the indoor control...

Page 29: ...connected loosely 2 The sequence of the wiring between the wired controller to the indoor control board is wrong 3 The wiring between the wired controller to the indoor control board fails 4 The wired controller is fails 5 The indoor control board is abnormal 1 2 Reconnect the wiring between the wired controller to the indoor control board Replace the wiring between the wired controller to the ind...

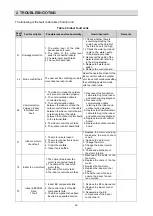
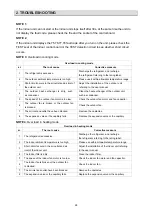
Page 30: ... such as condenser 5 The speed of the outdoor fan motor is too low Check the outdoor fan motor and fan capacitor 6 The outdoor fan is broken or the outdoor fan is blocked Check the outdoor fan 7 The air inlet and outlet have been blocked Remove the obstacles 8 The expansion valve or the capillary fails Replace the expansion valve or the capillary NOTE 4 Over load in heating mode Overload in heatin...

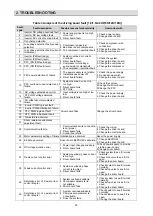
Page 31: ...etected failure 15 AD offset abnormal detected failure Driver board fails Change the driver board 16 Inverter PWM logic set fault 17 Inverter PWM initialization failure 18 PFC_PWM logic set fault 19 PFC_PWM initialization fault 20 Temperature abnormal 21 Shunt resistance unbalance adjustment fault 22 Communication failure 1 Communication wire connection is not proper 2 Driver board fails 3 Control...

Page 32: ...supply 2 Change the driver board 8 DC voltage overload voltage 1 Supply voltage input is too high 2 Driver board fault 1 Check the power supply 2 Change the driver board 9 AC voltage imbalance Driver board fails Change the driver board 10 The PFC current detection circuit fault before compressor is ON Bad driver board components Change the driver board 11 AC voltage supply in outrange 1 Power supp...

Page 33: ...18 Driver board read EE data error 1 EEPROM has no data or data error 2 EEPROM circuit fault 1 Change EEPROM component 2 Change the driver board 19 PFC chip receive data fault Abnormal communication loop Change the drive board 20 PFC soft start abnormally Abnormal PFC drive loop Change the drive board 21 The compressor drive chip could not receive data from PFC chip Communication loop fault Change...

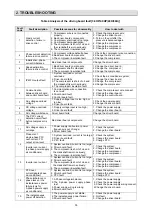
Page 34: ...quency control to keep appropriate temperature of the indoor unit coil 114 To prevent the indoor unit from being frozen or high temperature reduce the frequency Frequency control to keep appropriate temperature of the indoor unit coil 119 When DSH exceeds the target value the valve opening gets wider to adjust the flow Control on expansion valve based on DSH 120 When DSH exceeds the target value t...

Page 35: ...he low side Recharge refrigerant after air purging with the vacuum pump Is the low pressure normal over again Air remains at the refrigerant system yes The system needs refrigerant The service people must add refrigerant Does the low pressure rise NO Recharge refrigerant yes The refrigerant system is blocked Please check the Capillary Tube or electronic expansion valve Is it blocked Unsolder the c...

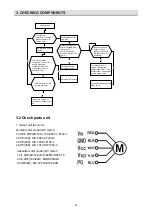
Page 36: ...sure is close to static pressure 4 way valve collude or compressor exhaust every ebb yes Check heat exchanger and 4 way valve NO The capillary tube is blocked Unsolder the capillary tube ASS Y The capillary tube1 and capillary tube2 is blown by N2 NO Remove the back panel see the capillary tube1 and capillary tube2 Is it defrosting yes NO 3 2 Check parts unit 1 Indoor unit fan motor Ducted motor m...

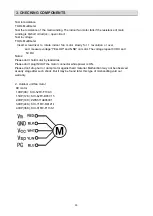
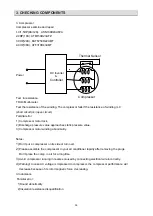
Page 37: ...YELLOW and GND on motor The voltage repeat 0V DC and 5V DC Notes Please don t hold motor by lead wires Please don t plug IN OUT the motor connector while power is ON Please don t drop hurl or dump motor against hard material Malfunction may not be observed at early stage after such shock But it may be found later this type of mishandling void our warranty 2 Outdoor unit fan motor DC motor 1 0HP 9K...

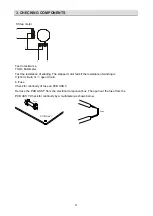
Page 38: ...ck 2 Discharge pressure value approaches static pressure value 3 Compressor motor winding abnormality Notes 1 Don t put a compressor on its side or turn over 2 Please assemble the compressor in your air conditioner rapidly after removing the plugs Don t place the comp in air for a long time 3 Avoid compressor running in reverse caused by connecting electrical wire incorrectly 4 Warning In case AC ...

Page 39: ... The stepper motor fails if the resistance of winding is 0 short circuit or open circuit 6 Fuse Check for continuity of fuse on PCB ASS Y Remove the PCB ASS Y from the electrical component box Then pull out the fuse from the PCB ASS Y Check for continuity by a multimeter as shown below Fuse PCB Ass Y Fuse 37 ...

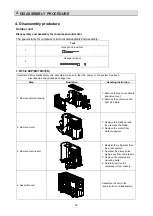
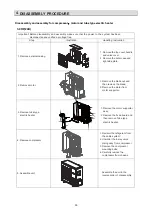
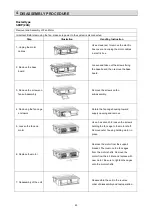
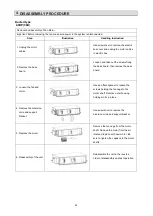
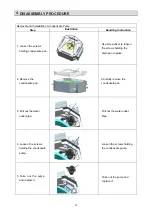
Page 40: ...ve external casing 1 Remove the top cover handle and valve cover 2 Remove the outer case and right side plate 2 Remove motor 1 Remove the blade nut and then remove the blade 2 Remove the motor from motor supporter 3 Remove compressor 1 Reclaim the refrigerant from the entire system 2 Unsolder the 4 way valve piping assy from compressor 3 Remove the compressor mounting bolts 4 Carefully remove the ...

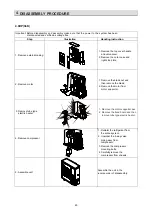
Page 41: ...ut and then remove the blade 2 Remove the motor from motor supporter 4 Remov 3 Remove tube type electric heater 1 Remove the motor supporter assy 2 Remove the fixed board and then remove Tube type electric heater e compressor 1 Reclaim the refrigerant from the entire system 2 Unsolder the 4 way valve piping assy from compressor 3 Remove the compressor mounting bolts 4 Carefully remove the compress...

Page 42: ... 2 Remove motor 1 Remove the blade nut and then remove the blade 2 Remove the motor from motor supporter 4 Remove compressor 1 Reclaim the refrigerant from the entire system 2 Unsolder the 4 way valve piping assy from compressor 3 Remove the compressor mounting bolts 4 Carefully remove the compressor from chassis 5 Assemble unit Assemble the unit in the reverse order of disassembly 40 3 Remove tub...

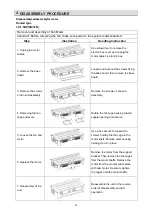
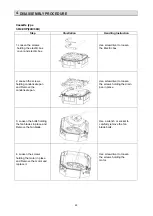
Page 43: ... board 3 Remove the screws on fan sub assembly Remove the screws on fan sub assembly 4 Removing the fan cage enclosure Rotate the fan cage housing toward supply opening and remove 5 Loosen the fan and motor Use a hex wrench to loosen the screws holding the fan cage to the motor shaft Remove outer housing holding motor in place 6 Replace the motor Remove the motor from the support bracket Then remo...

Page 44: ...e the screws on fan sub assembly 4 Removing the fan cage enclosure Rotate the fan cage housing toward supply opening and remove 5 Loosen the fan crosshead and motor Use a hex wrench to loosen the screws holding the fan cage to the motor shaft and the screws holding the crosshead to the motor shaft Remove outer housing holding motor in place 6 Replace the motor Remove the motor from the support bra...

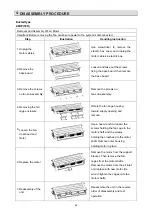
Page 45: ... screws on fan sub assembly Remove the screws on fan sub assembly 4 Removing the fan cage enclosure Rotate the fan cage housing toward supply opening and remove 5 Loosen the fan and motor Use a hex wrench to loosen the screws holding the fan cage to the motor shaft Remove outer housing holding motor in place 6 Replace the motor Remove the motor from the support bracket Then remove the fan cages fr...

Page 46: ...version circle and support bracket 5 Replace the motor 6 Reassembly of the unit Loosen and take out the screws fixing the base board then remove the base board Use an offset spanner to loosen the screws holding the fan cage to the motor shaft Remove outer housing holding motor in place Use screwdriver to remove the diversion circle and support bracket Remove the fan cage from the motor shaft Remov...

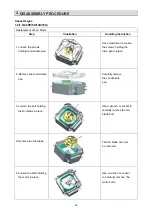
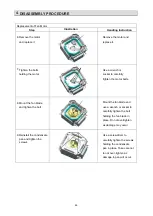
Page 47: ...o loosen the screws holding the drain pan in place 2 Remove the condensate pan Carefully remove the condensate pan 3 Loosen the bolt holding the fan blade in place Use a wrench or socket to carefully remove the fan blade bolt 4 Remove the fan blade The fan blade can now be removed 5 Loosen the bolts holding the motor in place Use a wrench or socket to carefully remove the motor bolts 45 ...

Page 48: ...fully tighten the motor bolts 8 Mount the fan blade and tighten the bolt Mount the fan blade and use a wrench or socket to carefully tighten the bolt holding the fan blade in place Do not overtighten as damage may occur 9 Reinstall the condensate pan and tighten the screws Use a screwdriver to carefully tighten the screws holding the condensate pan in place Take care not to not over tighten as dam...

Page 49: ...screwdriver to loosen the screws holding the drain pan in place 2 Remove the condensate pan Carefully remove the condensate pan 3 Pull out the water outlet pipe Pull out the water outlet Pipe 4 Loosen the screws holding the condensate pump Loosen the screws holding the condensate pump 5 Take out the pump and replace it Take out the pump and replace it 47 ...

Page 50: ... pan and Remove the condensate pan Use screwdriver to loosen the screws holding the drain pan in place 3 Loosen the bolts holding the fan blades in place and Remove the fan blade Use a wrench or socket to carefully remove the fan blade bolts 4 Loosen the screws holding the motor in place and Remove the motor and replace it Use screwdriver to loosen the screws holding the motor Cassette type 3 0 4 ...

Page 51: ... unit Compressor and outdoor fan running rules Once the compressor starts up it will follow the below rules When indoor room temp T1 is lower than Ts the compressor and outdoor fan will shut off When T1 is higher than Ts 1 the compressor and outdoor fan will start up Outdoor fan running rules Once the outdoor fan start up it will follow the below rules Single outdoor fan First it will run in an in...

Page 52: ... as high medium low and auto The auto fan T1 is indoor room temperature Ts is setting temperature DC Inverter outdoor unit Outdoor fan running rules Once the outdoor fan start up it will follow the below rules Single outdoor fan First it will run in an invariable speed for a short time Then it will regulate the speed by the indoor coil temperature Double outdoor fan If it has two outdoor fans the ...

Page 53: ...fan of the relevant mode The louver operates same as in relevant mode If the compressor keeps stopping for 10 minutes or the setting temperature is modified the machine will choose mode according to ΔT again 5 5 Evaporator Low temperature Protection DC Inverter AC will enter T2 protection if any of the following condition is satisfied Condition Cooling mode When the indoor coil temp T2 keeps lower...

Page 54: ... and outdoor fan will restart up Condition2 Heating mode When the indoor coil temp T3 keeps higher than T2 for 10 seconds the compressor and outdoor fan will shut off When T3 is lower than T1 the compressor and outdoor fan will restart up T3 TE10 Off On TE11 5 6 Condenser High temperature Protection DC Inverter outdoor unit AC will enter T3 protection if any of the following conditions is satisfie...

Page 55: ...bject to change without notice in order that Hitachi Johnson Controls Air Conditioning Inc may bring the latest innovations to their customers 2021 Johnson Controls Air Conditioning Inc Hitachi Hitachi Johnson Controls Air Conditioning Inc ...

Reviews: