4.
Review the settings for
UDeadband
(based on percentage of nominal bus voltage) and
calculate the upper (U2) and lower (U1) voltage regulation limits for which a tap change
command will be issued from the master transformer in the group.
5.
Review the expected time for first (
t1
) and subsequent (
t2
) tap change commands from the
master transformer in the local HMI under
Main menu/Settings /IED Settings/Control /
TransformerVoltageControl(90, U↕)/TR1ATCC(90, U↕):x/TR8ATCC(90, U↕||):x /Time/t1 and
t2
6.
Apply a voltage 1% below U1 and wait for the issue of a raise command from the voltage
control after the expiry of a constant or inverse time delay set by
t1
. Detection of this command
will involve locating the allocated binary output for a raise command in the Signal Matrix in
PCM600 and monitoring a positive from this output. Confirm the timing of this command
correlates with the setting
t1
.
7.
After the issue of the raise command, confirm that all follower transformers in the group change
tap in accordance with the command issued from the master transformer.
8.
Inject a voltage U
B
for the master transformer that is 1% above the upper deadband limit U2
and wait for the issue of a lower command from the voltage control after the expiry of a
constant or inverse time delay set by
t2
.
9.
Confirm that all follower transformers in the group change tap in accordance with this
command.
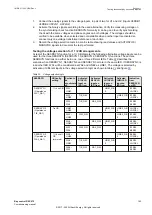
Circulating current voltage regulation
SEMOD175185-775 v8
This instruction for confirmation of circulating current voltage regulation assumes two transformers in
the parallel group. Setting confirmation through secondary injection requires calculation of circulating
currents for each transformer based on impedance values and respective compensating factors, and
is therefore more complex for greater than two transformers.
1.
Confirm that
OperationPAR
is set to
CC
for the transformers in the parallel group.
2.
For parallel operation, it is also recommended that settings be confirmed for parallel group
membership, governed by setting
TnRXOP
in the local HMI under
Main menu/Settings /IED
Settings/Control /TransformerVoltageControl(90, U↕)/TR8ATCC(90, U↕||):x/ParCtrl
The general parallel arrangement of transformers are defined by setting
TnRXOP
to
On
or
Off
.
The following rules are applicable on the settings
T1RXOP
-
T4RXOP
.
If IED
T1
and
T2
are connected,
•
T1RXOP
shall be set to
On
in instance 2 of TR8ATCC, and
•
T2RXOP
shall be set to
On
in instance 1 of TR8ATCC.
If
T1
-
T3
are available,
•
T1RXOP
and
T2RXOP
shall be set to
On
in instance 3 of TR8ATCC,
•
T2RXOP
and
T3RXOP
shall be set to
On
in instance 1 of TR8ATCC and so on.
The parameter corresponding to the own IED
must not
be set.
T1RXOP
should
thus
not
be set in IED
T1
,
T2RXOPnot
in IED
T2
and so on.
3.
Review the settings for
UDeadband
(based on percentage of nominal bus voltage) and
calculate the upper (U2) and lower (U1) voltage regulation limits for which a tap change
command will be issued from the master transformer in the group.
4.
Review the expected time for first (
t1
) and subsequent (
t2
) tap change commands from the
master transformer in the local HMI under
Main menu/Settings /IED Settings/
TransformerVoltageControl(90, U↕) /TR1ATCC(90, U↕):x/TR8ATCC(90, U↕||):x /Time/t1 and
t2
5.
Inject a voltage U
B
equal to
USet
for each transformer.
6.
Inject a load current for Transformer 1 that is equal to rated load current
I2Base
and a load
current for Transformer 2 that is equal to 95% of rated load current
I2Base
. This will have the
effect of producing a calculated circulating current that flows from HV to LV side for Transformer
1 and LV to HV side for Transformer 2.
7.
Confirm that a circulating current is measured on the local HMI that is equal in magnitude to 5%
of
I2Base
, with polarity as discussed in step
1MRK 511 403-UEN Rev. L
Section 11
Testing functionality by secondary injection
Bay control REC670
175
Commissioning manual
© 2017 - 2022 Hitachi Energy. All rights reserved
Summary of Contents for REC670
Page 1: ...Relion 670 SERIES Bay control REC670 Version 2 2 IEC Commissioning manual ...
Page 2: ......
Page 28: ...22 ...
Page 54: ...48 ...
Page 60: ...54 ...
Page 66: ...60 ...
Page 90: ...84 ...
Page 212: ...206 ...
Page 218: ...212 ...
Page 232: ...226 ...
Page 240: ...234 ...
Page 241: ...235 ...

