4.4
Energizing the IED
4.4.1
Checking the IED operation
M11726-2 v9
Check all connections to external circuitry to ensure correct installation, before energizing the IED
and carrying out the commissioning procedures.
Energize the power supply of the IED to start it up. Keep the DC power supply on until the Root
menu or the selected default screen is shown on the HMI before interrupting the DC power supply
again. The energization could be done in a number of ways, from energizing a whole cubicle with
many IEDs to energizing each single IED one by one.
If HW (i.e. I/O and/or communication boards etc.) have been changed (i.e. removed, replaced, or
added), the user should re-configure the IED by navigating in the local HMI menu to:
Main menu/
Configuration /Reconfigure HW modules
to activate the changed hardware modules in order to
enable the self-supervision function to detect possible hardware errors.
Check also the self-supervision function in
Main menu/Diagnostics/IED status/General
menu in
local HMI to verify that the IED operates properly.
Set the IED time if no time synchronization source is configured.
To ensure that the IED is according to the delivery and ordering specifications documents delivered
together with each IED, the user should also after start-up use the built in HMI to check the IED's:
•
Software version,
Main menu /Diagnostics/IED status /Product identifiers
.
•
Serial number,
Main menu /Diagnostics/IED status /Product identifiers
.
•
Installed modules and their ordering number,
Main menu/Diagnostics /IED status/Installed
HW
.
Instead of the LHMI the Remote IED Access tool, RIA600, can be used and perform
all of the actions that a physical LHMI can.
Information about LHMI working procedures is also valid when the operation is
performed through RIA600. For more information on RIA600 operations, see manual
Remote HMI client RIA600
user guide (1MRK 511 619-UEN).
4.4.2
IED start-up sequence
M11727-3 v13
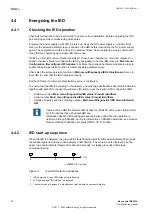
When the IED is energized, the green LED starts flashing instantly. After approximately 55 seconds
the window lights up and the window displays ‘IED Startup’. The main menu is displayed and the
upper row should indicate ‘Ready’ after about 90 seconds. A steady green light indicates a
successful startup.
xx04000310-1-en.vsd
t (s)
0
t1
t2
1
3
2
IEC04000310 V2 EN-US
Figure 2:
Typical IED start-up sequence
1 IED energized. Green LED instantly starts flashing
2 LCD lights up and "IED startup" is displayed
3 The main menu is displayed. A steady green light indicates a successful startup.
Section 4
1MRK 511 403-UEN Rev. L
Starting up
40
Bay control REC670
Commissioning manual
© 2017 - 2022 Hitachi Energy. All rights reserved
Summary of Contents for REC670
Page 1: ...Relion 670 SERIES Bay control REC670 Version 2 2 IEC Commissioning manual ...
Page 2: ......
Page 28: ...22 ...
Page 54: ...48 ...
Page 60: ...54 ...
Page 66: ...60 ...
Page 90: ...84 ...
Page 212: ...206 ...
Page 218: ...212 ...
Page 232: ...226 ...
Page 240: ...234 ...
Page 241: ...235 ...

