Servicing
Service Manual
250
RHUE-(3~6)A(V)HN
SMGB0066 rev.0 - 12/2009
9.1.13. removing reversing valve
Remove the service cover and the rear service panel
1.
according to the section “Removing Service Cover”
and the section “Removing lower part of service panel
and rear service panel”in this chapter.
Collect the refrigerant from the check joint according to
2.
the section “Removing compressor”.
Remove the reversing valve coil according to the
3.
section “Removing reversing valve coil”.
Remove one (1) fixing screw for the valve-mounting
4.
plate.
Remove the stop valve at the gas side from the valve-
5.
mounting plate by removing the two (2) screws.
Remove the reversing valve assemblies from the 4
6.
brazed parts where it is fixed. Remove the brazing of
the reversing valve and the stop valve at the gas using
a blowtorch. Cool down the piping side covering it with
wet cloth, in order to avoid brazing material entering
the reversing valve. Protect the connecting wires and
pipe insulation from the brazing frame.
Remove the reversing valves from its assemblies 4
7.
brazed parts
.
Cover by wet cloth
Reversing valve
9.1.14. removing expansion valves
Remove the service cover and rear service panel
1.
according to the section “Removing Service Cover”
and the section “Removing Lower Part of Service
Panel and Rear Service Panel”.
Collect the refrigerant from the check joint according to
2.
the section “Removing Compressor”.
Remove the coils according to the section “Removing
3.
Electronic Expansion Valve Coil”.
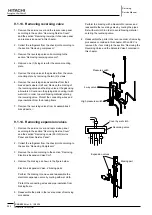
Remove the brazing as shown in the figure below.
4.
Electronic Expansion Valve: 2 brazing parts.
Perform the brazing to remove and reassemble the
electronic expansion valve by cooling with wet cloth.
Protect the connecting wires and pipe insulation from
brazing flame.
Reassemble the parts in the reverse order of removing
5.
procedures.
Expansion valves
Brazing part
Perform the brazing with a blowtorchto remove and
reassemble the reversing valve by cooling the pipes
first with wet cloth in order to avoid brazing material
entering the reversing valve.
Reassemble the parts in the reverse order of removing
8.
procedures contained in this chapter. When SFV is
removed, fix it according to the section “Removing the
Reversing Valve and the Solenoid Valve”contained in
this chapter.
4 way valve
Pressure switch
High pressure switch


