Water pipe
installation
Service Manual
40
Accessories hydraulic installation
SMGB0066 rev.0 - 12/2009
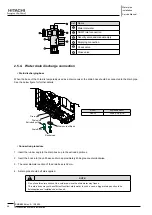
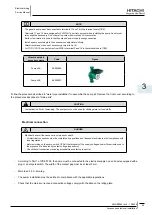
Remove service cover 1 (item 1) and service cover 2 (item 2).
-
Unscrew the nut of the plate heat exchanger assembly (item 3) and the nut of the water pipe 2 assembly (item 6) in
-
order to disassemble water pipe1 (item 5) from the Yutaki unit.
Separate the packings (item 4) to make possible to remove the water pipe1 (item 5).
-
Put the packings and connect the water pump (item 7) to the Yutaki unit and screw again the nut of the plate heat
-
exchanger assembly (item 3) and the nut of the water pipe 2 assembly (item 6).
Connect the pump wiring from the electrical box to the pump according to the detail.
-
Assemble the service cover 2 (item 2) and service cover 1 (item 1) to finish the installation.
-
Installation out of the yutaki unit
¡
Additionally, when the pump is installed out of the Yutaki unit, the installation must be in accordance with the following
guidelines:
The pump must be installed in an easily accesible place to facilitate inspection and replacement.
-
Assemble the pump such that water can not drip into the pump motor or terminal box.
-
Carry out stress- free installation with the pump motor shift in horizontal plane (see installation position in the next
-
figure):
The motor terminal box must not point downwards (see admissible installation position in previous figure). It may be
-
necessary to turn the motor hoosing round after loosening the hexagon socket screws.
2.5.2. WEH- Water Electric Heater
Hydraulic circuit
¡
General notes
When Piping connections are performed:
Connect all pipes as close as possible to the unit, so that disconnection can be easily performed when required.
1.
It is recommended to use flexible joints for the piping of water inlet and outlet, so vibration will not be transmitted.
2.
Whenever possible, sluice valves should be installed for water piping, in order to minimise flow resistance and to
3.
maintain sufficient water flow.
It is recommended to apply ball valves in both water pipe connections to make easier any maintenance work.
4.
Proper inspection should be performed to check for leaking parts inside and outside the system, by completely
5.
opening the hot water inlet and outlet valves to the water condenser.
This WEH must be fully air purged to avoid heating elements radiating the tank case without water.
6.
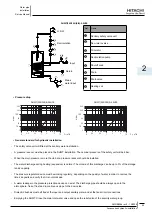
Install WEH as shows on the following drawing in order to allow a natural purge on the WEH (inlet pipe in the bottom
side, and outlet pipe in the upper side, both vertically oriented).
It is recommended to install an air purge after outlet piping in the highest position of the hydraulic installation.
Previous recommendation is a must when there are other parts of hydraulic system that could be installed in a higher
position than WEH.
Apply thermal insulation on the hydraulic system pipes in order to avoid accidental injure due to excessive heat on
7.
piping surfaces and also to avoid heat losses.
When the unit is stopped during shutdown periods and the ambient temperature is very low, it is possible that the
8.
water in the pipes and in the circulating pump freeze, thus damaging the pipes and the water pump.


