background image


5-10 

5.1.

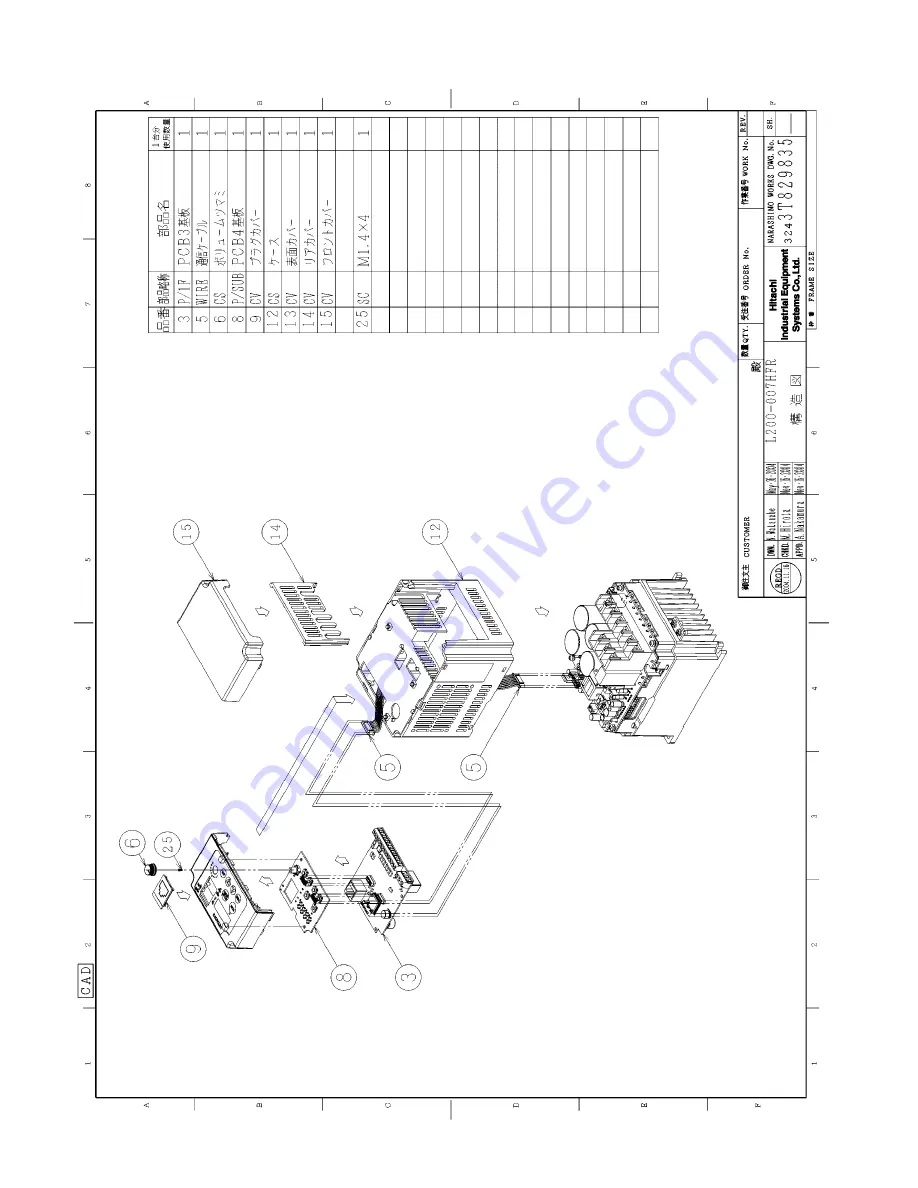
構造図

(10/11) 

Summary of Contents for SJ200 Series

Page 1: ... at hand for future reference ADJUSTMENT AND MAINTENANCE Model European Version SJ200 L200 002NFE F to SJ200 L200 022NFE F SJ200 L200 004HFE F to SJ200 L200 075HFE F US Version SJ200 L200 002NFU to SJ200 L200 022NFU SJ200 L200 037LFU to SJ200 L200 075LFU SJ200 L200 004HFU to SJ200 L200 075HFU ...

Page 2: ...e front cover can be removed without any instruments When you remove the front cover you can set the mode switch and set wire at the control terminal the main terminal and the intelligent relay output terminal control terminal A TM1C intelligent relay output terminal main terminal control terminal B TM2C main terminal intelligent relay output terminal upper cover control terminal A TM1C control te...

Page 3: ...ode switch and set wire at the control terminal the main terminal and the intelligent relay output terminal SJ200 055 075LFR SJ200 055 075HFR volume digital operator front cover cooling fin case rear cover top cover control terminal A control terminal B main terminal intelligent relay output terminal housing ...

Page 4: ...or operator and RS 485 knobofpotentiometer Note Theknobcanbetaken POWERlight ALARMlight RUNlight inputlogicswitch turningswitchRS 485 Operator turningswitchoffrequencysourceand runcommandsource control terminalA intelligentrelayoutput control terminalB terminal main terminal ...

Page 5: ... intelligent relay output terminal main terminal control terminal main terminal intelligent relay output terminal upper cover rear cover L200 002 007LFR front cover top cover cooling fin housing volume digital operator ground connector cover front cover rear cover cooling fin housing top cover volume digital operator ground L200 015 037LFR L200 004 037HFR connector cover Note The upper cover is fo...

Page 6: ...an set the mode switch and set wire at the control terminal the main terminal and the intelligent relay output terminal L200 055 075LFR L200 055 075HFR volume digital operator front cover cooling fin case rear cover top cover main terminal control terminal intelligent relay output terminal housing ...

Page 7: ...cover communication connector control terminal intelligent relay output terminal input logic switch turning switch RS 485 Operator turning switch frequency source run command source main terminal Items inside frontcover mode switch L200 002 007LFR type L200 002 007LFR type L200 002 007LFR type ...

Page 8: ... circuit It has a microcomputer which does calculation of the intelligent input output communication task and so on Core PCB PCB1 This part is a power circuit It has a translator This part is a core circuit It has a microcomputer which manages INV main function IGBT DM IGBT DM is a transistor unit for outputting to the motor It depends on the capacity and the voltage class whether IGBT or DM is us...

Page 9: ...odel number legend below Power Input Rating frequency voltage phase current Inverter model number Motor capacity for this model Output Rating Frequency voltage current Manufacturing codes Lot number date etc Specifications label SJ200 037 H F E Restricted distribution E Europe U USA R Japan Input voltage N single or three phase 200V class H three phase 400V class L three phase only 200V class Appl...

Page 10: ...t sink performance The mounting holes are pre drilled in the heat sink for your convenience Smaller models have two mounting holes while larger ones have four Be sure to use all the mounting holes provided Two chassis GND screws are located on the metal tab on the heat sink at the bottom of the inverter Never touch the heat sink during or just after operation it can be very hot The electronics hou...

Page 11: ... The clear plastic RJ45 modular interconnect makes the connection between the inverter and the keypad It is easily removed to allow you to plug a communications cable into the modular connector Installing the Keypad Follow these steps 1 Remember to install the RJ45 modular interconnect Otherwise there will be no connection to the keypad 2 Set the bottom edge of the keypad into the inverter keypad ...

Page 12: ...n to reveal the tabs The two locking tabs are the ones which you will need to press to remove the cover The two hinging tabs will allow the cover to tilt open once the unlocking tabs are released The figure below shows the procedure for removing the housing cover While pressing inward on the housing it is helpful to wiggle the cover side to side in order to release the locking tabs DO NOT force th...

Page 13: ...over with the notch on each edge of the inverter chassis Then lower the cover into position 2 Slide the cover toward the keypad keeping it flush against the inverter chassis Continue until the cover latches into place The notch on frame case The notch on front housing cover Note The example inverter in the diagrams is model L200 004LFU The cover removal or installation method is the same for the o...

Page 14: ...the main power to the inverter is OFF So never directly touch any terminal or circuit component The logic input connector top connector can be removed by pulling gently upward as shown below left DO NOT force the connector as damage to the circuit board may occur Try gently shifting the connector side to side while pulling if having difficulty The analog input output and logic output connector bot...

Page 15: ...ower wiring to the left separate from signal level logic or analog wiring to the right Remove the housing partition and as shown as set it aside in a secure place while wiring Never operate the inverter drive with the parti tion removed or the front housing cover removed The power input and motor 3 phase wiring connect to the lower row of terminals The upper row of power terminals connect to optio...

Page 16: ...odBus Appendix B B 4 OPE 485 DIP Switch SR SK OPE 485 PRG TM The difference between OPE S and OPE Smini is the short circuit inside the connector If you set 485 side OPE S SRW says communication error But OPE Smini works properly ...

Page 17: ...e many functions and parameters that can be configured by the user We recommend that you record all parameters that have been edited in order to help in troubleshooting or recovery from a loss of parameter data Main Profile Parameters This information is printed on the specification label located on the right side of the inverter SJ200 Inverter model MFG No F Group Parameters Default Setting User ...

Page 18: ...e end frequency 0 0 0 0 A013 O L input active range start voltage 0 0 0 0 A014 O L input active range end voltage 100 100 A015 O L input start frequency enable 01 01 A016 External frequency filter time constant 2 8 A020 Multi speed 0 setting 0 0 0 0 A220 Multi speed 0 setting 2nd motor 0 0 0 0 A021 Multi speed 1 setting 0 0 0 0 A022 Multi speed 2 setting 0 0 0 0 A023 Multi speed 3 setting 0 0 0 0 ...

Page 19: ... 02 A244 V f characteristic curve selection 2nd motor 02 02 A045 V f gain setting 100 100 A046 iSLV voltage compensation gain 100 100 A246 iSLV voltage compensation gain 2nd motor 100 100 A047 iSLV slip compensation gain 100 100 A247 iSLV slip compensation gain 2nd motor 100 100 A051 DC braking enable 00 00 A052 DC braking frequency setting 0 5 0 5 A053 DC braking wait time 0 0 0 0 A054 DC braking...

Page 20: ...00 A078 PID output limit 0 0 0 0 A081 AVR function select 00 00 A082 AVR voltage select 230 400 230 460 A092 Acceleration 2 time settin 15 00 15 00 A292 Acceleration 2 time setting 2nd motor 15 00 15 00 A093 Deceleration 2 time setting 15 00 15 00 A293 Deceleration 2 time setting 2nd motor 15 00 15 00 A094 Select method to switch to Acc2 Dec2 profile 00 00 A294 Select method to switch to Acc2 Dec2...

Page 21: ...OI L input active range end frequency 0 0 0 0 A103 OI L input active range start current 0 0 0 0 A104 OI L input active range end current 100 100 A105 OI L input start frequency enable 01 01 A141 A input select for calculate function 02 02 A142 B input select for calculate function 03 03 A143 Calculation symbol 00 00 A145 ADD frequency 0 0 0 0 A146 ADD direction select 00 00 A Group Parameters Def...

Page 22: ... for each inverter B212 Level of electronic thermal setting 2nd motor Rated current for each inverter Rated current for each inverter B013 Electronic thermal characteristic 01 01 B213 Electronic thermal characteristic 2nd motor 01 01 B021 Overload restriction operation mode 01 01 B022 Overload restriction setting Rated current x 1 5 Rated current x 1 5 B023 Deceleration rate at overload restrictio...

Page 23: ...tio 0 0 0 0 B091 Stop mode selection 00 00 B092 Cooling fan control 00 00 B095 Dynamic braking control 00 00 B096 Dynamic braking activation level 360 720 360 720 B130 Over voltage LADSTOP enable 00 00 B140 Over current trip suppression 00 00 B150 Carrier mode 00 00 B Group Parameters Default Setting User Setting Func Code Name FEF EU FU USA ...

Page 24: ... C016 Terminal 6 active state 00 00 C021 Terminal 11 function 01 01 C022 Terminal 12 function 00 00 C026 Alarm relay terminal function 05 05 C028 AM signal selection 00 00 C031 Terminal 11 active state 00 00 C032 Terminal 12 active state 00 00 C036 Alarm relay active state 01 01 C041 Overload level setting Inverter rated current Inverter rated current C042 Frequency arrival setting for acceleratio...

Page 25: ...86 AM terminal offset tuning 0 0 0 0 C091 Debug mode enable 00 00 C101 Up Down memory mode selection 00 00 C102 Reset selection 00 00 C141 Input A select for logic output 00 00 C142 Input B select for logic output 01 01 C143 Logic function select 00 00 C144 Terminal 11 ON delay 0 0 0 0 C145 Terminal 11 OFF delay 0 0 0 0 C146 Terminal 12 ON delay 0 0 0 0 C147 Terminal 12 OFF delay 0 0 0 0 C148 Outp...

Page 26: ...y 2nd setting Specified by the inverter capacity Specified by the inverter capacity H004 Motor poles setting 4 4 H204 Motor poles setting 2nd motor 4 4 H006 Motor stabilization constant 100 100 H206 Motor stabilization constant 2nd motor 100 100 H007 Motor voltage select Specified by the inverter voltage Specified by the inverter voltage H207 Motor voltage select 2nd motor Specified by the inverte...

Page 27: ...here is a danger of electric shock and or injury to personnel WARNING Never remove connectors by pulling on its wire leads wires for cooling fan and logic P C board Otherwise there is a danger of fire due to wire breakage and or injury to personnel General Precautions and Notes Always keep the unit clean so that dust or other foreign matter does not enter the inverter Take special care in regard t...

Page 28: ... for C001 C006 are correct Turn ON Run Command enable Supply 24V to FW or RV terminal if configured Has the frequency setting for F001 been set greater than zero Are the control circuit terminals H O and L connected to the potentiometer Set the parameter for F001 to a safe non zero value If the potentiometer is the frequency setting source verify voltage at O 0V Is the RS reset function or FRS fre...

Page 29: ...expected output frequency Verify the V f settings match motor specifications Make sure all scaling such as A011 to A014 is properly set Inverter data is not correct No downloads have occurred Was power turned OFF after a parameter edit but before pressing the Store key Edit the data and press the Store key once Edits to data are permanently stored at power down Was the time from power OFF to power...

Page 30: ...urrent event while at constant speed The inverter output was short circuited or the motor shaft is locked or has a heavy load These conditions cause excessive current for the inverter so the inverter output is turned OFF The dual voltage motor is wired incorrectly E 02 Over current event during deceleration E 03 Over current event during acceleration E 04 Over current event during other conditions...

Page 31: ... 1 5 Input over voltage When the input voltage is higher than the specified value it is detected 100 seconds after powerup and the inverter trips and turns OFF its output E 2 1 Inverter thermal trip When the inverter internal temperature is above the threshold the thermal sensor in the inverter module detects the excessive temperature of the power devices and trips turning the inverter output OFF ...

Page 32: ...En 2 Each error shifts D081 D082 to D082 D083 and writes the new error to D081 The following Monitor Menu map shows how to access the error codes When fault s exist you can review their details by first selecting the proper function D081 is the most recent and D083 is the oldest 2 1 Error Code FUNC Output frequency at trip point Motor current at trip point DC bus voltage at trip point No error Yes...

Page 33: ...code setting To change the country code press or to set to store 6 Press the key Country code for initialization selected 7 Press the key Initialization function selected 8 Press the key 00 initialization disabled clear trip history only 9 Press the key 01 initialization enabled 10 Press the key Initialization now enabled to restore all defaults 11 Press and hold the and keys Do not release yet Fi...

Page 34: ...85 both must be the same 7 Set INV kW Code C196 the wrong value once intentionally and store then set the right value After that start initialization with b084 C081 C082 O L adjustment at factory not C81 not C82 JPN version is 1 byte definition Core up to 3388 or before IO up to 3433 or before EU USA version is 2 byte definition from the beginning Core 3440 or after IO 3441 or after When initializ...

Page 35: ... data changed check C194 OC trip E23 E30 E14 Disconnect motor wire and check output voltage Power Off display Core ISPM failure not repairable E09 with motor maybe thyristor off please check waveform of DC bus voltage E12 EXT check C01 C06 EXT 12 E35 PTC check C06 SJ200 C05 L200 PTC 19 check C85 value E05 Over Load OC trip L200 is prematured check b32 value Cooling FAN doesn t work check b92 INV d...

Page 36: ...7 0000 9999 Monitors the version of the IO program 1 7 Peak voltage monitor d109 0 0 999 9 Monitors the peak P N voltage 0 1 V V Function mode No Function name Code Run Mode Edit Range Description Res defa ult unit 8 Debug mode enable C091 OK 00 disable 01 enable Debug mode select 00 9 Debug mode data set C092 OK 0000 FFFF Hexadecimal display Do not set 1200 10 Debug mode data monitor C093 OK 0000...

Page 37: ...inverter terminals L1 L2 L3 200V class 200 to 240V 50 60 Hz 400V class 380 to 460V 50 60 Hz Main circuit Ground Insulation Adequate resistance Digital volt meter GND to terminals 5 Meg Ohms or greater Mounting No loose screws Torque wrench M3 0 5 0 6 Nm M4 0 98 1 3 Nm M5 1 5 2 0 Nm Components Overheating Thermal trip events No trip events Housing Dirt dust Visual Vacuum dust and dirt Terminal bloc...

Page 38: ...es will be disconnected from the inverter 4 Use a bare wire and short terminals R S T RB PD 1 PD N U V and W together as shown in the diagram 5 Connect the megger to the inverter Earth GND and to the shorted power terminals as shown Then perform the megger test at 500 VDC and verify 5MΩ or greater resis tance 6 After completing the test disconnect the megger from the inverter 7 Reconnect the origi...

Page 39: ...e graph below demon strates Be sure to keep the ambient temperature at acceptable levels and perform maintenance inspections on the fan heat sink and other components If the inverter is installed on a cabinet the ambient temperature is the temperature inside the cabinet Part description Symbol Quantity Notes Used Spare Cooling fan FAN 1 1 015NF 022NF 030LF 015HF to 075HF Case CV 1 1 Front case Key...

Page 40: ...nusoid Parameter Circuit location of measurement Measuring instrument Notes Reference Value Supply voltage E1 ER across L1 and L2 ES across L2 and L3 ET across L3 and L1 Moving coil type voltmeter or rectifier type voltmeter Fundamental wave effective value Commercial supply voltage 200V class 200 240V 50 60 Hz 400V class 380 460V 50 60 Hz Supply current I1 Ir L1 Is L2 It L3 Total effective value ...

Page 41: ... page The voltage to be measured is the funda mental wave effective voltage The power to be measured is the total effective power E1 W1 I1 I1 I1 I1 EU V EU V EU V W01 W02 E1 I1 I1 I1 I1 EU V EU V EU V W01 W02 W01 W02 E1 E1 I2 I3 Single phase Measurement Diagram Three phase Measurement Diagram L1 N L1 N U V W T1 T2 T3 Inverter Motor T1 T2 T3 U V W R S T Inverter Motor L1 L2 L3 ...

Page 42: ...e misleading results So we highly recommend using the following circuits to measure voltage for performing the equipment inspections HIGH VOLTAGE Be careful not to touch wiring or connector terminals when working with the inverters and taking measurements Be sure to place the measurement circuitry components above in an insulated housing before using them 220 kΩ 2W 220 kΩ 2W Voltage measurement wi...

Page 43: ...lmost infinite resistance Ω Almost zero resistance 0 Ω NOTE The resistance values for the diodes or the transistors will not be exactly the same but they will be close If you find a significance difference a problem may exist NOTE Before measuring the voltage between and with the DC current range confirm that the smoothing capacitor is discharged fully then execute the tests Part DVM Measured Valu...

Page 44: ... remove the housing cover first and then replace the new fan Please refer to section 4 6 about the way to remove the housing cover Please make sure of the specification label to discriminate whether it s primary released product or not REV NO A primary released products REV NO not A not primary secondly released products 1 Insert the minus screw driver etc to the insert point and remove the upper ...

Page 45: ...s 0 4kW 3 7kW Scale small 1 Remove the monitor cover front cover and rear cover When removing the monitor cover please remove the communication cable from the front cover side 2 Insert the minus screw driver between the cooling fin and the housing and unlock the tabs 4 points at the left and right side 3 Remove the housing housi ng moni tor cover front cover rear cover tab1 tab2 tab3 tab4 ...

Page 46: ...move the monitor cover front cover and rear cover When removing the monitor cover please remove the communication cable from the front cover side 2 Remove the RB bar housi ng moni tor cover front cover rear cover RB bar ...

Page 47: ...3 Insert the minus screw driver between the cooling fin and the housing and unlock the tabs 4 points at the left and right side 4 Remove the housing tab1 tab2 tab3 tab4 ...

Page 48: ...nitor cover front cover and rear cover When removing the monitor cover please remove the communication cable from the front cover side Remove the two bolts and P PD short bar monitor cover front cover rear cover bolts P PD short bar ...

Page 49: ...4 15 Remove the housing housing ...

Page 50: ...5 1 PCB1 PCB2 OPE PCB3 ISPM regurration without gel gel for insulation and cooling PCB2 is soldered upon PCB1 core circuit ...

Page 51: ...5 2 OPE PCB3 PCB1 PCB2 PCB2 is soldered upon PCB1 core circuit ISPM regurration without gel gel for insulation and cooling ...

Page 52: ...5 3 ISPM regurration without gel gel for insulation and cooling PCB2 is soldered upon PCB1 core circuit PCB1 PCB2 PCB3 OPE ...

Page 53: ...5 4 OPE PCB3 PCB1 PCB2 PCB2 is soldered upon PCB1 core circuit ISPM regurration without gel gel for insulation and cooling ...

Page 54: ...5 5 5 1 構造図 5 11 ...

Page 55: ...5 6 5 1 構造図 6 11 ...

Page 56: ...5 7 5 1 構造図 7 11 ...

Page 57: ...5 8 5 1 構造図 8 11 ...

Page 58: ...5 9 5 1 構造図 9 11 ...

Page 59: ...5 10 5 1 構造図 10 11 ...

Page 60: ...5 11 5 1 構造図 11 11 ...

Page 61: ...SJ200 002 004 005NFEF Slide type ...

Page 62: ...SJ200 007 011NFEF 004 007HFEF Slide type ...

Page 63: ...SJ200 015 022NFEF 015 040HFEF Slide type ...

Page 64: ...SJ200 055 075HFEF Slide type ...

Page 65: ...L200 002 004 005NFEF Slide type ...

Page 66: ...L200 004 007HFEF 007NFEF Slide type ...

Reviews: