English
13
4. When the slider won’t move smoothly
If the slider will not move smoothly, try cleaning the
sliding surfaces of the slider and slider case with an
air gun, etc. (
Fig. 17
).
NOTE
The unit tends to easily become covered with lath or
plaster board dust during jobs where it faces upwards.
Clean the sliding surfaces at regular periods during
the work task.
5. Attaching the sheet
If the sheet has been damaged and cannot be used,
please replace the sheet with attached one. Attach
the sheet by inserting the holes on the sheet on the
two protrusions on the stopper (
Fig. 18
).
6. Using the hook
The hook is used to hang up the power tool to your
waist belt while working.
CAUTION:
䡬
When using the hook, hang up the power tool firmly
not to drop accidentally.
If the power tool is dropped, it may lead to an accident.
䡬
When carrying the power tool with hooked to your
waist belt, do not fit any bit to the tip of power tool. If
the sharp bit such as drill is fitted to the power tool
when carrying it with hooked to your waist belt, you
will be injured.
䡬
Install securely the hook. Unless the hook is securely
installed, it may cause an injury while using.
(1) Removing the hook.
Remove the screws fixing the hook with Philips screw
driver. (
Fig. 19
)
(2) Replacing the hook and tightening the screws.
Install securely the hook in the groove of power tool
and tighten the screws to fix the hook firmly. (
Fig. 20
)
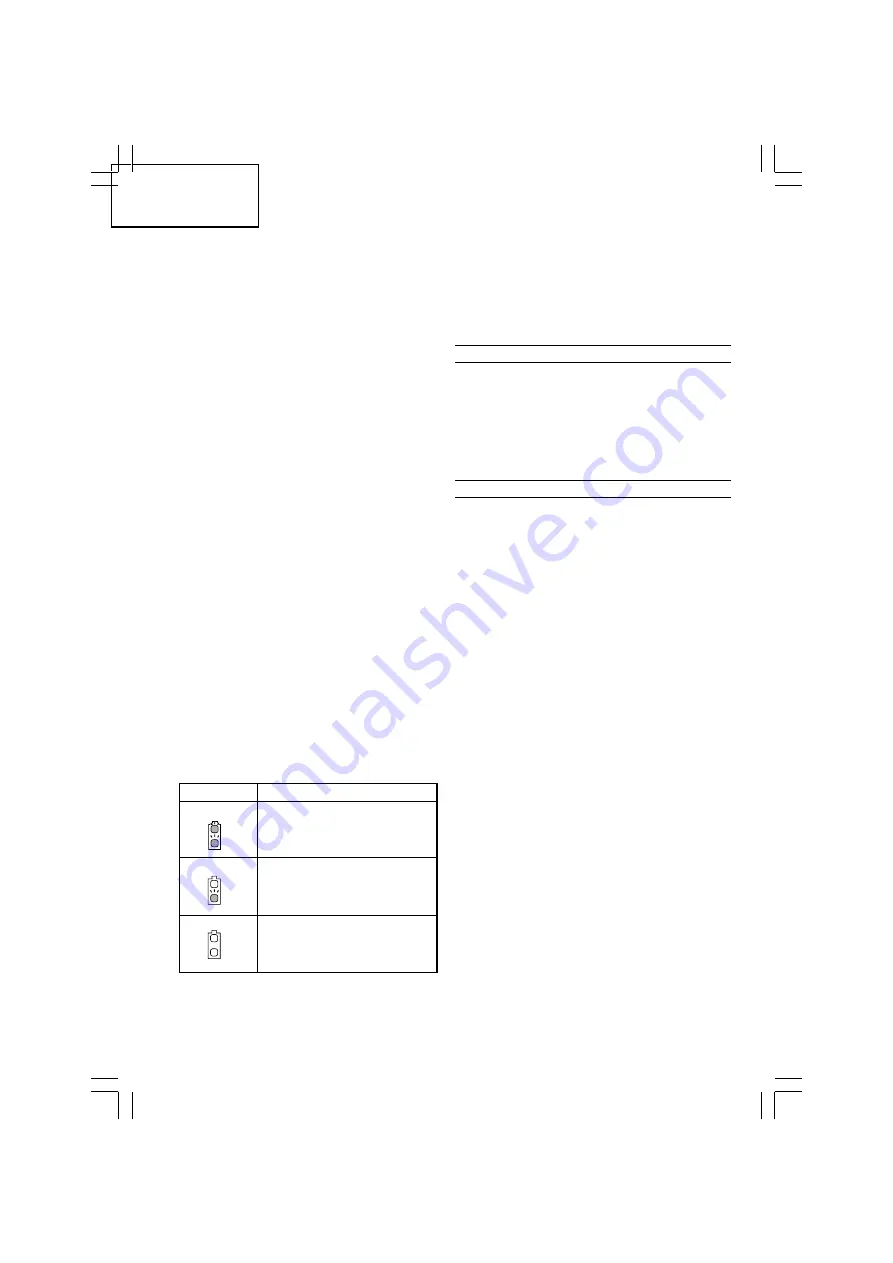
7. About Remaining Battery Indicator
When pressing the remaining battery indicator switch,
the remaining battery indicator lamp lights and the
battery remaining power can be checked. (
Fig.21
)
When releasing your finger from the remaining
battery indicator switch, the remaining battery
indicator lamp goes off. The table 4 shows the state
of remaining battery indicator lamp and the battery
remaining power.
As the remaining battery indicator shows somewhat
differently depending on ambient temperature and
battery characteristics, read it as a reference.
State of lamp Battery Remaining Power
The battery remaining power
is enough.
The battery remaining power
is a half.
The battery remaining power
is nearly empty.
Re-charge the battery soonest
possible.
Table 4
NOTE:
䡬
Do not give a strong shock to the switch panel or
break it.It may lead to a trouble.
䡬
To save the battery power consumption, the
remaining battery indicator lamp lights while pressing
the remaining battery indicator switch.
8. Confirm that the battery is mounted correctly
SCREW HANDLING
NOTE:
Handle both the packed box of screws and the collated
screw strips with care. If you drop them, screws can come
out of the collated tape and cause screw feed malfunctions.
Do not expose the screws to prolonged periods of direct
sunlight or outside air. They can cause rust and collated
tape problems, so when you will not be using the screws
for awhile, put them in the screw packing box or the like.
MAINTENANCE AND INSPECTION
1. Inspecting the driver bit
Using a broken bit or one with a worn out tip is
dangerous because the bit can slip. Replace it by
a new one.
2. Inspecting the mounting screws
Regularly inspect all mounting screws and ensure
that they are properly tightened. Should any of the
screws be loose, retighten them immediately. Failure
to do so could result in serious hazard.
3. Maintenance of the motor
The motor unit winding is the very “heart” of the
power tool.
Exercise due care to ensure the winding does not
become damaged and/or wet with oil or water.
4. Inspecting the carbon brushes (Fig. 22)
The motor employs carbon brushes which are
consumable parts. Since and excessively worn carbon
brush can result in motor trouble, replace the carbon
brush with new ones when it becomes worn to or
near the “wear limit”. In addition, always keep carbon
brushes clean and ensure that they slide freely whthin
the brush holders.
NOTE:
When replacing the carbon brush with a new one, be
sure to use the Hitachi Carbon Brush Code No. 999054.
5. Replacing carbon brushes
Take out the carbon brush by first removing the
brush cap and then hooking the protrusion of the
carbon brush with a flat head screw driver, etc., as
shown in
Fig. 24
.
When installing the carbon brush, choose the direction
so that the nail of the carbon brush agrees with the
contact portion outside the brush tube. Then push it
in with a finger as illustrated in
Fig. 25
. Lastly, install
the brush cap.
CAUTION:
Be absolutely sure to insert the nail of the carbon
brush into the contact portion outside the brush tube.
(You can insert whichever one of the two nails
provided).
Caution must be exercised since any error in this
operation can result in the deformed nail of the carbon
brush and may cause motor trouble at an early stage.
01Eng_WF14DSL_WE.p65
12/18/12, 9:35 AM
13


