-15-
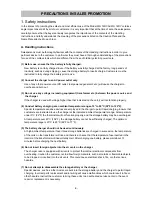
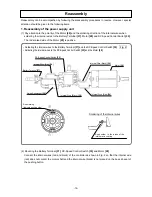
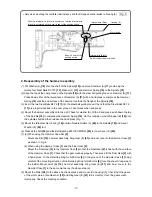
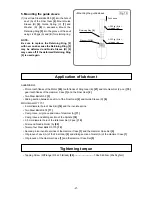
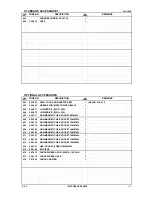
Washer (S)
[15]
J-297 base for washer (S)
Raised face of hammer
Top of spindle cam
Spindle
[18]
Hammer Spring
[14]
Stopper (B)
[16]
Hammer (A)
[11]
Spindle
[18]
Steel Ball D4.76
[17]
Push down.
• Disassembly of the hammer assembly
Fig. 1
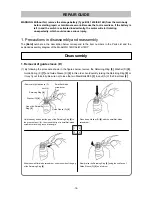
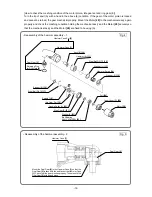
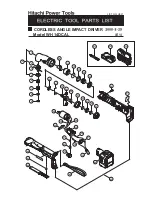
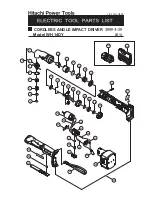
2. Disassembly of housing (A).(B) set
(1) Remove the eight Tapping Screws (W/Flange) D4 x 20 (Black)
[26]
to remove housing (B) from Housing
(A).(B) Set
[45]
.
(2) Remove the Hammer Case Set
[5]
, Inner Cover (D)
[25]
, Ring Gear (E)
[21]
, Anvil (B)
[10]
, hammer ass'y,
Spring (S)
[32]
, Paddle Lever
[42]
, Spring
[41]
and Pushing Button
[30]
. Then remove the assembly of the
Battery Terminal
[37]
, Noise Suppressor
[39]
, DC-Speed Control Switch
[35]
and Motor
[28]
from housing
(A).
3. Disassembly of the power supply unit
(1) Each of the Battery Terminal
[37]
, DC-Speed Control Switch
[35]
and Motor
[28]
removed in an
assembled status in the above step is connected to an internal wire by soldering. Remove the Battery
Terminal
[37]
, DC-Speed Control Switch
[35]
and Motor
[28]
by desoldering respectively.
4. Disassembly of the hammer assembly
(1) Mount the hammer assembly onto the J-297 base for washer (S) (special tool). With a hand press, push
down the top of the Spindle
[18]
to compress the Hammer Spring
[14]
. In this position, remove Stopper (B)
[16]
with a small flat-blade screwdriver then release the hand press.
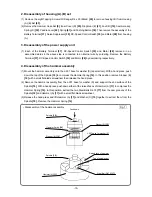
(2) Remove the hammer assembly from the J-297 base for washer (S) and support the end surface of the
Spindle
[18]
. With a hand press, push down either of the raised faces of Hammer (A)
[11]
to compress the
Hammer Spring
[14]
. In this position, extract the two Steel Balls D4.76
[17]
from the cam grooves of the
Spindle
[18]
and Hammer (A)
[11]
with a small flat-blade screwdriver.
(3) Release the hand press and lift Hammer (A)
[11]
and Washer (S)
[15]
together to extract them from the
Spindle
[18]
. Remove the Hammer Spring
[14]
.

