-40-
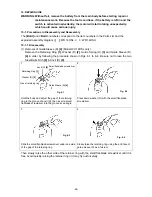
Fig. 23
J-295 jig (A) for retaining ring
Retaining Ring
[1]
Washer (D)
[2]
J-295 jig (B) for retaining ring
Push down.
Put the LED light in the rib of the protector.
Fig. 22
(6) Mounting Guide Sleeve (D)
[4]
(Model WH 14DSL only)
Insert the two Steel Balls D3.5
[8]
into the
hole of Anvil (D)
[9]
. Mount Guide Sleeve
(D)
[4]
, Guide Spring (D)
[3]
and Washer
(D)
[2]
in sequence. Mount the Retaining
Ring
[1]
into the groove of the anvil using
J-295 jigs (A) and (B) for retaining ring
(see Fig. 23).
NOTE:
Be sure to replace the Retaining Ring
[1] with new one because the Retaining
Ring [1] may be deformed and Guide
Sleeve (D) [4] may come off if the
deformed retaining ring is used again.
(7) Mounting Hook (A)
[41] <38>
Insert Hook (A)
[41] <38>
into the groove under the side of housings (A) and (B) and secure
with the M4 Truss Hd. Screw (Black)
[42] <39>
. At this time, do not turn the M4 Truss Hd.
Screw (Black)
[42] <39>
quickly. Otherwise, the Lock Nut M4 (Black)
[43] <40>
may slip off
the housing. Be sure to tighten the M4 Truss Hd. Screw (Black)
[42] <39>
slowly so that the
Lock Nut M4 (Black)
[43] <40>
can be tightened together. Hook (A)
[41] <38>
is attachable on
either side of the main body.
(8) Checking for lighting of the LED light and the remaining battery indicator lamp
Press the light switch on the Controller
[46] <43>
and check whether the LED light lights or
not. The LED light goes off by pressing the light switch again. Next, press the remaining
battery indicator switch and check whether both the remaining battery indicator lamps light or
not. Use a fully charged battery pack for checking. Keep pressing the remaining battery
indicator switch during checking. The remaining battery indicator lamps go off by releasing
your finger from the remaining battery indicator switch.


