background image


INSTALLATION AND OPERATION INSTRUCTIONS 503 EZ FLO INSERT 


This unit must be installed in a fireplace with either a listed type HT (2100

°

F) 

chimney per UL 103 or ULC S629 or a code approved masonry chimney with flue liner.  
The chimney size should not be less than or more than 3 times greater than the cross 
sectional area of the flue. Fireplace must accommodate this insert. No bricks or mortar 
may be removed to make the insert fit. All openings between the masonry of the fireplace 
and the facing masonry must be permanently sealed with mortar.  
  NOTE: For installations in Canada this insert must be installed with a continuous 
chimney liner with a diameter of 6” extending from the fireplace insert to the top of the 
chimney. The liner must conform to the Class 3 requirements of chimney liner standards 
CAN/ULC-S635 or CAN/ULC- S640. 
    

CAUTION:


DO NOT CONNECT THIS UNIT TO A CHIMNEY SERVING 

ANOTHER APPLIANCE.

 Inspection and cleaning are a prerequisite before installing 

your insert.  Your fireplace and chimney system must be free of all soot and creosote.  
Inspect for deterioration of mortar joints and cracked liners for the safety of your unit and 
your home. If chimney is damaged or if local regulations or insurance companies require 
chimney lining for safety, install liner or reline the chimney following all of the  liner 
manufacturer’s instructions. 
 
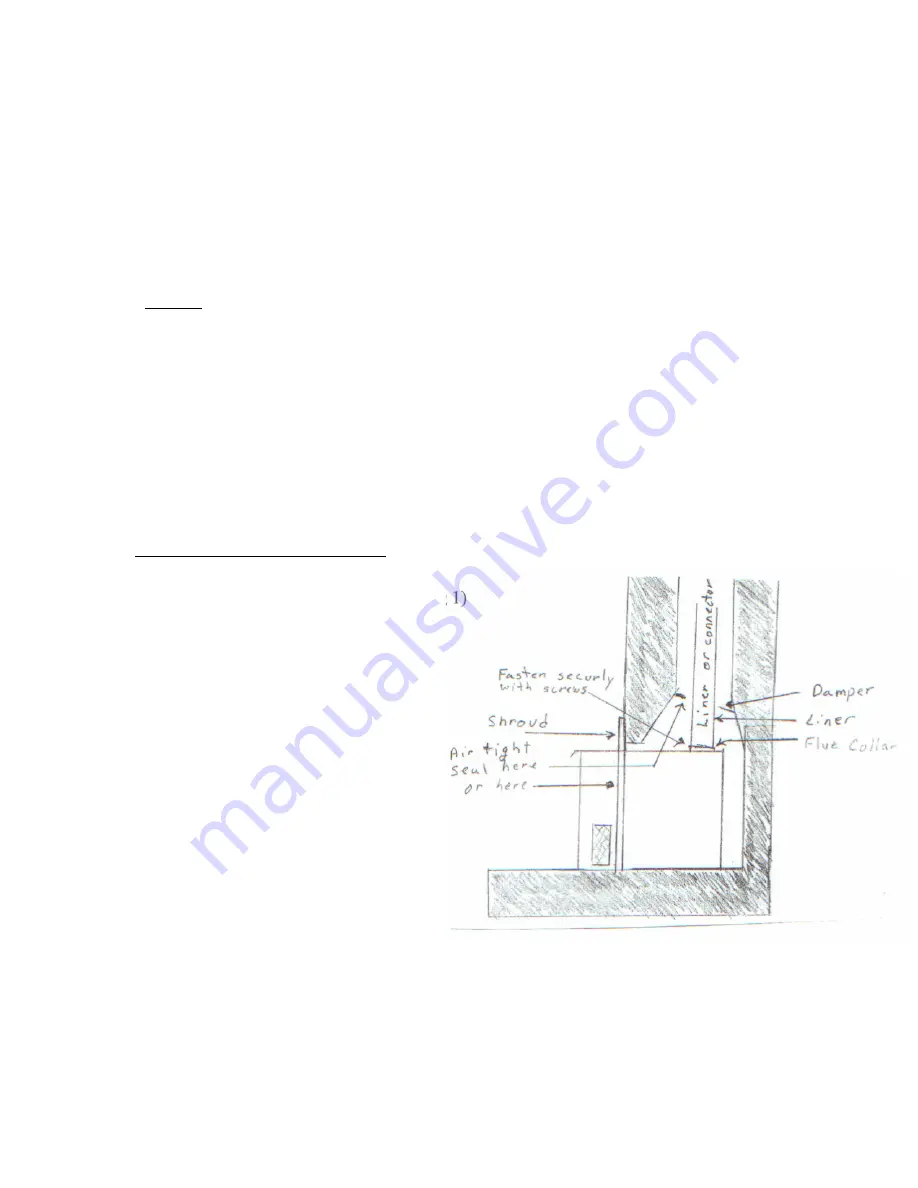
Installation in a masonry fireplace  (see Fig 1) 
   Remove your damper from your                                                                                  
fireplace or block open permanently                                                                                   
to prevent it from accidentally                                                                                     
closing and causing smoke in your                                                                                   
room. A 6 inch chimney connector                                                                                  
must be connected from your insert                                                                                    
up through the damper area to the first                                                                                              
flue liner This connector should be                                                                                                                                                                                                                      
stainless steel chimney liner material.                                                                                                          
Insert this liner in chimney now and                                                                                           
support up in chimney until your                                                                                     
insert is in place. Now position your                                                                               
insert on the hearth 

(Note:  First


you                                                                              

will want to place a thin sheet of metal 
or cardboard on your hearth for


protection from chipping or 
scratching your hearth.)

  With       

your insert positioned on the hearth,  
you are now ready to fasten the                                                           
shroud on the sides of your insert                                       Fig 1                                             
with 2 screws on each side. Determine the depth of the insert in the fireplace and adjust 
the shroud sides accordingly to line the flues up as close as possible. The sides are 
adjustable and should be tightened to the insert at this time.  The shroud should overlap 
the face of the fireplace a minimum of 2 inches.  This is necessary to hold the insulation 
in place and insure a good airtight seal around fireplace. Contact your dealer if a custom 
sized shroud is required. Pull chimney connector down into flue collar of the insert and 

Summary of Contents for 503

Page 1: ...S MAY RESULT IN PROPERTY DAMAGE BODILY INJURY OR EVEN DEATH INSTALLATION OF SMOKE DETECTORS IS ALWAYS A GOOD IDEA CONTACT YOUR LOCAL BUILDING INSPECTOR OR FIRE OFFICIALS ABOUT THE NEED FOR A PERMIT RESTRICTIONS OR INSTALLATION INSPECTION REQUIRED IN YOUR AREA SAVE THESE INSTRUCTIONS FOR FUTURE REFERENCE CAUTION THIS UNIT IS HOT WHEN IN OPERATION DO NOT TOUCH KEEP CHILDREN CLOTHING AND ANY COMBUSTI...

Page 2: ... companies require chimney lining for safety install liner or reline the chimney following all of the liner manufacturer s instructions Installation in a masonry fireplace see Fig 1 Remove your damper from your fireplace or block open permanently to prevent it from accidentally closing and causing smoke in your room A 6 inch chimney connector must be connected from your insert up through the dampe...

Page 3: ...h listed chimney liner meeting type HT requirements 2100 F per UL 1777 US or ULC S635 or ULC S640 CANADA Liner must be securely attached to the chimney top and also the flue collar of the insert Remove your damper from your fireplace or block open permanently to prevent it from accidentally closing and causing smoke in your room Run liner down chimney and support at top of fireplace Now position y...

Page 4: ...board that is protecting your hearth DO NOT CONNECT TO ANY AIR DISTRIBUTION DUCT OR SYSTEM CLEARANCE Proper clearance from combustibles is a must to prevent fires See figure for proper clearances that must be maintained This is a must to prevent fires and damage to your home Listed solid fuel burning fireplace inserts require noncombustible floor protection 16 inches beyond the front and 8 inches ...

Page 5: ...burn and what type of appliance you burn it in Carbon monoxide is produced when burning gas oil wood coal and anything else that burns and any venting problems can cause it to back up into the house Carbon monoxide is extremely dangerous and can result in serious injury or even death Starting your fire with anthracite coal First open the draft slide in the ash door to full open position This is yo...

Page 6: ... out to the full open position Open the ash door and place shaker handle on the end of grate Shake vigorously until you see red coals dropping into the ash pan Caution should be used when burning pea coal as shaking the grates too far can cause the small coal to be dumped into the ash pan thus wasting your coal Remove shaker from grate and attach to other grate Shake until you see red coals again ...

Page 7: ...nspected to see that it is in good working condition Removal of your 503 insert for chimney and insert inspection You may have to remove your insert for cleaning and inspection The first thing you want to do is lift insert slightly and slide cardboard or sheet metal under it to protect your hearth from scratching Begin sliding insert out of fireplace until you can reach the two bolts on either sid...

Page 8: ... want to pad the surface especially if you have the optional gold plated door so as not to scratch the finish Remove and save the glass retainers and screws Carefully remove all broken glass and sealing gasket material Install new glass using new sealing gasket material and reinstall all glass retainers and screws Optional gold plating The gold plating option is real gold Gold is very soft Any abr...

Reviews: