- 8 -
BROOM INSTALLATION & REMOVAL INSTRUCTIONS
INSTALLATION:
1. Place this product on a firm, level surface that is large enough to safely accommodate this product, your power unit and all
workers involved in the mounting process.
2. Enter the power unit.
3. Fasten safety restraints.
4. Start the engine.
5. Disengage the parking brake
6. Align the attachment mechanism with the mounting on the Broom, attach to power unit. Refer to the operator’s manual(s) for
your power unit, loader and quick-attach and follow the mounting instructions contained therein.
7. Engage parking brake and shout down power unit. Be sure to relieve pressure to the auxiliary hydraulic lines.
8. Unfasten safety restraints and exit power unit.
9. Ensure hydraulic quick couplers are clean. Connect hydraulic lines for the Broom to power unit. Twist the collar of the quick
coupler one quarter of a turn in order to secure the hydraulics connections.
10. Connect the 12 volt control box battery cables to either the battery or a suitable positive and negative electrical connection with
a minimum 5 amp capacity. Control box may be attached to loader in a convenient place with the Velcro provided.
11. While the loader arms are lowered, visually inspect the Broom to ensure it is securely mounted.
12. Enter power unit, fasten safety restraints and start the power unit.
13. Carefully raise the loader arms and cycle the tilt cylinders to check clearances and to verify that all mounting procedures have
been successfully completed.
REMOVAL:
Reverse the instructions ABOVE.
Ensure hydraulic hose couplings do not fall in dirt and electrical wires do not become damaged in storage.
BROOM ADJUSTMENTS
Hydraulic Angle
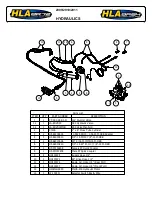
Angle cylinder speed can be controlled with the adjustment screw on the manifold.
To set up:
1. Undo
locknut.
2. Turn screw until it lightly bottoms out.
3. Then back-off approx. one round.
4. Tighten jam nut (refer to page 13).
Brush Pattern
To check pattern:
1. Move Broom to a dusty flat surface.
2. Set power unit’s parking brake and leave the engine running.
3. Start the Broom at a slow speed; then lower it so bristle tips touch the ground. Run the Broom in a stationary position
for 10-30 seconds.
4. Raise the Broom and back away; switch off Broom and engine, remove safety restraints and remove the key. The
brush pattern left in the dust should be 2-4 inches (50-133mm) wide, running the length of the Broom.
5. The castors should just touch the surface, as they are only for leveling purposes.
6. Tighten or loosen springs until optimum pressure is attained.
SAFETY FIRST!! READ AND UNDERSTAND THE SAFETY INSTRUCTIONS
(pages 3-6 of
this manual)
BEFORE BEGINNING ANY BROOM MOUNTING.


