background image


22


M2218


COMPUTER OPERATION 
 
1. 

POWER ON 

Pedaling or press the MODE button. 


2.      SET THE PROGRAM 

 Stop pedaling for four seconds. Press the 

SET 

button and the display will flash one of the following seven program, P0, P1, P2, P3, 

P4, P5, or P6. Press the "▲/ ▼" button to select a program. Press the

 SET

 button when the desired program number appears. You 

are now ready to set the program time. 
 

3.     SEE THE PROGRAM TIME  

1. If you selected the program


“P0”,


the TIME function mode will appear with the display flashing “0:00”. Use "▲/ ▼" buttons to set 

the program time, from 1 minutes up to 99 minutes in 1 minute increments. When desired time is chosen press the

 SET

 button.  

The 

TIME


will count down from preset value. If you set the time at “0:00”, the 

TIME

 will count up from 0:00. 

2. If you selected one of the programs 

“P1-P6”

, the TIME function mode will appear with the display flashing 

“20:00”,

 the minimum 

program  time  value  is 

20:00 

minutes.  Use  the    "▲/  ▼"  buttons  to  set  the  program  time,  from  20  minutes  up  to  99 minutes  in  1 

minute increments. When desired time is displayed

 press the 

SET

 button. The 

TIME 

will count down from preset value. 


4.  

Now you are ready to begin exercising. The program will not start until you start pedaling. 


NOTE:  
6. 

Time example: If the program time is set at 30 minutes, the timer will count down from 30:00 to 00:00. Then, the display will 
flash the program time (30:00) four times and start counting up from 30:oo. The program will be repeated. 

7. 

To stop a running program ,stop pedaling for 4 seconds to switch into 

“STOP”

 mode. In this mode, you can move the pedals 

again to continue to run the current program or, you can press the 

SET

 button to select a new program. The functional values 

of

 DISTANCE

 and 

CALORIE

 will continue to accumulate.   

8. 

When you complete a program, you can stop pedaling an press STE button to select a new program. The functional values of 

DISTANCE 

and 

CALORIE

  will  continue  to  accumulate.  This  will  allow  you  to  run  several  programs  and  still  know  the  total 

DISTANCE 

and

 CALORIE

 during the workout. 

9. 

If you want to restart with a new program, press and hold the 

MODE

 button down for two seconds to reset all of the function 

values to zero. Press 

SET

 button to select a new program. 

10. 

The computer will shut off automatically after 4 minutes of inactivity and all function values, 

DISTANCE

 and 

CALORIE

, will be 

kept. 


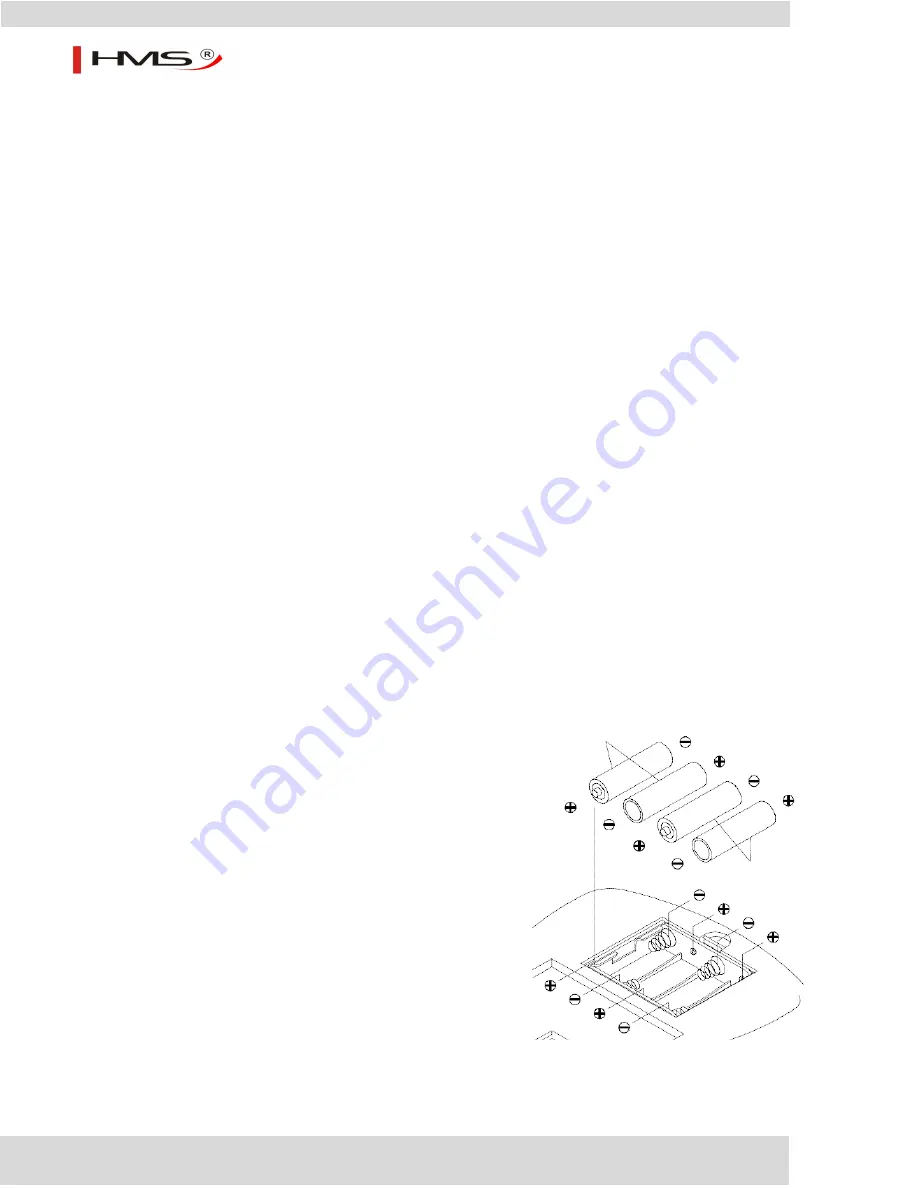
HOW TO INSTALL AND REPLACEBATTERIES: 

1. Open the battery door on the back of the computer. 
2. The computer operates with four AA batteries (four batteries 
  included). Refer to the illustration to install or replace the batteries. 
 

NOTE:


1. Do not mix a new battery with an old battery. 
2. Use the type of battery. Do not mix an alkaline battery with 
  another type of battery.  
3. Rechargeable batteries are not recommended.  


Summary of Contents for M2218

Page 1: ...INSTRUKCJA U YTKOWANIA MANUAL INSTRUCTION N VOD K OBSLUZE ROWER MAGNETYCZNY MAGNETIC BIKE MAGNETICK ROTOPED M2218...

Page 2: ...ie jest ca kowicie sprawne 9 Urz dzenie powinno by regularnie sprawdzane pod wzgl dem zu ycia i uszkodze tylko wtedy b dzie ono spe nia o warunki bezpiecze stwa Szczeg ln uwag nale y zwr ci na uchwyty...

Page 3: ...pek siode ka 1 zestaw 19 23 57 Przedni stabilizator k ka transportowe ruby 1 zestaw 32 22 57 Tylny stabilizator za lepki ruby 1 zestaw 2 3 5 4 6 5 8 Kierownica czujniki pomiaru pulsu wtyczka piankowe...

Page 4: ...z przewodem 1 45 Ko o z o yskiem 1 15 Przew d oporu 1 46 Stalowa tuleja 15x 10x18H 1 16 ruba imbusowa M8x20L 7 47 Wspornik ko a 1 17 Podk adka 12x 8 4x1 5T 11 48 Podk adka 1 18 Podk adka 19x 8 4x1 5T...

Page 5: ...5 M2218 Diagram zbiorczy...

Page 6: ...k 18 dw ch podk adek 17 oraz dw ch za lepek 21 UWAGA Upewnij si e wszystkie ruby s dobrze dokr cone 3 Monta siode ka i s upa siode ka Usu ju zamontowane 3 podk adki 31 oraz 3 nakr tki 30 z siode ka 29...

Page 7: ...owanie z cz ciami i wyci gnij 3 podk adki 18 3 podk adki 17 oraz 3 ruby 16 Przypasuj gniazdo kierownicy 2 do trzech otwor w w g rnej cz ci s upa kierownicy 10 i dokr korzystaj c z trzech podk adek 18...

Page 8: ...do 99 59 minut SPEED PR DKO Wy wietla aktualn pr dko w przedziale od 0 do 999 9 km godz DISTANCE ODLEG O Wy wietla odleg o w przedziale od 0 do 99 99 km UWAGA Na wy wietlaczu pojawi si symbol rowerka...

Page 9: ...u ytkownikowi na dowolne ustawienie obci enie Korzystaj c z przycisk w zwi ksza obci enie oraz zmniejsza obci enie PROGRAMY AUTOMATYCZNE P1 do P6 to programy automatyczne Aktualny poziom obci enia b d...

Page 10: ...o zako czeniu odliczania 4x na wy wietlaczu zab y nie ikonka 30 00 a nast pnie je eli nie zako czysz wiczenia rozpocznie si odliczanie w g r od 30 oo a program zostanie powt rzony 2 Aby zatrzyma aktua...

Page 11: ...rzez 5 10 minut Mo na wykona kilka wicze rozci gaj cych lub peda owa przez kilka minut przy ma ym oporze Sesje treningowe D ugo treningu mo e by okre lona wed ug nast puj cej regu y Trening codzienny...

Page 12: ...bie gospodarowania zu ytymi odpadami elektrycznymi i elektronicznymi dla tego typu sprz tu nale y stosowa oddzielne sposoby utylizacji U ytkownik kt ry zamierza pozby si tego produktu zobowi zany jest...

Page 13: ...i zu ycie takich element w jak linki paski elementy gumowe peda y uchwyty z g bki k ka o yska itp 6 Gwarancja traci wa no w przypadku Up ywu terminu wa no ci samodzielnych napraw nieprzestrzegania za...

Page 14: ...ghtened 9 Always use the equipment as indicated If you find any defective components whilst assembling or checking the equipment or if you hear any unusual noise coming from the equipment while using...

Page 15: ...e sensor plate plug foam grip cap wire 1set 29 30 31 Seat w washers nylon nuts 1 set 10 11 Front post w upper section system cable 1set 7 Monitor w extention system cable four screws 1set NOTE 4 Above...

Page 16: ...Corn 1 44 Nylon nut M8x1 25Px6H 1 14 Bar Sensor w Wire 1 45 Idle Wheel w Bearing 1 15 Resistant Cable 1 46 Steel Sleeve 15x 10x18H 1 16 Allan Head Bolt M8x20L 7 47 Idle Wheel Bracket 1 17 Spring Washe...

Page 17: ...17 M2218 Explode View...

Page 18: ...ve bracket of main frame 24 using two carriage bolts 20 two curve washers 18 two spring washers 17 and two cap nuts 21 NOTE Make sure you fasten the bolts securely to avoid shaking and discomfort when...

Page 19: ...h handlebar Please open hardware blister card and take three curve washer 18 three spring washer 17 and three allen head bolts 16 from it Attach the welded bracket of handlebar 2 with hand pulse senso...

Page 20: ...er hour DISTANCE Displays the distance from zero to 99 99 Kilometer NOTE The LCD will display an image of a bike This bike will travel around the window in a clockwise direction to track the distance...

Page 21: ...ase the load PRESET PROGRAMS P1 to P6 are preset automatic programs The present load level of the selected program will be shown in the LOAN INDICATOR in the LCD display Use the button to increase the...

Page 22: ...will count down from 30 00 to 00 00 Then the display will flash the program time 30 00 four times and start counting up from 30 oo The program will be repeated 7 To stop a running program stop pedalin...

Page 23: ...per unit 1 2 x per week approx 60 min per unit Cool down To introduce an effective cool down of the muscles and the metabolism the intensity should be drastically decreased during the last 5 10 minute...

Page 24: ...lectrical and electronic equipment together with other types of waste In accordance with the WEE directive on waste electrical and electronic equipment separate waste management processes should be ap...

Page 25: ...t pouze v p pad e je za zen dn sestaveno 8 Za zen by m lo b t pravideln kontrolov no z hlediska opot eben a po kozen pouze tehdy budou spln ny bezpe nostn podm nky Zvl tn pozornost je pot eba v novat...

Page 26: ...26 M2218 Mont n n kres...

Page 27: ...ada 2 3 5 4 6 5 8 d tka s idlem pulsu z str kou p novkou koncovkou p evodem 1sada 29 30 31 Sedadlo s podlo kami nylonov mi matkami 1sada 10 11 P edn sloupek s horn m p evodem 1sada 7 Po ta s p evodem...

Page 28: ...dlu 29 p ipevn n 3 ploch podlo ky 31 a t i nylonov matky 30 P ilo te t i otvory sedadla 29 k t em otvor m pro rouby nach zej c se na desti ce horn sti sloupku sedadla 28 a p ipevn te jej pomoc t ploch...

Page 29: ...s koncovkou p evodu vych zej c ho z monitoru 7 Spojen p evody 9 7 vlo te do otvoru desti ky p edn ho sloupku 10 P ipevn te monitor 7 k desti ce p edn ho sloupku 10 pomoc ty roub 12 Zapojte z str ku p...

Page 30: ...30 M2218 N KRES...

Page 31: ...L 3 21 epi kov matka M8 4 52 Magnet 1 22 Koncovka zadn ho stabiliz toru 3 v 1 2 53 Kladka emene 1 23 Koncovka p edn ho stabiliz toru 3 v 1 2 54 Klika 1 24 Hlavn r m 1 55 emen 1 25 Obj mka sloupku seda...

Page 32: ...ento po ta obsahuje 7 r zn ch program P0 a P6 M ete nastavit as program a po ta rozd l tento as na 10 interval Pokud as programu nenastav te pak po ta pou ije p ednastavenou hodnotu 20 minut Stupe zat...

Page 33: ...o minutu Jakmile nastav te po adovan as stiskn te SET as bude odpo t v n od nastaven hodnoty 4 Nyn m ete za t s tr ninkem Program se nespust dokdy neza nete lapat POZN MKA 1 P klad Pokud je as progra...

Page 34: ...n po ta e 2 Po ta pot ebuje 4 AA baterie 4 baterie jsou sou st balen Viz obr zek n e POZN MKA 1 Nepou vejte kombinaci star ch a nov ch bateri 2 Pou vejte jeden typ bateri Nem chejte alkalick baterie s...

Page 35: ...ninku m e b t d na na z klad t chto faktor Ka dodenn tr nink kolem 10 min 2 3 kr t t dn kolem 30 min 1 2 kr t t dn kolem 60 min Odpo inek Spole n s ukon en m tr ninku je pot eba postupn sni ovat z t...

Page 36: ...o za zen spole n s jin mi odpady Spole n se Sm rnic WEE o zp sobu nakl d n s elektrick mi a elektronick mi odpady je pot eba pro tento druh za zen pou vat odd len zp soby jejich likvidace U ivatel kte...

Reviews: