background image


IMPORTANT SAFETY INFORMATION 
 
This  product  has  been  designed  for  home  use  only  and  built  for  optimum  safety.  Please  note  the  following  safety 
precautions: 
 
1. 

Before  starting  any  exercise  program  you  should  consult  your  doctor  to  determine  if  you  have  any  physical  or 
health  conditions  that  could  create  a  risk  to  your  health  and  safety,  or  prevent  you  from  using  the  equipment 
properly. Your doctor's advice is essential if you are taking medication that affects your heart rate, blood pressure 
or  cholesterol  level.  This  is especially  important  for  persons  over the  age of  35,  pregnant women,  or  those with 
pre-existing health problems or balance impairments.  

2. 

Before using this equipment to exercise, always do stretching exercises to properly warm up.  

3. 

Be  aware  of  your  body's  signals.  Incorrect  or  excessive  exercise  can  damage  your  health.  Stop  exercising  if  you 
experience any of the following symptoms: pain, tightness in your chest, irregular heartbeat, extreme shortness of breath, 
feeling light headed, dizzy or nauseous. If you do experience any of these conditions you should consult your doctor before 
continuing with exercise program. Injuries to health may result from incorrect or excessive training.  

4. 

During exercises and after keep children and pets away from the equipment. 

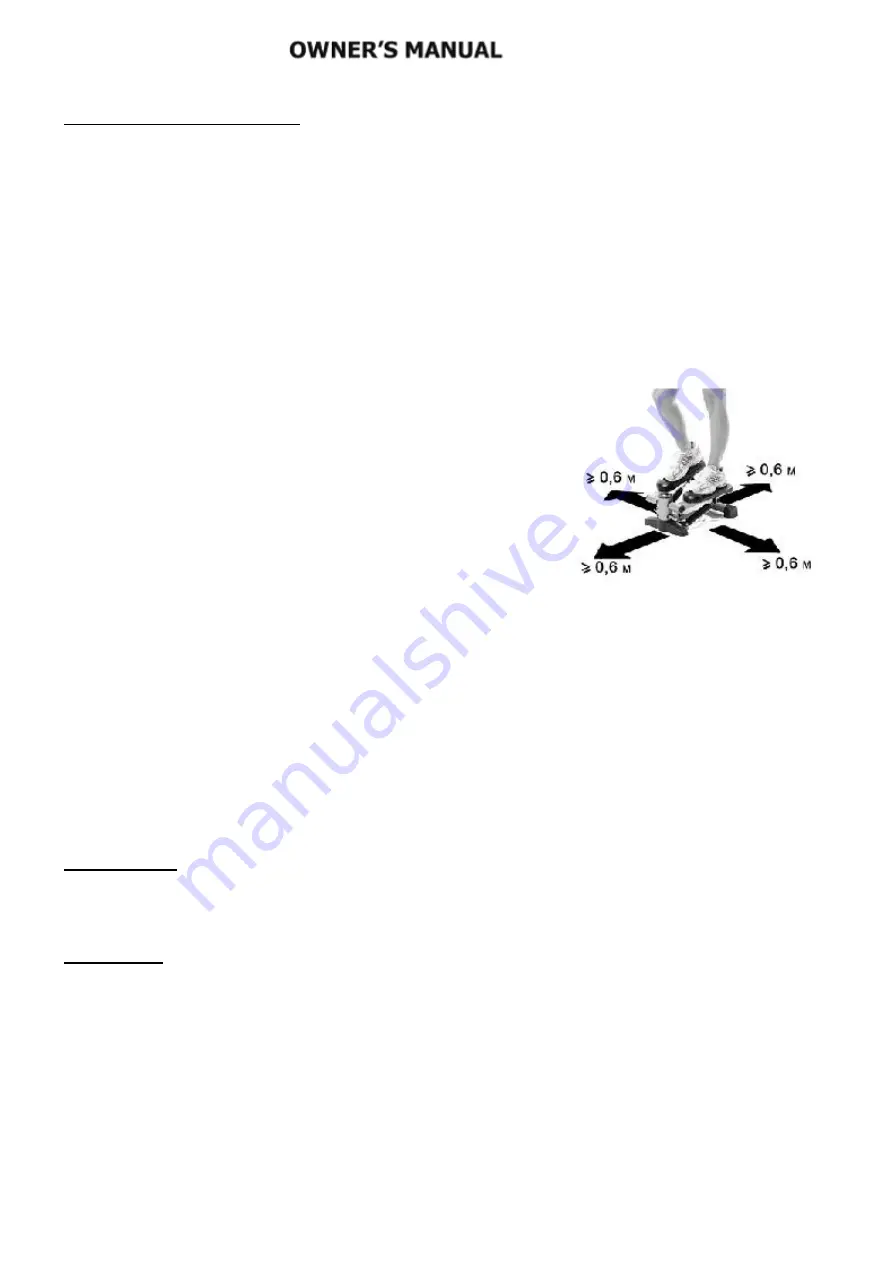
5.  Use the equipment on a stable and levelled surface with a protective cover for your floor or carpet. Move  all sharp  objects. 
6.  Free area shall be not less than 0,6 m greater than the training area in 

the  directions  from  which  the  equipment  is  accessed.  Free  area  must 
also  include  the  area  for  emergency  dismount.  Where  equipment  is 
positioned  adjacent  to  each  other  the  value  of  the  free  area  may  be 
shared.  

7.  Before  each  use,  visually  inspect  the  unit  including  hardware  and 

resistance bends. 

8.  Before using the equipment, check if the nuts, bolts and other bends are 

securely tightened. 

9.  Always  use  the  equipment  as  indicated.  If  you  find  any  defective 

components whilst assembling or checking the equipment, or if you hear 
any unusual noise coming from the equipment while using, stop. Do not 
use the equipment until the problem has been rectified. 

10.  Do not insert any object into any openings. 
11.  Be aware of all regulation and constructions parts which may disturb during exercises. 
12.  The safety level of the equipment can only be maintained if it is regularly examined for damage and/or wear and tear.  
13.  Wear suitable clothing whilst using the equipment. Avoid wearing loose clothing which may get caught in the equipment or 

that may restrict or prevent movement. 

14.  The  equipment  has  been  tested  and  certified  according  to  EN  ISO  20957-1  under  class  H.  It  is  not  suitable  for 

therapeutic use. 

15.  Care must be taken when lifting or moving the equipment so as not to injure your back. Always use proper lifting techniques 

and/or use assistance. 

16.  The equipment is designed for adult use only. Keep unsupervised children away from the equipment.  
17.  Assemble this unit as described in this manual. Use only parts from the set. Check all parts with the part list. 


WARNING:

  READ ALL INSTRUCTIONS BEFORE USING ANY FITNESS EQUIPMENT. WE ASSUME NO RESPONSIBILITY 

FOR PERSONAL INJURY OR PROPERTY DAMAGE CAUSED BY OR THROUGH THE USE OF THIS PRODUCT 


SPECIFICATIONS 

Weight 

– 7,7 kg 

Dimensions - 


42 x 30 x 22 cm 

Maximum  weight of user 

– 100 kg 


MAINTENANCE  

Your  unit  has  been  carefully  designed  to  require  minimum  maintenance.  To  ensure  this,  we  recommend  that  you  do  the 
following: 


Keep your unit clean by wiping sweat, dust or other residue off with a soft, clean cloth after each use 


Always make sure that the bands are secure and show no signs of wear 


Regularly check the tightness of nuts and bolts 


Summary of Contents for S3086

Page 1: ...INSTRUKCJA UŻYTKOWANIA MANUAL INSTRUCTION NÁVOD K OBSLUZE ...

Page 2: ...je śrub Trening można rozpocząć tylko wtedy jeżeli urządzenie jest całkowicie sprawne 9 Urządzenie powinno być regularnie sprawdzane pod względem zużycia i uszkodzeń tylko wtedy będzie ono spełniało warunki bezpieczeństwa Szczególną uwagę należy zwrócić na uchwyty piankowe zaślepki na nogi i tapicerkę które ulegają najszybszemu zużyciu Uszkodzone części należy natychmiast naprawić lub wymienić do ...

Page 3: ...r prosty włóż szpilkę 34 w górny otwór rys 1 2 Stepper skośny włóż szpilkę 34 w dolny otwór rys 2 UWAGA by szpilka bez problemu weszła w otwór pedały muszą być na tym samym poziomie i dokładnie nad tylnym stabilizatorem NO DESCRIPTION QTY NO DESCRIPTION NO 1 Rama główna 1 18 Pierścień 2 2 Zaślepka 4 19 Nakładka L 1 3 Podkładka 1 20 Podkładka 2 4 Śruba 2 21 Zaślepka 2 5 Dolna rama 1 22 Śruba sześci...

Page 4: ...Jest to wartość przybliżona PRZYCISK FUNKCYJNY Służy do wybory funkcji CZAS LICZNIK KROKÓW LICZBA POWTÓRZEŃ MINUTĘ LICZNIK KALORII Aby zresetować wybraną funkcję przytrzymaj przycisk przez 4 sekundy BATERIA Do poprawnego funkcjonowania monitora potrzebna jest sprawna bateria R03 ZAKRES ZASTOSOWANIA Stepper jest urządzeniem przeznaczonym do ćwiczeń ogólnorozwojowych w warunkach domowych Stepper 2w1...

Page 5: ...rony opuść obie ręce do pozycji wyjściowej Powtórz ćwiczenie Krok 1 Stań z tyłu stepera Połóż lewą stopę na środku pedału i naciśnij w dół aż do oporu Krok 2 Umieść prawą stopę na środku prawego pedału Krok 3 Zacznij wykonywać powolne kroki aż przyzwyczaisz się do ruchów pedałów stepera Aby dostosować opór pedałów odkręć gałkę i przesuń do nowej pozycji następnie dokręć Uwaga Celem ćwiczenia jest ...

Page 6: ... o czas niezbędny do jej sprowadzenia jednak nie dłużej niż o 40 dni 5 Gwarancją nie są objęte Uszkodzenia mechaniczne i wywołane nimi wady uszkodzenia i wady wynikłe wskutek niewłaściwego z przeznaczeniem użytkowania i przechowywania niewłaściwy montaż i konserwacja uszkodzenia i zużycie takich elementów jak linki paski elementy gumowe pedały uchwyty z gąbki kółka łożyska itp 6 Gwarancja traci wa...

Page 7: ... unit including hardware and resistance bends 8 Before using the equipment check if the nuts bolts and other bends are securely tightened 9 Always use the equipment as indicated If you find any defective components whilst assembling or checking the equipment or if you hear any unusual noise coming from the equipment while using stop Do not use the equipment until the problem has been rectified 10 ...

Page 8: ...nto the lower hole See the picture 2 NOTE to insert the pin without any problems the pedals have to be on the same level and closely above the rear stabilizer NO DESCRIPTION QTY NO DESCRIPTION NO 1 Main frame 1 18 Snap Ring 2 2 End cap 4 19 Plastic washer L 1 3 Steel plate 1 20 Flat washer 2 4 Cross Screw 2 21 Plastic cover 2 5 Lower front tube 1 22 inner hexagon screw M8x20 2 6 Shaft sleeve 3 23 ...

Page 9: ...hat each workout period starts with a warm up We suggest you do the following exercise as the sketch map Each exercise at least about 30 seconds 2 Getting on the lateral thigh trainer Important to help establish correct balance and proper form while exercising on the lateral thigh trainer we highly recommend that first time users place the unit between a doorway or position a high back chair in fr...

Page 10: ...ns your legs While stepping position keep your hands near your shoulders Every time your right or left foot step down against the pedal extend both hands over your head toward the ceiling without locking out your elbows Next as you press the opposite foot against the pedal slowly lower your arms back to their starting position and repeat ALTERNATE BICEP CURLS Carefully step onto the stepper Grip t...

Page 11: ... částí a šroubů které je spojují Trénink je možné započít pouze v případě že je zařízení řádně sestaveno 9 Zařízení by mělo být pravidelně kontrolováno z hlediska opotřebení a poškození pouze tehdy budou splněny bezpečnostní podmínky Zvláštní pozornost je potřeba věnovat potahu a pěnovkám které podléhají opotřebení nejrychleji Poškozené části je potřeba co nejrychleji opravit nebo vyměnit do té do...

Page 12: ...viz obr 1 2 Twist cvičení vložte pojistný kolík 34 do dolního otvoru viz obr 2 POZNÁMKA pro bezproblémové vsunutí kolíku zanechte pedály ve stejné výšce Č POPIS POČET Č POPIS POČET 1 Hlavní rám 1 18 Pojistný kroužek 2 2 Koncovka 4 19 Plastová podložka L 1 3 Ocelová destička 1 20 Plochá pdložka 2 4 Křížový šroub 2 21 Plastový kryt 2 5 Dolní přední trubka 1 22 Vnitřní šestúhlý šroub M8x20 2 6 Pouzdr...

Page 13: ...rávy a spálenými kaloriemi umožní schození nadbytečných kil 1 Rozvička Před započetím tréninku doporučujeme provést zahřívací cviky které jsou zobrazeny níže na obrázku Každý cvik bychom měli vykonávat min po dobu 30 sekund Rozcvička snižuje riziko úrazu a svalové křeče a způsobuje lepší práci svalů 2 Vcházení na stepper DŮLEŽITÉ Pro dosažení plné rovnováhy a potřebné pozice během tréninku se dopo...

Page 14: ...ěte ruce tak aby se dotýkaly ramen Pokaždé kdy provádíte na steperu krok zvedněte obě ruce nad hlavu Když provádíte druhý krok spusťte ruce do výchozí pozice Cvik opakujte CVIČENÍ NA BICEPSY Vezmi do ruky držadlo lanka Během stepu dej obě ruce podél těla dlaně nasměruj ven Ohni pravý loket a zvedni ruku k hrudi v této chvíli má být pravá noha narovnaná pedál stepperu je dole Během provádění kroku ...

Page 15: ......

Reviews: