background image

MANUAL INSTRUCTION 


IMPORTANT SAFETY INFORMATION 


This product has been designed for home use only and built for optimum safety. Please note the following 
safety precautions: 
 

1. 

Before starting any exercise program you should consult your doctor to determine if you have any physical or health 
conditions that could create a risk to your health and safety, or prevent you from using the equipment properly. Your 
doctor's  advice  is  essential  if  you  are  taking  medication  that  affects  your  heart  rate,  blood  pressure  or  cholesterol 
level. This is especially important for persons over the age of 35, pregnant women, or those with pre-existing health 
problems or balance impairments.  

2. 

Before using this equipment to exercise, always do stretching exercises to properly warm up.  

3. 

Be aware of your body's signals. Incorrect or excessive exercise can damage your health. Stop exercising if you experience 
any  of  the  following  symptoms:  pain,  tightness  in  your  chest,  irregular  heartbeat,  extreme  shortness  of  breath,  feeling  light 
headed, dizzy or nauseous. If you do experience any of these conditions you should consult your doctor before continuing with 
exercise program. Injuries to health may result from incorrect or excessive training.  

4. 

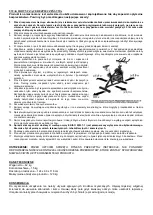
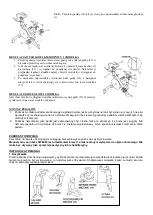
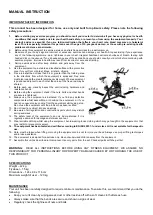
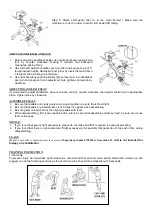
During  exercises  and  after  keep  children  and  pets  away  from  the 
equipment. 

5.  Use the equipment on a stable and levelled surface with a protective 

cover for your floor or carpet. Move  all sharp  objects. 

6.  Free area shall be not less than 0,6 m greater than the training area 

in  the  directions  from  which  the  equipment  is  accessed.  Free  area 
must also include the area for emergency dismount. Where equipment 
is positioned adjacent to each other the value of the free area may be 
shared.  

7.  Before  each  use,  visually  inspect  the  unit  including  hardware  and 

resistance bends. 

8.  Before using the equipment, check if the nuts, bolts and other bends 

are securely tightened. 

9.  Always  use  the  equipment  as  indicated.  If  you  find  any  defective 

components  whilst  assembling  or  checking  the  equipment,  or  if  you 
hear any unusual noise coming from the equipment while using, stop. 
Do not use the equipment until the problem has been rectified. 

10.  Do not insert any object into any openings. 
11.  Be aware of all regulation and constructions parts which may disturb 

during exercises. 

12.  The  safety  level  of  the  equipment  can  only  be  maintained  if  it  is 

regularly examined for damage and/or wear and tear.  

13.  Wear suitable clothing whilst using the equipment. Avoid wearing loose clothing which may get caught in the equipment or that 

may restrict or prevent movement. 

14.  The equipment has been tested and certified according to 

EN ISO 20957-1 under class H. It is not suitable for therapeutic 

use. 

15.  Care must be taken  when lifting or moving the equipment so as not to injure your back. Always use proper lifting techniques 

and/or use assistance. 

16.  The equipment is designed for adult use only. Keep unsupervised children away from the equipment.  
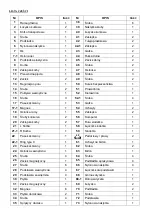
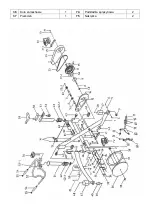
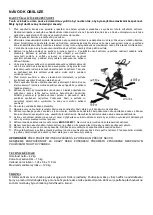
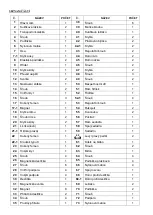
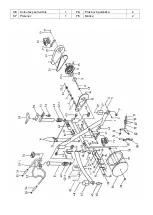
17.  Assemble this unit as described in this manual. Use only parts from the set. Check all parts with the part list. 


WARNING:

    READ  ALL  INSTRUCTIONS  BEFORE  USING  ANY  FITNESS  EQUIPMENT.  WE  ASSUME  NO 

RESPONSIBILITY FOR PERSONAL INJURY OR PROPERTY DAMAGE CAUSED BY OR THROUGH THE USE OF 
THIS PRODUCT 


SPECIFICATIONS 

Weight – 42 kg 
Flywheel – 15 kg 
Dimensions – 124 x 96 x 116 cm 
Maximum weight of user – 120 kg 


MAINTENANCE  

Your unit has been carefully designed to require minimum maintenance. To ensure this, we recommend that you do the 
following: 


Keep your unit clean by wiping sweat, dust or other residue off with a soft, clean cloth after each use 


Always make sure that the bands are secure and show no signs of wear 


Regularly check the tightness of nuts and bolts 

Summary of Contents for SW8905

Page 1: ...MAGNETYCZNY SPIN BIKE SPIN BIKE MAGNETICK CYKLOTRENA R SW8905 INSTRUKCJA U YTKOWANIA MANUAL INSTRUCTION N VOD K OBSLUZE...

Page 2: ...z dzenie powinno by regularnie sprawdzane pod wzgl dem zu ycia i uszkodze tylko wtedy b dzie ono spe nia o warunki bezpiecze stwa Szczeg ln uwag nale y zwr ci na uchwyty piankowe za lepki na nogi i ta...

Page 3: ...17 Pasek sk rzany 1 53 Ga ka 1 17 1 Magnes 1 54 Uchwyty 2 18 Os onka ramy 1 55 Za lepka 2 19 ruby ko nierza 2 56 Komputer 1 20 Za lepka korby 2 57 Rura siode ka 1 21 L Korba 1 58 cznik siode ka 1 21...

Page 4: ...36 Ko o zamachowe 1 74 Podk adka spr ynowa 2 37 Pier cie 1 75 Nakr tka 2...

Page 5: ...nakr tek 75 Zamontuj korek zabezpieczaj c Nast pnie przykryj przedni pokryw dna 50 Krok2 Przekr ga k 43 w lewo a nast pnie poci gnij eby poluzowa Jednocze nie w prowadnic 51 do ramy g wnej 1 Umie kie...

Page 6: ...g na g wki bolc w je li s zbyt ciasne lub zbyt lu ne nie mocuj ich na si Sprawd czy nie znajduj si na nich stalowe drzazgi lub inne elementy pomi dzy peda em a korb Wyczy je by unikn zniszczenia 2 Pod...

Page 7: ...d coraz atwiejsze i b dziesz si czu sprawniejszy w ci gu normalnego dnia Jednak nale y si zmotywowa do regularnych wicze Wybierz okre lon godzin treningu i nie rozpoczynaj wicze zbyt agresywnie Stare...

Page 8: ...takich element w jak linki paski elementy gumowe peda y uchwyty z g bki k ka o yska tapicerka itp 6 Gwarancja traci wa no w przypadku Up ywu terminu wa no ci samodzielnych napraw nieprzestrzegania zas...

Page 9: ...unit including hardware and resistance bends 8 Before using the equipment check if the nuts bolts and other bends are securely tightened 9 Always use the equipment as indicated If you find any defect...

Page 10: ...BOLT 3 52 1 BOTL 4 17 LEATHER BELT WHEEL 1 53 KNOB 1 17 1 MAGNET 1 54 HANDLEBAR GRIP 2 18 LINE TUBE CAP 1 55 END CAP 2 19 FLANGE BOLT 2 56 COMPUTER 1 20 CRANK CAP 2 57 SEAT POST JOIN 1 21 L CRANK 1 58...

Page 11: ...34 BOLT 4 72 FOOTREST HOLDER BUSHING 1 35 PRESS SPRING 1 73 NYLON NUT 1 36 FLYWHEEL 1 74 ARC WASHER 2 37 AL RING 1 75 NUT 2...

Page 12: ...ssemble the safety cap Then cover front bottom tube cap 50 Step2 Turn on the spring knob 43 left direction while pull it to loosen Insert the Handlebar post 51 into the Main Frame 1 simultaneously Put...

Page 13: ...ASSEMBLE PEDALS 1 Be sure that pedals and crank gears are in good condition be sure the left and right 2 Be sure that pedals are inserted into crank at least five gears when assembling 3 Be sure gears...

Page 14: ...y For this achievement you should motivate yourself to exercise regularly Choose fixed hours for your training session and do not start training too aggressively An old quote amongst sportsmen says Th...

Page 15: ...Tr nink je mo n zapo t pouze v p pad e je za zen dn sestaveno 9 Za zen by m lo b t pravideln kontrolov no z hlediska opot eben a po kozen pouze tehdy budou spln ny bezpe nostn podm nky Zvl tn pozornos...

Page 16: ...b 4 17 Ko en emen 1 53 Regula n roub 1 17 1 Magnet 1 54 Rukojeti 2 18 Krytka r mu 1 55 Koncovka 2 19 roub l mce 2 56 Po ta 1 20 Krytka kliky 2 57 R m sedadla 1 21 L klika lev 1 58 Spoj sedadla 1 21 1...

Page 17: ...36 Kotou ov setrva n k 1 74 Pru inov podlo ka 2 37 Prstenec 1 75 Matice 2...

Page 18: ...50 Krok 2 Oto te regula n m roubem 43 doleva a pot hn te jej tak aby do lo k jeho povolen Z rove nasa te ty d tek 51 do hlavn ho r mu 1 Um st te d tka 52 na ty d tek 52 a p ipevn te je pomoc roub 52 1...

Page 19: ...lo a zp t jej ut hnout P IPEVN N PED L 1 B hem p ipev ov n ped l si v imn te hlavov ch ep pokud jsou p li t sn nebo p li voln nep ipev ujte je n sil m Zkontrolujte zda se na nich nenach zej ocelov pil...

Page 20: ...en optim ln hladiny pulsu Tr ninky pro V s budou st le leh a budete c tit zlep en fyzi ky P esto je pot eba naj t si motivaci k pravideln m tr nink m Vyberte si konkr tn hodinu tr ninku a nezapo nejte...

Reviews: