background image

OM-240 362 Page 1

SECTION 1 

 SAFETY PRECAUTIONS 

READ BEFORE USING

Protect yourself and others from injury — read and follow these precautions.
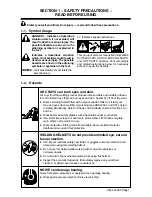
1-1. Symbol Usage

This group of symbols means Warning! Watch

Out! ELECTRIC SHOCK, MOVING PARTS,

and HOT PARTS hazards. Consult symbols

and related instructions below for necessary

actions to avoid the hazards.

.

Indicates special instructions.

DANGER! 

 Indicates a hazardous

situation which, if not avoided, will

result in death or serious injury. The

possible hazards are shown in the

adjoining symbols or explained in

the text.

NOTICE


 Indicates statements not related to

personal injury.

Indicates a hazardous situation

which, if not avoided, could result in

death or serious injury. The possible

hazards are shown in the adjoining

symbols or explained in the text.

1-2. Hazards

ARC RAYS can burn eyes and skin.

Arc rays from the welding process produce intense visible and invisible (ultravio-

let and infrared) rays that can burn eyes and skin. Sparks fly off from the weld.

D

Wear a welding helmet fitted with a proper shade of filter to protect your

face and eyes when welding or watching (see ANSI Z49.1 and Z87.1 listed

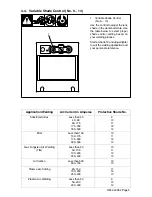
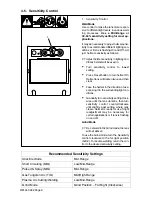
in Safety Standards). Refer to Shade and Sensitivity charts in Sections 3-4

and 3-5.

D

Wear approved safety glasses with side shields under your helmet.

D

Use protective screens or barriers to protect others from flash and glare;

warn others not to watch the arc.

D

Wear protective clothing made from durable, flame-resistant material

(leather and wool) and foot protection.

WELDING HELMETS do not provide unlimited eye, ear and

face protection.

D

Use impact resistant safety spectacles or goggles and ear protection at all

times when using this welding helmet.

D

Do not use this helmet while working with or around explosives or

corrosive liquids.

D

Do not weld in the overhead position while using this helmet.

D

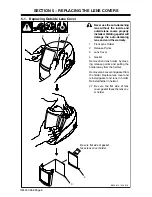
Inspect the auto-lens frequently. Immediately replace any scratched,

cracked, or pitted cover lenses or auto-lenses.

NOISE can damage hearing.

Noise from some processes or equipment can damage hearing.

D

Wear approved ear protection if noise level is high.

Summary of Contents for Hood XVX

Page 1: ...Expert Series Auto Darkening Helmets Model XVX OM 240 362B 2008 11 For more information visit www HobartWelders Com ...

Page 2: ...tor 4 3 3 Lens Delay Control 4 3 4 Variable Shade Control No 9 13 5 3 5 Sensitivity Control 6 SECTION 4 ADJUSTING HEADGEAR 7 SECTION 5 REPLACING THE LENS COVERS 8 5 1 Replacing Outside Lens Cover 8 5 2 Replacing Inside Lens Cover 9 SECTION 6 REPLACING THE BATTERY 10 SECTION 7 INSTALLING OPTIONAL MAGNIFYING LENS 11 SECTION 8 MAINTENANCE 11 SECTION 9 TROUBLESHOOTING 12 SECTION 10 PARTS LIST 13 SECTI...

Page 3: ...urn eyes and skin Sparks fly off from the weld D Wear a welding helmet fitted with a proper shade of filter to protect your face and eyes when welding or watching see ANSI Z49 1 and Z87 1 listed in Safety Standards Refer to Shade and Sensitivity charts in Sections 3 4 and 3 5 D Wear approved safety glasses with side shields under your helmet D Use protective screens or barriers to protect others f...

Page 4: ...wer Supply CR2450 Lithium Batteries Hobart Part No 770 284 Sensors Independent Redundant Four Operating Temperature 14_F to 131_F 10_C to 55_C When stored in extremely cold temperatures warm helmet to ambient temperature before welding Storage Temperature 4_F to 158_F 20_C to 70_C When stored in extremely cold temperatures warm helmet to ambient temperature before welding Total Weight 510 3 g 1 lb...

Page 5: ... INSTRUCTIONS 3 1 Helmet Controls 1 Reset Button See Section 3 2 2 Low Battery Indicator See Section 3 2 3 Variable Shade Control See Section 3 4 4 Sensitivity Control See Section 3 5 5 Lens Delay Control See Section 3 3 1 2 3 4 5 804 847 ...

Page 6: ...ee Section 9 Trouble shooting 2 Low Battery Indicator The low battery indicator lights when 2 3 days of battery life remain If battery power is low replace with CR2450 lithium batteries 2 required Hobart Part No 770 284 see Sec tion 6 1 2 3 3 Lens Delay Control 1 Lens Delay Control The lens delay control is used to ad just the time for the lens to switch to the clear state after welding The delay ...

Page 7: ... to suit the welding application and your personal preference 1 Application Welding Arc Current in Amperes Protective Shade No Stick Electrodes Less than 40 40 80 80 175 175 300 300 500 9 10 11 12 13 MIG Less than 100 100 175 175 300 300 500 10 11 12 13 Gas Tungsten Arc Welding TIG Less than 50 50 100 100 200 200 400 10 11 12 13 Air Carbon Less than 500 500 700 12 13 Plasma Arc Cutting 60 150 150 ...

Page 8: ...in the direction of use exposing it to the surrounding light con ditions S Gradually turn sensitivity setting clock wise until the lens darkens then turn sensitivity control counterclockwise until slightly past setting where lens clears Helmet is ready for use Slight readjustment may be necessary for certain applications or if lens is flashing on and off Grind Mode Do not weld in the Grind mode th...

Page 9: ...nce Adjustment Adjusts the distance between the face and the lens To adjust loosen both outside tension knobs and press inward to free from adjustment slots Move forward or back to de sired position and retighten Both sides must be equally positioned for proper vision 4 Angle Adjustment Four pins on the right side of the headband top provide adjustment for the forward tilt of the helmet To adjust ...

Page 10: ...e warranty 1 Front Lens Holder 2 Release Points 3 Lens Cover 4 Gasket Remove front lens holder by press ing release points and pulling the holder away from the helmet Remove lens cover and gasket from the holder Replace lens cover and reinstall gasket and lens in holder Reinstall holder in helmet Be sure the flat side of lens cover gasket faces the lens cov er holder 8804 814 804 816 1 2 Be sure f...

Page 11: ...y 2 inside Lens Cover Remove the lens cover holder see Section5 1 Remove lens assembly Remove the inside lens cover by pry ing the cover up at either thumbnail opening at each side of the cover Slide cover it out of either side of frame Replace lens cover and rein stall the assembly in the helmet by re versing the above procedure Be sure the cover lens is seated properly flat to prevent fogging 80...

Page 12: ...2450 lithium type batteries 2 required or equivalent Hobart Part No 770 284 Be sure Positive side of the battery faces up toward inside of helmet Reinstall the battery trays To test press the Reset button The lens should flash dark twice Reinstall the lens assembly Left and right battery trays are not interchangeable The auto darkeninghelmet will not work if battery trays are installed on the wron...

Page 13: ...ion Slide magnifying lens up or down slightly as de sired D Reinstall the auto darkening lens in the lens holder D Reverse procedure to re move magnifying lens To prevent lens fogging install flat side of magnifying lens to ward auto darkening lens 804 818 1 SECTION 8 MAINTENANCE NOTICE Never use solvents or abrasive cleaning detergents NOTICE Do not immerse the lens assembly in water The helmet r...

Page 14: ...ht conditions it may be necessary to reduce the surrounding light levels Sections of the auto lens are not going dark distinct lines separate the light and dark areas Stop welding immediately The auto lens may be cracked which can be caused by the impact of dropping the helmet Weld spatter on the auto lens may also cause cracking The lens may need to be replaced most cracked lenses are not covered...

Page 15: ...OM 240 362 Page 13 SECTION 10 PARTS LIST 2 804 814 4 6 3 1 5 Figure 10 1 Prowler Auto Darkening Welding Helmet ...

Page 16: ... Include Item 2 1 2 770616 Comfort Cushion 1 3 770274 Diopter Lens 150X 1 770275 Diopter Lens 175X 1 770276 Diopter Lens 200X 1 770277 Diopter Lens 250X 1 4 770612 Cover Lens Includes Front Lens Cover Gasket 1 Front Lens Covers 2 Inside Lens Covers 5 770614 Auto Darkening Lens 1 770284 Battery CR2450 Lithium Not Shown 2 6 770615 Front Lens Holder 1 ...

Page 17: ... defects in material and workmanship at the time it is purchased at the retailer THIS WAR RANTY IS EXPRESSLY IN LIEU OF ALL OTHER WARRANTIES EXPRESS OR IMPLIED INCLUDING THE WARRANTIES OR MERCHANTABILITY AND FIT NESS Hobart auto darkening lens helmets are warranted for two 2 years from the date of purchase Proof of purchase is required for warranty transactions so it is imperative that a copy of t...

Page 18: ......

Page 19: ......

Page 20: ...PRINTED IN USA 2008 Hobart Welders Hobart Welders 1635 West Spencer Street Appleton WI 54914 USA Phone 800 332 3281 Visit our website at www HobartWelders com ...

Reviews: