❏
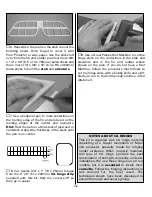
6. Reposition the plan so the stab is over the
building board. Don’t forget to cover it with
Plan Protector or wax paper. Use the sticks left
over from the fin and rudder plus four more 3/8"
x 1/2" x 30" [9.5 x 13 x 760mm] balsa sticks and
three more 1/4" x 3/8" x 18" [6.4 x 9.5 x 460mm]
balsa sticks to build the
stab
and
elevators
.
❏
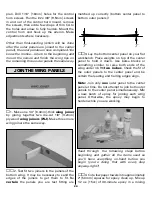
7. Use a ballpoint pen to mark centerlines on
the trailing edge of the fin and stab and on the
leading edges of the rudder and elevators.
Hint:
Rest the pen on a thin stack of plywood or
cardstock. Adjust the thickness of the stack until
the pen is on-center.
❏
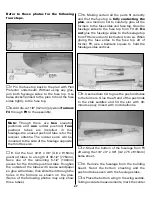
8. Cut twelve 3/4" x 1" [19 x 25mm] hinges
from the 2" x 9" [51 x 230mm]
CA hinge strip
supplied with this kit. Snip the corners off so
they go in easier.
❏
9. Use a Great Planes Slot Machine to cut the
hinge slots on the centerlines in the stab and
elevators and in the fin and rudder where
shown on the plan. If you do not have a Slot
Machine, follow the procedure that follows to
cut the hinge slots with a hobby knife and a #11
blade
(or run to the hobby shop and buy a Slot
Machine!).
NOTES ABOUT CA HINGES
This kit is supplied with CA hinge material
consisting of a 3-layer lamination of Mylar
and polyester specially made for hinging
model airplanes. When properly installed,
this type of CA hinge provides the best
combination of strength, durability and easy
installation. We use these hinges on all our
models, but it is
essential
to install them
correctly
. Follow the hinging instructions in
this manual for the best result. The
techniques shown have been developed to
ensure thorough and secure gluing.
12
Summary of Contents for Dynaflite S.E.5a
Page 9: ...9 Die Drawing...
Page 10: ...10 Die Drawing...


