background image

12

ENGLISH


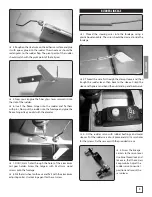
4. Hook the Z-cranked end of the linkage into the servo 

horn. Insert the other end into the hole of the linkage carrier. 
Set the servo and the aileron flap into neutral position. Fix the 
clamp screw of the carrier. Don’t forget locking agent. 


5. Repeat the procedure for the second main wing.

INSTALLING THE RC COMPONENTS

For operation you need at least a four channel receiver. We 
recommend the Tactic TR624 (TACL0624). Additional you 
need 2 pcs of 100mm Servo extension cables for connecting 
the aileron servos (HCAQ7330).
If you dismount the wings for transport, you can disconnect 
the aileron servos easily.
If you reinstall the wings for flight, take care, that the aileron 
servos are connected to the correct channels!!

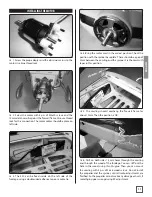
In the picture you can see a possible arrangement of the 
RC-components.

The receiver is fixed with a double sided adhesive tape to the 
left side of the fuselage. The cables were folded, if to long and 
bundled with cable ties. The plugs for left and right aileron 
servo are marked with a paint stick.
Very important is, that the antenna of the Rx is free and not 
surrounded with cable jam. Also avoid the silver colored parts 
of the film. This film includes aluminium particles, which are 
shielding the 2.4GHz signal a little.


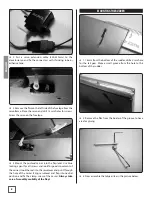
7. On the bottom side of the fuselage you can cut out the 

opening for cooling air stream.

MOUNTING THE MAIN WINGS


1. Glue the ailerons into the wings, like you did with 

elevator or rudder flaps.


2. Remove the covering film from the servo- and flap slots. 

Glue the aileron flap levers with epoxy glue into the slots. 
Sand the adhesive areas of the levers before.


3. Put the servos into the servo slots. The servo lever should 

point to the exterior end of the wing. Drill 1,5mm holes and 
screw the servos into the wing. Use the screws, provided with 
the servos. Install the linkage carrier like you can see in the 
picture above. The clamp screw shall point to the fuselage. 
Use blue locking agent for the nut of the carrier. Take care of 
a good mobility of axis of the carrier. Otherwise the linkage 
becomes stiff.

Summary of Contents for Edge 540 RB FLWA4140

Page 1: ...obbico de Technical data Edge 540 RB Wingspan 1290 mm Lenght 1150 mm Take off weight 1250 g Wing Area 28 dm Wing loading 44 6 g dm Battery LiPo 3S 2200 mAh RC Functions Ailerons elevator rudder motor...

Page 2: ...s 4 Contenu du kit 5 Installing the elevator 6 Elevator linkage 7 Mounting the rudder 8 Rudder linkage 9 Installing the landing gear 10 Installing the motor 11 Mounting the main wings 12 Installing th...

Page 3: ...as correct 3 You must take time to build straight true and strong 4 You must use an R C radio system that is in first class condition 5 You must correctly install all R C and other components so that...

Page 4: ...crews nuts bolts are also available from these outlets If you need assistance locating a dealer to purchase parts contact Product Support Service Abteilung Revell GmbH Henschelstr 20 30 32257 B nde Ge...

Page 5: ...uselage 3 Canopy 4 Elevator complete with connection bracket 5 Rudder 6 Wing set 7 Carbon fiber wing joiner 460x13mm 8 Landing gear bows with axles 9 Wheel pants 10 Linkage and screw set 11 Tail landi...

Page 6: ...for a correct alignment according to the center line of the fuselage 4 Check the correct placement measuring the distance from elevator to a center point of the fuselage on both sides Now mark the fus...

Page 7: ...y glue on both sides of the steel bracket Put flaps and elevator together and fix with tape Take care that both flaps are in plane and not distorted Distorted elevator flaps are like ailerons 10 Remov...

Page 8: ...nd fix the connectors with shrinking tube or adhesive tape 3 Remove the film on the left side of the fuselage from the servoframe Place the servo and drill 1 5mm holes for screws Screw the servo on th...

Page 9: ...rs keep mobile Adjust the rudder servo to neutral position and mount the servo lever 4 Roughen the steel wire on the adhesive surface and glue it with epoxy glue into the rudder The wheel axis should...

Page 10: ...th the provided wood screws 5 Thread the steering wire into the eye bolts and the clamp sleeves Adjust the wire so that the eye bolt can easy reach the linkage carrier of the servo lever Then crimp th...

Page 11: ...Then you can mount the cowling with 4 pcs of 2 3x8 wood screws Do not install the propeller and the spinner until all radio adjustments are finished So the propeller cannot make any damage or hurts i...

Page 12: ...d bundled with cable ties The plugs for left and right aileron servo are marked with a paint stick Very important is that the antenna of the Rx is free and not surrounded with cable jam Also avoid the...

Page 13: ...itework battery belt with 200mm The 2200mAh battery in correct position FINAL FLIGHT PREPARATION CENTER OF GRAVITY C G More than any other factor the C G center of gravity balance point can have the g...

Page 14: ...e securely glued in place 7 Reinforce holes for wood screws with thin CA where appropriate servo mounting screws cowl mounting screws etc 8 Confirm that all controls operate in the correct direction a...

Page 15: ...15 ENGLISH NOTES...
Page 16: ...16 ENGLISH Flitework GmbH Geymannstra e 27 4713 Gallspach Austria Europe Tel 43 664 3231059 Skype flitework Mail office flitework at www flitework at...

Reviews: