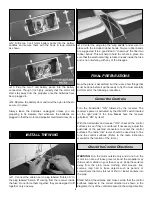
on the line on the bottom of the wing. You may also use a
Great Planes C.G. Machine (GPMR2400).
❏
3. With the plane resting on your fingertips, note whether
the nose or tail drops. If the nose drops, the plane is “nose
heavy” and weight must be added to the tail. If the tail drops,
the plane is “tail heavy” and weight must be added to the
nose. If neither the nose nor tail drops, the C.G. is good. If
additional weight is required, use Great Planes “stick-on”
lead weight (GPMQ4485).
❏
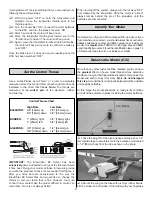
1. With the wing level, have an assistant help you lift the
model by the prop shaft and the bottom of the fuse under the
TE of the vertical fin. Do this several times.
❏
2. If one wing always drops when you lift the model, it means
that side is heavy. Balance the airplane by adding weight to the
other wing tip. An airplane that has been laterally balanced
will track better in loops and other maneuvers.
Read and abide by the following excerpts from the Academy
of Model Aeronautics Safety Code. For the complete Safety
Code refer to
Model Aviation magazine, the AMA web site,
or the Code that came with your AMA license.
1) I will not fly my model aircraft in sanctioned events, air
shows, or model flying demonstrations until it has been proven
to be airworthy by having been successfully flight tested.
2) I will not fly my model aircraft higher than approximately
400 feet within 3 miles of an airport without notifying the
airport operator. I will give right-of-way and avoid flying in
close proximity of full-scale aircraft. Where necessary, an
observer shall be utilized to supervise flying to avoid having
models fly in the proximity of full-scale aircraft.
3) Where established, I will abide by the safety rules for the
flying site I use, and I will not willfully and deliberately fly my
models in a careless, reckless, and/or dangerous manner.
7) I will not fly my model unless it is identified with my name
and address of AMA number, on or in the model. Note: This
does not apply to models while being flown indoors.
9) I will not operate models with pyrotechnics (any device
that explodes, burns, or propels a projectile of any kind).
1) I will have completed a successful radio equipment ground
check before the first flight of a new or repaired model.
2) I will not fly my model aircraft in the presence of
spectators until I become a qualified flyer, unless assisted by
an experienced helper.
3) I will perform my initial turn after takeoff away from the pit
or spectator areas and I will not thereafter fly over pit or
spectator areas, unless beyond my control.
4) I will operate my model using only radio frequencies currently
allowed by the Federal Communications Commission (FCC).
5) I will not knowingly operate my model within three
miles of any pre-existing flying site except in
accordance with the frequency sharing agreement
listed (in the complete AMA Safety Code).
If you have not already done so, charge your transmitter and
receiver batteries as well as your two 7-cell 3000mAh
motor batteries.
Basically any tool that you used to assemble the plane
should accompany you to the flying field as well as the
following tools and accessories:
•
Standard and metric hex drivers
•
#64 Rubber bands (HCAQ2000)
•
Hook & loop material (GPMQ4480)
•
Tie straps
•
Thread-locking compound
•
CA glue and de-bonder
Gather the Necessary Tools
Charge the Batteries
PREFLIGHT
Radio Control
General
AMA SAFETY CODE (excerpts)
Balance the Model Laterally
This is where your model should balance for the first
flights. Later, you may wish to experiment by shifting the
C.G. up to 3/8" [9.5mm] forward or 3/8" [9.5mm] back to
change the flying characteristics. Moving the C.G. forward
may improve the smoothness and stability, but the model
may then require more speed for takeoff and make it more
difficult to slow for landing. Moving the C.G. aft makes the
model more maneuverable, but could also cause it to
become too difficult to control. In any case, start at the
recommended balance point and do not at any time
balance the model outside the specified range.
12


