ASSEMBLY OF YOUR ELECTRIC FREE-FLIGHT AIRPLANE
❶
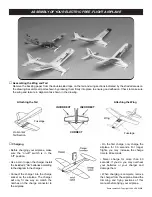
Assembling the Wing and Tail
Remove the backing paper from the double-sided tape on the tail and wing sections indicated by the shaded areas on
the drawing. Assemble all parts shown by pressing them firmly into place to ensure good adhesion. Check to make sure
the wing and tail are in alignment as shown in the drawing.
❷
Charging
• Before charging your airplane, make
sure the “on-off” switch is in the
“off” position.
• Use a coin to open the charger. Install
the included 2 “AA” batteries according
to the diagram in the charger.
• Connect the charger into the charge
socket on the airplane. The charger
will only fit one way so match the
notches on the charge connector to
the airplane.
• On the first charge, only charge the
airplane for 30 seconds. For longer
flights, you may increase the charge
time to 60 seconds.
• Never charge for more than 60
seconds. If you do, you may overheat
your batteries or your charger and
damage them.
• When charging is complete, remove
the charger from the airplane. Read the
trimming and flying sections of this
manual before flying your airplane.
Entire Contents © Copyright 1999 HCAZ3085
Attaching the Tail
Attaching the Wing
Fuselage
Fuselage
Wing
CORRECT
INCORRECT
INCORRECT
Horizontal
Tail Section


