background image

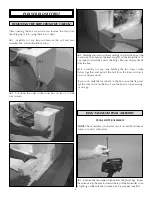
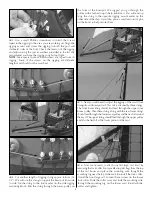
8. To review, the route of the string should be from the base

of the aft mast, continuing up to the top of the aft mast, across
to the center mast, over to the top of the fore mast and down
to the base of the fore mast.

ADDING THE FLAGS AND OTHER ACCESSORIES

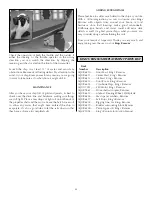
1. You will have received two flags, a lifeboat, steering

wheel, and 4 Pirates with your ship. The flag with the round
hoop mounts slides over the center mast and should be tack
glued to hold it in place. Do not force the part over the mast.
You might have to take a hobby knife and scrape out some of
the paint in the attachment area. The other flag glues to the
inside back of the stern. There is a small locating hole in the
back of the stern for the flag to glue to.

2. If you choose to attach the lifeboat we suggest you glue

it on the top of the center hatch.

3. The wheel (which doubles as a handle) should be glued

on the rear hatch using the pegs and holes provided. 

If you choose to sail with the pirate figures on deck (do so at
your own risk) we suggest you glue or use double-sided tape
to secure them into place.

9

Summary of Contents for King's Ransom

Page 1: ...vices 3002 N Apollo Drive Suite 1 Champaign Illinois 61822 Attn Service Department Phone 217 398 0007 9 00 am 5 00 pm Central Time M F E mail hobbyservices hobbico com Thank you for purchasing Aquacraft s Kings Ransom Pirate Ship This manual contains the instructions you need to safely prepare operate and maintain your R C boat Read over this manual thoroughly before operating your ship If for any...

Page 2: ... Adult supervision is strongly recommended Children should be warned about the dangers of playing in close to the proximity of water This ship is controlled by radio signals Before turning on your hand held transmitter make sure there is no one else in the area on the same radio frequency channel Avoid coming in contact with the spinning propeller DTXC2020 1900mAh 7 2 volt battery pack DTXP4020 Du...

Page 3: ... 4 Carefully cut any tape holding the two foam cradle halves together and extract the hull from the foam and set it on your display stand If you wish slide the foam back in the box raise the flap and put the cover back on the box Save the box for future moving or storage TRANSMITTER ASSEMBLY NOTE The transmitter is not water resistant and should never come in contact with water 1 Remove the transm...

Page 4: ...he ship Take your time rigging the sails and masts adjusting them to your likeness NOTE The numbers you see in the pictures of this manual might be different then they are on your ship The numbering system is for your reverence only and should not be compared to our photos Let s start from the front Bow of the ship and work our way to the back Stern Remove the sail bags and other parts from the sa...

Page 5: ... up tying the string to the opposite rigging mount eyelet on the other side of the ship If you like place a small amount of glue on the knots to help secure them 5 Next you will need to adjust the rigging of the small front triangular sail bowsprit sail This sail is attached by three strings The front lower string should first feed through the upper front boom pulley Then these string along with t...

Page 6: ...the hull Use the spacer washers to adjust the tension of the rigging as needed 2 At this point we can rig the remaining strings from the front mast sail Route each of the long strings through the upper pulleys located on the center mast Tie off both of the strings at the lower portion of the center mast Set the tension rather loose since these strings are only for esthetics and should not carry an...

Page 7: ...ently on the adjustment blocks bowsies 3 Start rigging the rear sail by routing the top strings through the appropriate pulleys and tie the strings off at the lower portion of the mast 4 For the lower strings of the rear sail we suggest you route them through the eye hole of the mast before tying the strings off at the mast 5 At this point we can string the remaining strings from the center mast s...

Page 8: ... Bring the string up and run it through the hole in the top mast stand off 5 Loop the string through the hole in the top mast stand off a second time and continue on to the center mast 6 Double loop the center mast stand off the same as you did the first one 7 Continue on to the fore front mast and double loop it as you did the last one Finish by tying the string to the lower portion of the fore m...

Page 9: ...d to hold it in place Do not force the part over the mast You might have to take a hobby knife and scrape out some of the paint in the attachment area The other flag glues to the inside back of the stern There is a small locating hole in the back of the stern for the flag to glue to 2 If you choose to attach the lifeboat we suggest you glue it on the top of the center hatch 3 The wheel which doubl...

Page 10: ...ght removed place a small amount of light oil on the thumb screws threads this will make installation of the keel much easier the next time you set her to sea PREPARING YOUR KING S RANSOM FOR SAILING You can use a small length of clear tape to attach the receiver antenna white wire located behind the main mast to the main mast The two small strings with hooks are used to secure the sail when in th...

Page 11: ... EXTRA DETAILS Please feel free to add as much detail to the ship as you like With a little imagination you can customize your Kings Ransom with objects from around your house or local hardware store Ball bearings make good cannonballs Dollhouse type barrels and crates could add extra deck details as well If a ghost pirate ship is what you want you may consider dying and weathering the sails From ...

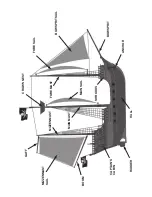
Page 12: ...GAFF CROW S NEST FORE SAIL BOWSPRIT SAIL BOWSPRIT ANCHOR SHROUDS HULL RUDDER CAPTAIN S CABIN BOOM MIZZENMAST SAIL MIZZENMAST MAIN MAST FORE MAST MAIN SAIL ...

Reviews: