background image

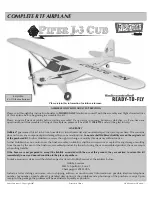
COMPLETE RTF AIRPLANE

ASSEMBLE ONLY WITH ADULT SUPERVISION

Please read through this instruction booklet to 

THOROUGHLY

 familiarize yourself with the assembly and fl ight characteristics 

of this airplane before beginning to assemble the kit.

Please inspect all parts carefully before starting assembly! If any parts are missing, broken or defective, or if you have any 
questions about the assembly or fl ying of this airplane, please call us at 

(217) 398-8970

 and we’ll be glad to help.

WARRANTY

Hobbico

®

 guarantees this kit to be free from defects in both material and workmanship at the date of purchase. This warranty 

does not cover any component parts damaged by use or modifi cation. 

In no case shall Hobbico’s liability exceed the original cost 

of the purchased kit. 

Further, Hobbico reserves the right to change or modify this warranty without notice.

In that Hobbico has no control over the fi nal assembly, no liability shall be assumed nor accepted for any damage resulting 
from the use by the user of the fi nal user-assembled product. By the act of using the user-assembled product, the user accepts 
all resulting liability.

If the buyers are not prepared to accept the liability associated with the use of this product, they are advised to return this kit 
immediately in new and unused condition to the place of purchase.

To make a warranty claim send the defective part or item to Hobby Services at the address below:

Hobby Services

3002 N. Apollo Dr., Suite 1

Champaign IL 61822 USA

Include a letter stating your name, return shipping address, as much contact information as possible (daytime telephone 
number, fax number, e-mail address), a detailed description of the problem and a photocopy of the purchase receipt. Upon 
receipt of the package the problem will be evaluated as quickly as possible.

Entire Contents © Copyright 2007

Printed in China

HCAZ2400 for HCAA24**

Please retain this information for future reference.

REQUIRES:

8 “AA” Alkaline Batteries

Summary of Contents for Piper J-3 CUB

Page 1: ...ontrol over the final assembly no liability shall be assumed nor accepted for any damage resulting from the use by the user of the final user assembled product By the act of using the user assembled p...

Page 2: ...flight to insure that all equipment is operating properly and that the model remains structurally sound 3 Fly only on calm days with wind speeds less than 5 mph and in large open areas free of trees p...

Page 3: ...rewdriver mounting screws 1 wing 6 struts wrench FCC REQUIREMENT This device complies with Part 15 of the FCC Rules Operation is subject to the following two conditions 1 This device may not cause har...

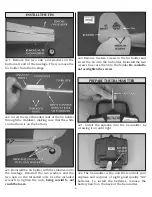
Page 4: ...uts on the threaded rods Use the included wrench to tighten the nuts being careful to not crush the foam 4 Remove the two screws in the fin holder and insert the fin into the fin holder Reinstall the...

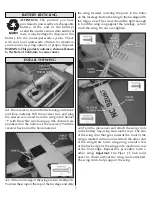
Page 5: ...three LEDs are illuminated it is safe to fly As battery power is depleted the green and yellow LEDs will go out When only the red LED is illuminated land your J 3 Cub and install fresh batteries OPTI...

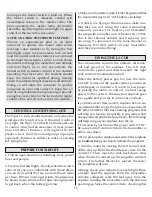
Page 6: ...see if it is starting to warm up A warm but not hot battery pack is a sign that the battery is nearing a full charge If the battery becomes hot disconnect it from the charger 5 Once the battery reach...

Page 7: ...ottom of the receiver Push the receiver back onto the hook material 2 Atthefrontedgeofthewingaretwosmallposts Positionthewingonthetopofthefuselageandslide the wing forward inserting the posts in the h...

Page 8: ...h on the left side of the fuselage CAUTION Once the battery is connected to the ESC and the plane is turned on stay clear of the propeller 2 Center the rudder aileron and elevator trim 3 Install the r...

Page 9: ...irplane from the aft end move the left control stick to the left The rudder must move to the left If it does not change the position of the rudder servo reversing switch on the transmitter When the le...

Page 10: ...it there for 5 seconds Then return the stick down This will arm the motor The motor will now operate when the throttle stick is moved up NOTE Arming the motor must be done each time after the airplane...

Page 11: ...when used with another Tactic or Futaba transmitter can transfer airplane control to a second pilot for learning purposes To use the trainer system the FUTM4415 Trainer Cord must be purchased Connect...

Page 12: ...enough power to get back when the battery gets low 3 Makesurethebatterypackisfullychargedandthat the transmitter has fresh AA batteries installed 4 If others are flying in the same area make sure tha...

Page 13: ...time to trim the plane for straight level flight If the airplane wants to climb when the right control stick is released move the elevator trim lever up away from you If the airplane wants to dive mov...

Page 14: ...le from Product Support but can be purchased from hobby shops or mail order Internet order firms If you need assistance locating a dealer to purchase parts contact Product Support Phone 217 398 0007 F...

Page 15: ...y sized NiMH packs HCAA28 Fully assembled test flown at the factory fun indoors or out and ready for 3D aerobatics that s the Axe CP RTF You can fly inverted with ease and perform virtually any stunt...

Page 16: ...e comfortable flying solo For power Hobbico includes the ElectriFly RimFire 42 50 800 out runner brushless motor which rivals glow engines for performance And numerous patented design features such as...

Reviews: