background image

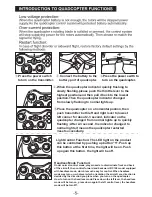
.Press the power switch 

to turn on the transmitter.  

.Connect the battery to the 

battery port of quadcopter.

.When the quadcopter indicator quickly flashing to 

    slowly flashing,please push the throttle lever to the 

    highest position,and then pull it back to the lowest 

    position.Then the quadcopter indicator changed 

    from slowly flashing to normal lights up.

.Place the quadcopter on a horizontal postion, then 

    push transmitter both left and right lever to lowest 

    left conner for about 2-3 second, indicator on the 

    quadcopter changed from normal lights up to quickly 

    flashing ;After 2-3 second ,the indicator changed to 

    normal lights,it means the quadcopter restarted 

    /reset successfully.

Light Control Function: The LED light on the product 

    can be controlled by pushing up button "5". Push up 

    this button at the first time, the light will be on. Push 

    up again this button, the light will be off.

Headless Mode Function: 

Under normal control mode, player needs to discriminate front and back 

of the aircraft, then control forward and backward. RC108 model equipped 

with headless mode, which is much easy for control. When headless 

mode was turn on, whatever which orientation the aircraft are, direction is 

decided by the direction you place when you turn on the quadcopter.

How to turn on the headless mode:Press down the left lever, the headless 

mode will be turn on, press down again the left control lever, the headless 

mode will be turn 0ff.

.Press the power swith to 

turn on the quadcopter.

Summary of Contents for REH13128

Page 1: ...id when flying Built in 6 axis gyroscope for precise hovering in the sky Simple modular design makes changing parts easy With 360 3D eversion and throwing flight function The materials and specificaci...

Page 2: ...e any responsibility for any wrong operation as this may result in severe injury or loss of property and we can not control the operating proccess during the time when the user assemble or use this pr...

Page 3: ...X AAA LR03 1 5V Batteries AAA TIPS When syncing your quadcopter keep it in a horizontal position to start to a stable flight Step1 Open the battery cover and insert the battery into power port Step2 C...

Page 4: ...Charging time about 40 minutes Flying time about 6 8 minutes...

Page 5: ...n order to adapt for more plays operating habits our controller sets three different speeds Low Medium High Speed can be changed by pushing down button 5 Push the throttle up or down the quadcopter fl...

Page 6: ...the quadcopter restarted reset successfully Light Control Function The LED light on the product can be controlled by pushing up button 5 Push up this button at the first time the light will be on Push...

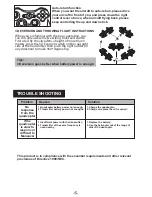
Page 7: ...ugh 2 Transmitter battery power not enoughv 1 Charge the quadcopter 2 Charge or replace them if required 1 Insuffcient power with the transmitter 2 Transmitter of the same frequency is used nearby 1 R...

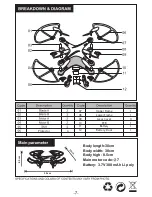
Page 8: ...0 c m 8 5 cm 30 cm Body length 30cm Body width 30cm Body high 8 5cm Main motor code 7 Battery 3 7V 380 mAh Li poly 07 08 09 10 11 12 Upper Frame Lower Frame Gear Cover PCB Battery Battery Door Protec...

Reviews: