background image

6

7

c. If the rotation direction is not correct during running, exchange the two wires connecting motor and ESC.
d.  To make sure everything is ok, please turn on the transmitter first and finally turn on the ESC, turn off the ESC first and 

finally turn off the transmitter.

Note: Please refer to the relevant sections for details about the battery type, drag brake force and running mode of the ESC.

Attention:

• Make sure the product is installed and calibrated correctly, failure to do so may result in serious injury.
•  Please carefully check each power device and car frame instructions to ensure the power matching is reasonable before 

use. Avoid damaging power system due to incorrect matching.

•  Do not let the external temperature of the system exceed 90°C /194°F , because high temperature will damage the 

power system.

•  Make sure the receiver’s battery is disconnected before turning off the transmitter, failure to do so can result out of 

control. Unreasonable setting of the Failsafe may cause accidents.

•  After use, remember to disconnect the battery and the ESC. If the battery isn’t disconnected, the ESC will consume 

electric energy all the time even if it is off. It will discharge completely if connect the battery for a long time, thus resulting in 
the failure of the battery or the ESC. We are not responsible for any damage caused by this!

•  Make sure the receiver is mounted away from motors or any device that emits excessive electrical noise.
• Keep the antenna of the receiver at least 1cm away from conductive materials such as carbon or metal.
• Do not power on the receiver during the setup process to prevent loss of control.

LITHIUM POLYMER (LIPO) BATTERY WARNING

•  Never charge a lithium polymer battery with a charger designed for Nicd, NIMH, or any other type of battery chemistry. Use 

ONLY charger designed for LiPo battery.

• Do not leave LiPo battery unattended during charging.

• Do not overcharge the battery.

• Always charge LiPo batteries on non-flammable, heat-resistant surfaces.

• Always use a LiPo-safe bag or container while charging. Do not allow LiPo cells to overheat at any time.

• Cells which reach greater than 140 Fahrenheit (60°C) will usually become damaged and will catch fire.

• Do not charge the LiPo pack while it is still in the model. Never charge or store battery packs in a vehicle.

• Do not discharge LiPo; doing so will damage the battery.

• Do not expose LiPo cell to water or moisture at any time.

• Do not store battery near open flame or heater.

• Do not assemble LiPo cells or pre-assembled packs together with other LiPo cells or packs.

• Always store LiPo battery in a secure location away from children.

• Always remove the LiPo battery if model is involved in any kind of crash.

• Carefully inspect the battery and connectors for even the smallest damage.

• CAUTION: Cells may become hot after usage. Allow the pack to cool to room temperature prior to recharging.

•  Do not allow the electrolyte to get into eyes or on skin. Wash affected areas immediately if they come into contact with 

electrolyte. Do not alter or modify connectors or wires of a LiPo battery pack.

• Always inspect the condition of the battery before charging and operating.

• Do not short circuit the LiPo battery.

• Do not have contact with a leaky/damaged battery directly.

• Do not charge battery out of recommended temperature range (0°C-45°C).

E

NGLIS

H

F

RA

N

Ç

AI

S

Summary of Contents for 1.CRX18-BL

Page 1: ... years old without adult supervision Ceci n est pas un jouet Ne convient pas aux enfants de moins de 14 ans sans la surveillance d un adulte Kein Spielzeug Nichte geeignet für Kinder unter 14 Jahren ohne Aufsicht Erwachsener N o e s u n j u g u e t e N o r e c o m e n d a d o p a r a n i ñ o s m e n o r e s d e 1 4 a ñ o s ...

Page 2: ...nd your equipment read this manual and follow the instructions carefully Make sure the product is properly installed in your model Failure to do so may result in serious injury Make sure that the receiver s battery is disconnected before turning off the transmitter Failure to do so may lead to unintended operation and cause an accident Ensure that all motors operate in the correct direction If not...

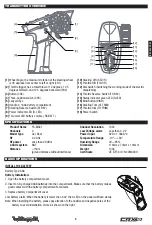
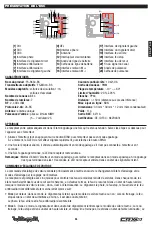
Page 3: ...FICATIONS Product Name FS MG41 Channels 4 Model Type Car Boat RF 2 4 GHz RF power Less than 20 dBm 2 4GHz system ANT Distance 150m ground distance without interfence Channel Resolution 1024 Low Voltage alarm Less than 4 2 V Power Input 6V DC 1 5AAA 4 Temperature Range 10 60 Humidity Range 20 95 Dimension 118mm x 73mm x 145mm Weight 130g Certificate CE FCC ID N4ZMG400 BASIC OPERATIONS INSTALL THE B...

Page 4: ...transmitter is calibrated before leaving the factory however if recalibration is required please follow these steps 1 Turn and hold the wheel as far clockwise as it will turn hold the throttle all the way forward then turn on the transmitter in calibration mode The R LED and G LED will flash twice 2 Calibrate wheel Turn the wheel completely clockwise then completely counterclockwise When calibrati...

Page 5: ...e time The G LED on the transmitter flashes quickly then release the BIND button 2 After the receiver is powered on it will automatically enter the binding mode if it is not connected to the transmitter in 1 second 3 After the binding is finished the LED of the receiver is solid on Notes Put the transmitter into binding mode first and then put the receiver into its binding mode If the binding is n...

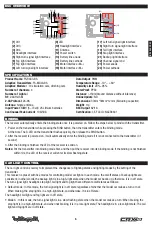
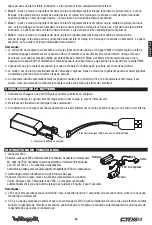
Page 6: ...ency lights 4 This receiver identifies the neutral positions of Steering CH1 and Throttle CH2 automatically when it is powered on It recommends to power on the receiver again after the trims of the transmitter are turned CHARGING THE BATTERY 1 Connect the charger to a USB port then connect the battery to the charger 2 When charging the status LED is red when charged the status LED is green 3 Do no...

Page 7: ...ceiver during the setup process to prevent loss of control LITHIUM POLYMER LIPO BATTERY WARNING Never charge a lithium polymer battery with a charger designed for Nicd NIMH or any other type of battery chemistry Use ONLY charger designed for LiPo battery Do not leave LiPo battery unattended during charging Do not overcharge the battery Always charge LiPo batteries on non flammable heat resistant s...

Page 8: ...lures Une mauvaise utilisation de ce produit peut entraîner des blessures graves ou la mort Pour assurer votre sécurité et celle de votre entourage lisez ce manuel et suivez attentivement les instructions Assurez vous que la batterie du récepteur est débranchée avant d éteindre l émetteur Le non respect de cette consigne peut entraîner un fonctionnement imprévu et provoquer un accident Assurez vou...

Page 9: ...du produit FS MG41 Canaux 4 Type de modèle Voiture Bateau RF 2 4 GHz Puissance RF Moins de 20 dBm Fourmi système 2 4 GHz Distance 150 m distance au sol sans interférence Résolution de canal 1024 Alarme basse tension Moins de 4 2 V Entrée d alimentation 6 V CC 1 5 AAA 4 Plage de température 10 60 Plage d humidité 20 95 Dimensions 118 mm x 73 mm x 145 mm Poids 130g Certificat CE FCC ID N4ZMG400 INST...

Page 10: ... émetteur est calibré avant de quitter l usine mais si un recalibrage est nécessaire veuillez suivre ces étapes 1 Tournez et maintenez le volant aussi loin que possible dans le sens des aiguilles d une montre maintenez la gâchette des gaz à fond puis allumez l émetteur en mode calibrage Les LEDs rouge et verte clignoteront deux fois 2 Calibrer la direction Tourner les roues complètement à droite p...

Page 11: ...r passe en mode appairage À ce moment le G LED de l émetteur clignote rapidement puis relâchez le bouton BIND 2 Une fois le récepteur allumé il entrera automatiquement en mode appairage s il n est pas connecté à l émetteur en 1 seconde 3 Une fois l appairage terminée la LED du récepteur reste allumée Remarques Mettez d abord l émetteur en mode appairage puis mettez le récepteur dans son mode appai...

Page 12: ...nce Dans ce mode les clignotants gauche et droit clignotent de manière synchrone et lente comme feux de secours 4 Ce récepteur identifie automatiquement les positions neutres de la direction CH1 et de l accélérateur CH2 lorsqu il est allumé Il est recommandé de rallumer le récepteur après avoir tourné les trims de l émetteur CHARGEMENT DE LA BATTERIE 1 Connectez le chargeur à un port USB puis conn...

Page 13: ...s que le carbone ou le métal N allumez pas le récepteur pendant le processus de configuration pour éviter une perte de contrôle AVERTISSEMENT CONCERNANT LES PILES AU LITHIUM POLYMÈRE LIPO Ne chargez jamais une batterie au lithium polymère avec un chargeur conçu pour Nicd NIMH ou tout autre type de chimie de batterie Utilisez UNIQUEMENT un chargeur conçu pour la batterie LiPo Ne laissez pas la batt...

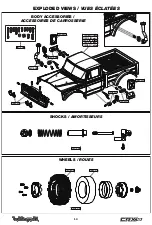
Page 14: ...X18 030 blue CRX18 031 white CRX18 016 CRX18 015 CRX18 014 CRX18 013 CRX18 005 CRX18 005 CRX18 005 CRX18 005 CRX18 005 CRX18 005 CRX18 005 CRX18 005 EXPLODED VIEWS VUES ÉCLATÉES BODY ACCESSORIES ACCESSOIRES DE CARROSSERIE SHOCKS AMORTISSEURS WHEELS ROUES ...

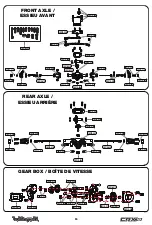
Page 15: ...CRX18 022 CRX18 017 CRX18 017 CRX18 011 CRX18 024 CRX18 024 CRX18 024 CRX18 011 CRX18 011 CRX18 011 CRX18 024 CRX18 001 CRX18 003 CRX18 020 CRX18 020 CRX18 003 CRX18 002 CRX18 002 CRX18 002 CRX18 002 CRX18 002 CRX18 002 CRX18 001 CRX18 024 CRX18 024 CRX18 024 CRX18 024 CRX18 023 CRX18 023 CRX18 019 CRX18 019 CRX18 018 CRX18 023 CRX18 005 FRONT AXLE ESSIEU AVANT REAR AXLE ESSIEU ARRIÈRE GEAR BOX BO...

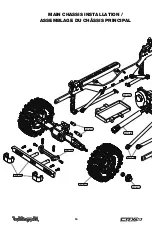
Page 16: ...16 CRX18 004 CRX18 012 CRX18 015 CRX18 009 CRX18 007 CRX18 023 CRX18 008 CRX18 006 MAIN CHASSIS INSTALLATION ASSEMBLAGE DU CHÂSSIS PRINCIPAL ...

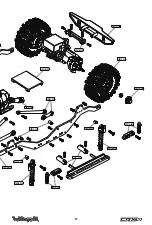
Page 17: ...17 CRX18 006 CRX18 012 CRX18 010 CRX18 003 CRX18 015 CRX18 016 CRX18 016 CRX18 004 CRX18 004 CRX18 021 CRX18 009 CRX18 007 CRX18 007 CRX18 004 CRX18 023 CRX18 007 ...

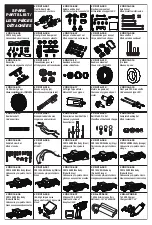
Page 18: ...e Screw Set Kit de visserie CRX18 026 LED light Kit LED CRX18 027 CRX18 SURVIVAL Body Clear Carrosserie transparente lexan CRX18 028 CRX18 SURVIVAL Body Grey Carrosserie pré peinte Camo gris CRX18 029 CRX18 SURVIVAL Body Orange Carrosserie pré peinte Camo orange CRX18 030 CRX18 SURVIVAL Body Blue Carrosserie pré peinte Camo bleu CRX18 031 CRX18 SURVIVAL Body White Carrosserie pré peinte Camo blanc...

Page 19: ...NOTES ...
Page 20: ...assembly and painting Les spécificités peuvent changer sans information préalable Les photos sont non contractuelles El fabricante puede modificar los kits sin previsio aviso Las fotos no son contractuales Spezifikation können ohne vorherige Ankündigung ändern Effektive Abbildung zeigt das Modell in Montage und Lackierung ...

Reviews: