background image

EN

5

RTF / BNF

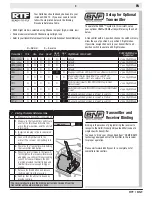
Setup for Optional 
Transmitter

Transmitter

Thro

Aile Elev

Rudd

Gear/ 

Ch 5

Aux 

1

Flight Mode/ Panic Switch

SAFE Flight Modes  

Supported

DX4e (2pos)

N

N

N

N

N

N/A

Default

2 pos Flight Mode

DX4e (3pos)

N

N

N

N

N

N/A

Default

3 pos Flight Mode

DX5e (2pos)

N

N

N

N

N

N/A

Default

2 pos Flight Mode

DX5e (3pos)

N

N

N

N

N

N/A

Default

3 pos Flight Mode

DX6i

N

N

N

N

R

N

(Flap System) Norm UP Arrow 100  Land Down Arrow 100

2 pos Flight Mode

DX7

N

N

N

N

N

N

(Flap System) Norm Down Mid 0  Land UP 100  

(3 pos Aux1 switch–0 & 1 are normal, 2 is panic)

2 pos Flight Mode

DX7s

N

N

N

N

N

R

(Switch Select) Gear to INH, FM to INH, Flap to Gear, 

Trainer to Aux1

3 pos Flight Mode

DX8

N

N

N

N

N

R

(Switch Select) Gear to INH, FM to Gear, Flap to INH, Trainer 

to Aux 1

3 pos Flight Mode

DX9

N

N

N

N

N

R

(Channel Input Config) Gear is B, Aux1 is switch i

3 pos Flight Mode

DX10t

N

N

N

N

N

R

(Channel Input Config) Gear is A, Aux1 is R stick

3 pos Flight Mode

DX18

N

N

N

N

N

R

(Channel Input Config) Gear is B, Aux1 is switch i

3 pos Flight Mode

N = Normal           R = Reverse

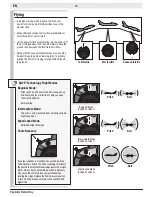
•  SAFE Flight mode is selected using Channel 5 signal (high, middle, low)
•  Panic mode is selected with Channel 6 signal (high, low)
•  Refer to your transmitter’s manual for more information about transmitter setup

Binding Procedure Reference Table

1.

  Make sure the transmitter is powered off.

2.

  Make sure the transmitter controls are 

neutral, the throttle and throttle trim 

are in the low position, and the aircraft 

is immobile.

3. 

Install a bind plug in the receiver bind 

port.

4. 

Connect the flight battery in the 

aircraft. The receiver LED will begin to 

flash.

5. 

Power on the transmitter while holding 

the transmitter bind button.

6. 

When the receiver binds to the transmit-

ter, the light on the receiver will turn solid 

and produce a series of three ascending 

tones. The tones will indicate the ESC 

is armed, provided the throttle stick and 

throttle trim are low enough to trigger 

arming.

7. 

Release the Bind button and remove 

the bind plug from the receiver.

8. 

Confirm that the aircraft is bound by 

moving controls.

Transmitter and 

Receiver Binding

Binding is the process of programming the receiver to 

recognize the GUID (Globally Unique Identifier) code of a 

single specific transmitter.
You need to ‘bind’ your chosen Spektrum

 DSM2/DSMX 

technology equipped aircraft transmitter to the receiver 

for proper operation. 

Please visit www.bindnfly.com for a complete list of 

compatible transmitters.

BIND PLUG

To operate the SAFE™ system in this aircraft, set up 
your optional DSM2

®

/DSMX

®

 transmitter using the chart 

below.
 
A transmitter with a 2-position channel 5 switch will only 
allow the use of position 0 or position 2 flight modes.
If possible, assign channel 5 in your transmitter to a 3- 
position switch to operate all 3 flight modes.

The receiver should retain the binding instructions received from the 

transmitter until another binding is done.

Your Delta Ray should already be bound to your 
included DX4E TX.  IF you ever need to rebind, 
follow the step listed below in the Binding 
Procedure Reference Table.

Summary of Contents for Firebird DeltaRay

Page 1: ...Instruction Manual Bedienungsanleitung Manuel d utilisation Manuale di Istruzioni ...

Page 2: ...support tab for this product The following terms are used throughout the product literature to indicate various levels of potential harm when operating this product NOTICE Procedures which if not properly followed create a possibility of physical property damage AND little or no possibility of injury CAUTION Procedures which if not properly followed create the probability of physical property dama...

Page 3: ... more confident change modes to advance your flying skills Always keep your aircraft in plain sight and upwind from you Do not attempt your first turn at low altitude Higher altitudes allow for greater possibility of correction Always make deliberate and steady control stick movements for smooth control of your aircraft Do not fly in winds greater than 8 10 mph If flying in winds 5 10mph and in be...

Page 4: ...noting proper polarity and reinstall the battery cover Low Battery Alarm When the battery voltage drops below 4 7 volts an alarm sounds and the voltage LEDs flash The batteries must be replaced immediately If this happens while flying land your aircraft as soon and as safely as possible WARNING Do not pick up the transmitter by the antenna Do not alter or put weight on the antenna Damage to antenn...

Page 5: ...ition and the aircraft is immobile 3 Install a bind plug in the receiver bind port 4 Connect the flight battery in the aircraft The receiver LED will begin to flash 5 Power on the transmitter while holding the transmitter bind button 6 When the receiver binds to the transmit ter the light on the receiver will turn solid and produce a series of three ascending tones The tones will indicate the ESC ...

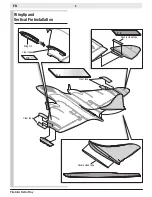
Page 6: ...EN Firebird Delta Ray 6 Wingtip and Vertical Fin Installation Double sided tape Clear tape Clear tape Wing Fin Clear tape Double sided tape X 4 X 8 X 1 X 2 X 4 X 8 X 1 X 2 X 4 X 8 X 1 X 2 X 4 X 8 X 1 ...

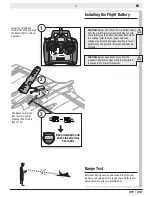
Page 7: ...es are charged CAUTION Always keep hands away from the propellers SAFE technology will turn propellers in response to any aircraft movement Range Test Before each flying session and especially with a new model you should perform a range check Refer to your transmitter manual for more information Lower the throttle and throttle trim then power on the transmitter for at least 5 seconds The elevons w...

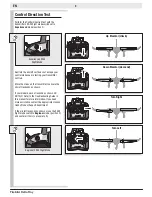
Page 8: ...in the aircraft so it does not escape your control while you are testing your transmitter controls Move the sticks on the transmitter to ensure the aircraft responds as shown If your model does not respond as shown DO NOT FLY Refer to the Troubleshooting Guide in this manual for more information If you need more assistance contact the appropriate Horizon Hobby Product Support department If the air...

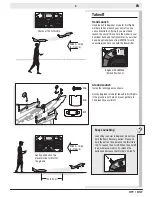
Page 9: ...r takeoff in first flights If the ground is not hard and level get help to hand launch your aircraft Easy Launching Launching is easier in Beginner mode if you hold the Panic Recovery button Press and hold the button then increase the throttle to 100 Launch the aircraft When the aircraft is up where you want to fly release the button and decrease the throttle to 50 60 CH 5 CH 5 CH 5 CH 5 CH 5 X 6 ...

Page 10: ...r Mode Switch Position 0 CH 5 CH 5 CH 5 CH 5 CH 5 Intermediate Mode Switch Position 1 CH 5 CH 5 CH 5 CH 5 CH 5 Experienced Mode Switch Position 2 CH 5 CH 5 CH 5 SAFE Technology Flight Modes Beginner Mode Pitch nose up and down and Roll wing tips up and down angles are limited to help you keep the aircraft airborne Self leveling Intermediate Mode The pilot is only prevented from entering extreme fl...

Page 11: ...red for landing NOTICE If a crash is imminent reduce the throttle Failure to do so could result in extra damage to the airframe as well as damage to the receiver and motors NOTICE Crash damage is not covered under warranty Post Flight NOTICE When you are finished flying never leave the aircraft in direct sunlight or in a hot enclosed area such as a car Doing so can damage the foam Post Flight Chec...

Page 12: ...ick is at neutral centered position move the aileron trim slider by one or two click increments OPPOSITE the direction of roll If you must use more than 8 clicks on a trim slider to make the aircraft fly straight and level land and adjust a control surface as described below Perform manual adjustment of trim before increasing the throttle above 25 or SAFE will move the control surfaces when the ai...

Page 13: ...instructions Transmitter too near aircraft during binding process Move powered transmitter a few feet from aircraft disconnect and reconnect flight battery to aircraft Aircraft or transmitter is too close to large metal object wireless source or another transmitter Move aircraft and transmitter to another location and attempt binding again Flight battery transmitter battery charge is too low Repla...

Page 14: ...hat contains the motor from the wing Paint may keep the cowling attached to the wing 5 Remove 2 screws E from the front of the cowling that secures the motor 6 Disconnect the motor wires from the ESC wires 7 Remove the motor F and motor wires from the wing 8 Assemble in reverse order 9 Correctly center and attach the spinner to the propeller hub using CA cyanoacrylate adhesive NOTICE Make sure the...

Page 15: ...chase Law These terms are governed by Illinois law without regard to conflict of law principals This warranty gives you specific legal rights and you may also have other rights which vary from state to state Horizon reserves the right to change or modify this warranty at any time without notice WARRANTY SERVICES Questions Assistance and Services Your local hobby store and or place of purchase cann...

Page 16: ...om Air 888 959 2305 United Kingdom Service Parts Sales Horizon Hobby Limited sales horizonhobby co uk Units 1 4 Ployters Rd Staple Tye Harlow Essex CM18 7NS United Kingdom 44 0 1279 641 097 Germany Horizon Technischer Service service horizonhobby de Christian Junge Straße 1 25337 Elmshorn Germany Sales Horizon Hobby GmbH 49 0 4121 2655 100 France Service Parts Sales Horizon Hobby SAS infofrance ho...

Page 17: ...ive 2006 95 EC EN 301 489 1 V1 9 2 2012 EN 301 489 17 V2 1 1 2009 EN60950 1 2006 A11 2009 A1 2010 A12 2011 EN55022 2010 AC 2011 EN55024 2010 Signed for and on behalf of Horizon Hobby Inc Champaign IL USA Jan 04 2014 AT BE BG CZ CY DE DK EE ES FI FR GR HR HU IE IT LT LU LV MT NL PL PT RO SE SI SK UK IS LI NO CH Compliance Information for the European Union Instructions for disposal of WEEE by users...

Page 18: ... Set de moteurs 180 à balais 2 Set motore 180 con spazzole 2 PKZ1080 2 SV80 Long Lead Servo Parkzone SV80 Servo Servo SV80 2 2 SV80 servo con cavo lungo EFLC3125 2 Cell DC Balancing Li Po Charger 2S DC Balancing Ladegerät Chargeur équilibreur LI Po DC 2S Caricabatterie per 2 celle Li Po con bilanciatore EFLB13002S20 1300mAh 2S 7 4V 20C Li Po 13 AWG EC2 Battery 1300mAh 2S 7 4V 20C Li Po 13 AWG EC2 ...

Page 19: ...demarks or registered trademarks of Horizon Hobby Inc The outline and trim scheme of the Firebird Delta Ray were designed by Quique Somenzini in cooperation with Mirco Pecorari of Aircraft Studio Design The Spektrum trademark is used with permission of Bachmann Industries Inc Patents Pending www hobbyzonerc com HBZ7900 HBZ7980 Created 012 13 37394 1 ...

Reviews: