background image

7

6

-

FIG 9

FIG 8

6

7

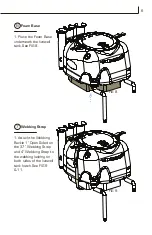
Foam Base

Webbing Strap

1. Place the Foam Base 
underneath the livewell 
tank. See FIG 8.

1. Attach the Webbing 
Buckle 1” Open Sided on 
the 37” Webbing Strap 
and 4” Webbing Strap to 
the webbing lashing on 
both  sides of the livewell 
tank hatch. See FIG 9 
& 11. 

Summary of Contents for Adventure Island Livewell

Page 1: ...Please read through the instruction manual before using this product Hobie Adventure Island Livewell Kit...

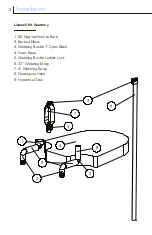
Page 2: ...well Kit Anatomy 3 6 4 9 1 5 7 8 2 2 1 90 Degree Hose to Barb 2 Barbed Elbow 3 Webbing Buckle 1 Open Sided 4 Foam Base 5 Webbing Buckle Ladder Lock 6 37 Webbing Strap 7 4 Webbing Strap 8 Downspout Hos...

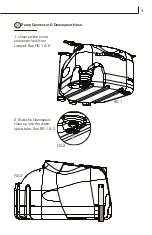
Page 3: ...3 2 Pump Connector Downspout Hose 1 Unscrew the pump connector lock from Livewell See FIG 1 2 2 Slide the Downspout Hose up into the down spout tube See FIG 1 3 FIG 1 FIG 2 FIG 3...

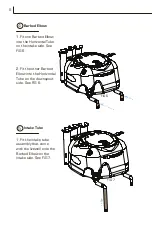
Page 4: ...b fitting to the intake pump inside the livewell See FIG 4 2 Insert one Barbed Elbow into the Downspout Hose See FIG 4 1 Fit one Horizontal Tube onto the 90 Degree Hose to Barb fitting on the intake s...

Page 5: ...d Elbow into the Horizontal Tube on the intake side See FIG 6 2 Fit the other Barbed Elbow into the Horizontal Tube on the downspout side See FIG 6 1 Fit the intake tube assembly that come with the li...

Page 6: ...ing Strap 1 Place the Foam Base underneath the livewell tank See FIG 8 1 Attach the Webbing Buckle 1 Open Sided on the 37 Webbing Strap and 4 Webbing Strap to the webbing lashing on both sides of the...

Page 7: ...ock attached to the 4 Webbing Strap See FIG 10 12 2 Once the webbing straps are attached make sure the strap runs evenly around the livewell and Foam Base See FIG 10 3 Pull the end of the web bing str...

Page 8: ...Huskisson New South Wales Australia 1 800 4 HOBIE hobiecat com au Hobie Cat Europe Toulon France 33 0 494 08 78 78 hobie cat net Hobie Kayak Europe Stellendam The Netherlands 31 0 187 499 440 hobie ka...

Reviews: