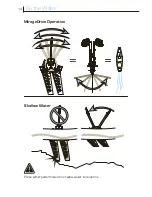
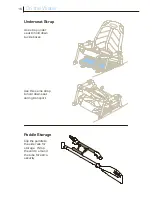
background image

Hobie Mirage 

Pro Angler Manual

®

®

Summary of Contents for mirage Pro Angler

Page 1: ...Hobie Mirage Pro Angler Manual ...

Page 2: ......

Page 3: ...e s dream was born in his parents garage when he decided to apply his love of woodworking to the sport of surfing Dad backed out the Buick Hobie carved out his very first surfboard Hobie s business of fun had begun ...

Page 4: ...ing 10 On the Water 14 Lowrance Ready Option 17 Storage and Transport 20 Maintenance and Care 23 Safety 25 Warranty 27 Look for this icon Online video is available at www hobiecat com support products Please read through the instruction manual before using this product ...

Page 5: ...ive 3 MirageDrive Seal 4 Vantage Seating 5 Paddle and T Handle 6 Mirage Well Scupper Plug 7 Gear Bucket 8 Steering Handle Parts 9 Tackle Management Rack 10 Lowrance Ready Components 2 1 2 3 4 5 6 7 8 9 10 Items not shown to scale ...

Page 6: ...pful feature and reduces water surge up the well Pay special attention to installing the drive correctly if the seal is installed 1 Insert cranks into drums The steering handle and steering knob can be installed on either the right or left side per your preference 2 Tighten crank bolt using a 9 16 or 15mm wrench ...

Page 7: ...7 Assembly Required Tackle Management Rack Removal 1 Twist handle counter clockwise 2 Open lid 3 Press rack to the side to clear the detent and lift out 4 Unloop retraction line ...

Page 8: ...nstruction CLICK Removal Level Level Installation 2 Press down and lock drive into Click and Go s 1 Lower drive straight down making sure the spine is level 2 Lift drive straight up 1 Pull back each Click and Go lever ...

Page 9: ...position by rotating and clicking them into the desired posi tion Make sure both cranks are in the same position number 3 With both feet on the pedals and together fins straight down your knees should be comfortably bent and not over crunched or extended 1 Squeeze adjuster handle ...

Page 10: ...10 Vantage Seating Installation 1 3 2 Pivot chair onto kickstand Lock chair feet to boat Place webbing strap over pin on the seat frame and hook clip ...

Page 11: ...Seating Lowering Raising Pull 1 Shift weight forward and tilt seat up 2 Pull and hold seat handle 3 Lean back to lower seat down 1 Shift weight forward and tilt seat up 2 Lean back to lower seat onto kickstand 1 2 ...

Page 12: ...rd Seatback Forward Seatback Back Seatback Back Back and Bottom Adjustment Lean forward to make seat back adjustment easier Ease weight off of seat to make adjusting seat bottom easier 1 Slide adjuster grip forward 2 Rotate grips to adjust seat 3 Make sure adjuster grip locks securely ...

Page 13: ...13 Vantage Seating Click Click C l i c k Lumbar Adjustment 1 Pull knob to release lumbar 2 Press knob to lock lumbar 3 Rotate knob to tension lumbar ...

Page 14: ...14 On the Water MirageDrive Operation Shallow Water Press either pedal forward in shallow water to raise fins ...

Page 15: ...15 On the Water Rudder Down and Up Steering Uncleat and release Pull and cleat ...

Page 16: ...eat Strap Paddle Storage Use strap under seat to hold down tackle boxes Use this same strap to hold down seat during transport Clip the paddle to the side rails for storage Wrap the velcro around the tube for extra security ...

Page 17: ...17 Lowrance Ready Option 1 8 3mm Transducer Installation Transducer is an option accessory and is not included with boat Metal clips ...

Page 18: ... solid rubber plug 3 Choose the correct plug for your wire size and insert the wire by opening the plug along the slit 4 Press the new plug with the wire installed into the plastic plug making sure it fits properly 5 Bolt the thru hull wire assembly to the hull using the nut and making sure you have the o ring installed O ring ...

Page 19: ... either side of the boat if you prefer a right left side screen location 1 Run the cable into the plug just behind the transducer scupper 2 Lead the cable through the insde of the boat and exit the cable up under neath either side of the mounting boards and out through the thru hull fitting ...

Page 20: ...me can flatten dent the sides Hanging the boat by the scuppers can distort the scupper holes Never hang the boat by handles or pad eyes They are not designed to handle long term load and will fail Storing your boat upright with prop erly fitting cradles is most advised Storing your boat upside down on crossbars or hanging from wide strapping are two other great ways to keep the boat stored ...

Page 21: ...art for more than one hour less time in warmer temperatures or direct sunlight Store out of Weather Additional Storage Key Points Always remove all water from boat Don t leave tie down straps tight over a long period of time Storing in non recommended configurations can result in hull damage and can void your warranty Never hang from the handles or padeyes ...

Page 22: ...o first consult your car and roof rack owner s manual to ensure that you comply with all of their recommendations precautions and specifications Running a line or strap from the bow and stern of the boat to each bumper is required If your bumpers do not have a gap to pass a rope around look underneath There should be a loop of metal which is used by car transports such as tow trucks Many people li...

Page 23: ...rageDrive Regular Maintenance Checking Cable Tension Visit the support section at hobiecat com for information on the MirageDrive Cables should be tight enough so they can only be slightly squeezed in under firm finger pressure ...

Page 24: ...over 3 Loosen the screw clamping the rudder line 4 Pull the slack out of the rudder line making sure that the steering handles are still straight If they are not straight adjust the lines accordingly 5 Tighten the screw to clamp the line and hold it in place Replace the rudder cover ...

Page 25: ... carry the spare paddle provided with the boat Never Never go alone and always file a float plan Never go in flood and or fast moving water conditions Hobie kayaks are not designed for fast moving water Never exceed your ability and be aware of your limitations Never use alcohol or mind altering drugs prior to or while using this product Never open your hatches in unstable water conditions Never r...

Page 26: ...ayak sail down on the water if applicable Mirage Cassette Plug You Hobie is shipped with a Mirage Cassette Plug The plug is provided as standard equipment in the Mirage Kayak package Insert the plug into the Mirage well when the MirageDrive is removed to provide added safety and to fair the bottom of the hull when paddling Getting into your Boat Falling out of your boat is some thing that very rar...

Page 27: ... hobiecat com support warranty registration or Scan this QR code with your smart phone If you have a problem or question with your Hobie product please see your Authorized Hobie Kayak Dealer They will be able to assess the problem assist with a repair and file a warranty claim with Hobie Cat Company if needed All warranty claims must go through your Authorized Hobie Kayak Dealer The Warranty Regis...

Page 28: ...California USA 1 800 HOBIE 49 hobiecat com Hobie Cat Australasia Huskisson New South Wales Australia 1 800 4 HOBIE hobiecat com au Hobie Kayak Europe Stellendam The Netherlands 31 0 187 499 440 hobie kayak com PN 89511 REV 120827 ...

Reviews: