background image

1. 

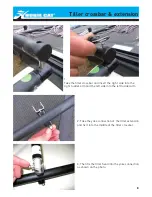
Take the tiller crossbar and insert the right  side into the 

right rudder arm and the left side into the left rudder arm.

2. Take the yoke connection of  the tiller extension 

and fix it into the middle of the tiller crossbar 

3. Then fix the tiller head into the yoke connection 

as shown on the photo.

Tiller crossbar & extension

Summary of Contents for Tiger

Page 1: ... ASSEMBLY MANUAL HOBIE TIGER ...

Page 2: ... mast 11 Stepping the mast 12 Trapeze 13 Boom 14 Mainsail 15 Cunningham 16 Mast rotation 18 Jib furler option 19 Fully battened jib serial 21 Jib sheet self tacking system 23 Self tacker traveller car control 24 Main sheet system 25 Trumpet Spinnaker option 27 Before Sailing 32 Safety advice 33 LIST OF PARTS Hulls 2 Front crossbar Rear crossbar Mast Boom Trampoline Part bag wires Rigging bag Ropes...

Page 3: ...eet system RIG BAG 1 Drain plug gasket 2 Plastic spring for boom 3 Main cunningham blocks 4 Heart shackle cunningham blocks 5 Gooseneck connector 6 Ball stop 7 Stay adjusters 8 Batten kit 9 Cunningham blocks 10 Inox rudder pins split rings LIST OF PARTS WIRES 1 Shrouds 2 Bridles 3 Diamond wires 4 5 Forestay pigtail jib halyard rope 6 7 Trapeze wires 8 rigid forestay 9 Stay adjuster 10 Spreader bar...

Page 4: ... onto the screws photo Fasten loosely Lift the left hull and follow the same steps as for the right hull Do not fully tighten the screws Respect same order for the washers as as sembled at the delivery 3 Apply silicone sealant around the screw holes at the back of the hulls Place the rear crossbar on the right side Insert the bolts washers and nuts as shown for the front crossbar Do the same thing...

Page 5: ...nt corner 3 Move to the rear of the trampoline Very closely to where the side tensioning line exits the rear of the tram poline tie a loop ensure you pull the side tensioning line firmly as to tie the loop as closely to the trampoline where the rope exits as possible Tie a bowline or a similar loop in the line which will be used for a 4 1 purchase of the side tensioning lines Repeat this step for ...

Page 6: ...supplied Continue across the rear crossbar and tie off securely when finished 7 Again take the side tensioning line and very firmly pull the line in order to tighten the trampo line Repeat this for the opposite side rear corner 8 Once the sides of the trampoline have been further tightened tie off the line and hide the tail under the trampoline Repeat this step for the opposite side rear corner NB...

Page 7: ...icker right red sticker left Take the left rudder and align the lower rudder casting onto the rear gudgeon 2 Insert the rudder pin Do not forget to put in the two split rings one on top and one at the bottom of the rudder pin Repeat the procedure for the right rudder assembly ...

Page 8: ...e right rudder arm and the left side into the left rudder arm 2 Take the yoke connection of the tiller extension and fix it into the middle of the tiller crossbar 3 Then fix the tiller head into the yoke connection as shown on the photo Tiller crossbar extension ...

Page 9: ...ll the shrouds and the forestay wire pigtail jib halyard rope and fix them to the lower hole of the mast tang using a shac kle 8 mm The shrouds go onto each side of the forestay 3 IMPORTANT Do not forget to attach the jib halyard rope to the small single block at the end of the jib halyard wire Tie off the jib halyard wire and rope near the base of the mast Preparation of the mast ...

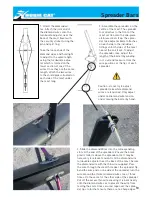
Page 10: ...st the length of the barrel by winding in or out and measure from the wire positions at the tips of each spreader 3 Slide the diamond Wires into the corresponding slots at the end of the spreaders Ensure the black plastic roller is above the spreader arm It may be necessary to release tension from the diamond wire turnbuckle adjuster near the base of the mast Secure the diamond wire with the thin ...

Page 11: ...t toggles with the clevis pins and rings Attach both shrouds into the top hole of the respective stay adjusters This is only a tempo rary position for raising the mast 4 Attach the bridle wires to the bow tangs 5 OPTION JIB FURLER Now attach the jib furler to the bridle wires NB Ensure that the hole in the furler housing is facing towards the front crossbar Now also is a good time to roll some lin...

Page 12: ... with the weight of his body Once the mast is secured remove the pin from the base of the mast which can now turn freely Fix the cunningham blocks on each side of the base of the mast 3 The second person can now take the forestay make sure it is not tangled and pin it into one of the top holes of the stay adjuster or of the furler mounted stay adjuster for the option roller jib 4 Once the mast is ...

Page 13: ...ach the trapeze handles and kits to the trapeze wires 3 Pass the skipper trapeze shock cords under neath the trampoline and up through the grom mets at the side of the trampoline Attach to the trapeze system as shown in the photographs 4 For the crew trapeze take the shock cord that comes out of the cross bar and fix to it the end of the trapeze adjustable rope using a bowline knot see above photo...

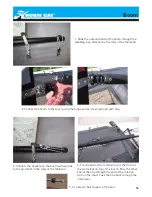
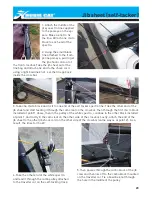
Page 14: ...vis pin and split ring 3 Connect the shackle on the boom outhaul line to the grommet in the clew of the mainsail 4 Tie one end of the rotation line to the front of the clamcleat on top of the boom Pass the other end of the line through the end of the rotation arm on the mast Take the line back through the clamcleat 5 fit a plastic ball stopper at the end Boom ...

Page 15: ...e mast Pass one end through the hole in the mainsail head plate and stop with a 8 figure knot on the left side 3 Go onto the trampoline Feed the luff of the mainsail into the opening of the mast track ensuring that the hook is on one side of the mast and the halyard rope on the other side Raise the mainsail by pulling the halyard and feeding the sail until it reaches the top When the sail is all t...

Page 16: ... other side with the B line take the central line C Insert it in the cunningham block on the left side of the mast and feed it up through the first sheave in the left pulley from the rear to the front take it down in the left sheave at the bottom of the mast from the front to the rear take it back up into the second sheave of the left block from the rear to the front take it down in the single blo...

Page 17: ...f the central line C lead them behind the shrouds under the trampoline and attach them on the inox rings that are hold by shock cords Be careful to cross the lines Attach the end coming fromt he right to the left ring and the end coming from left to the right ring ...

Page 18: ...They feed it under the trampoline through the eyelet and fix one micro block at each end 2 Take the green and white lines Attach them using a bowline knot to the tram poline chain plates on the inside of the hulls Take each free end feed each of them into one of the micro block installed in point 1 above and lead each of them out to the respective cleat located on the hulls near the shrouds ...

Page 19: ...emains inside the zipper As you pull down on the halyard line close the zipper as the sail is raised 3 Once the jib is fully raised take the jib luff tensioner line and secure it to the bottom holes in the stay adjuster 4 Now pass the line through the small pulley at the end of the jib halyard then back down through the cleat on the tack of the jib Remove the jib halyard line and stow it in the tr...

Page 20: ...rough the small pulley Then lead it down through the stay adjuster and through the furler 6 After that lead it through the small pulley at the end of the line that is attached on the briddle toggle on the left hull 7 Lead it through the block fixed on the brid dle toggle of the opposite side right hull 8 Lastly secure it in the cleat on the front crossbar ...

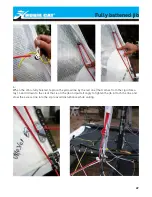
Page 21: ...t Attach the 2 m lang line on the dolphin striker Lead the free end through one of the supplied blocks and fix it to the jib cleat on the front crossbar 3 Unroll the jib and open the zipper on the luff Attach the jib head using the shackle of the white halyard rope Take the other end of the halyard with the small pulley Then position the jib and the halyard line against the forestay as shown on th...

Page 22: ...sted replace the yellow line by the red one that comes from the rigid fores tay Lead it down to the cleat that is on the jib and pull strongly to tighten the jib Attach the line and stow the excess line into the zip to avoid disturbance while sailing ...

Page 23: ...e jib sheet and start feeding it through the cam cleat on the crossbar then through the first micro block installed at point 1 above then in the pulley of the white spectra continue in the other block installed at point 1 and lastly in the cam cleat on the other side of the crossbar Lastly attach the end of the jib sheet to the other jib shock cord on the other side of the crossbar same way as at ...

Page 24: ...e spinnaker pole near the base This line passes from the front to back through the pad eye The line then passes through the black cleat on the crossbar lead the line between the rail and the crossbar and tie an 8 figure knot at the end to prevent the line from falling off 3 To adjust the limit of the jib traveller car simply pull or release the thin line and replace in the cleat once set ...

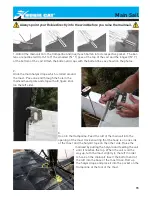
Page 25: ...tructions 2 Shackle the mainsheet ratchet block to the top of the main traveller car 3 Shackle the boom block to the boom block han ger 4 Thread the tail of the main sheet through the swivel cleat assy on the rear beam through the sheaves on the traveller car down through the eyes trap on the rear of the beam and tie a figure 8 knot in the end ...

Page 26: ...26 Main sheet system 1 2 3 4 5 6 7 8 9 10 11 12 ...

Page 27: ... the middle of the front crossbar 3 Fix the spi pole bridles to the bridle plates at the bow of the hull 4 Take the spi bag and insert it in the trumpet as shown on the picture Then fix the whole thing to the pole using the screws supplied in the kit 5 Attach the spi bag to the pole using the velcro stripes and attach the rear part of the bag to the cross bar using the plastic pad eye and the spi ...

Page 28: ...ker 7 Take the other end of the spinnaker halyard the one that is along the mast between the spreader bars Lead it through the cam cleat that is on the mast then through the pulley on the crossbar then through the pulley on the shock cord near the rear crossbar then back on the pulley that is on the trampoline and lastly in the eyelet that is in front of the trampoline pulley Trumpet spinnaker kit...

Page 29: ...patch tight a figure 8 knot 9 Attach the security line between the last patch and the spinnaker head 10 To avoid the trumpet mouth to move during the handlings it must be fixed using a grey spectra line as shown on the photos The line must be attached on the pole then through the trumpet and fixed on the bridle plate on the hull Trumpet spinnaker kit ...

Page 30: ...ock as shown on the pictures below 3 Attach the white spectra to the dolphin striker after you have lead it through the trampolin eyelet 4 Take one end of the spinnaker sheet line lead it through the carbo block near the trampolin through the spi block with plastic spring mounted on the trampolin back to the carbo block installed on the self tacker track support Proceed in the same way on the othe...

Page 31: ...31 Spinnaker line circuit Spinnaker halyard Spinnaker tack line Spinnaker sheet line ...

Page 32: ...ave been worn through or the colored wear indicator is showing stop using them and rebuild the bottom with glassfiber and resin CAREFULLY READ AND OBSERVE THE SAFETY ADVICES MENTIONED IN THE FOLLOWING PAGE Before sailing check the following points 1 Install the drain plugs do not overtigh ten hand tight is sufficient Overtightening may cause the drain plug flange to distort and cause leakage 2 Ten...

Page 33: ...sail without a righting line Wear appropriate clothes Wear a wet suit or dry suit in cold weather or cold water conditions Learn the right of way rules and when in doubt give way to others When not sailing always keep the boat pointed into the wind whether in the water or on the beach Read the instruction manual carefully Make sure everyone on the boat reads and understnads these safety instructio...

Reviews: