HOBO MicroRX Station for HOBOnet (RX2105 and RX2106) Manual
1-800-LOGGERS
8
www.onsetcomp.com
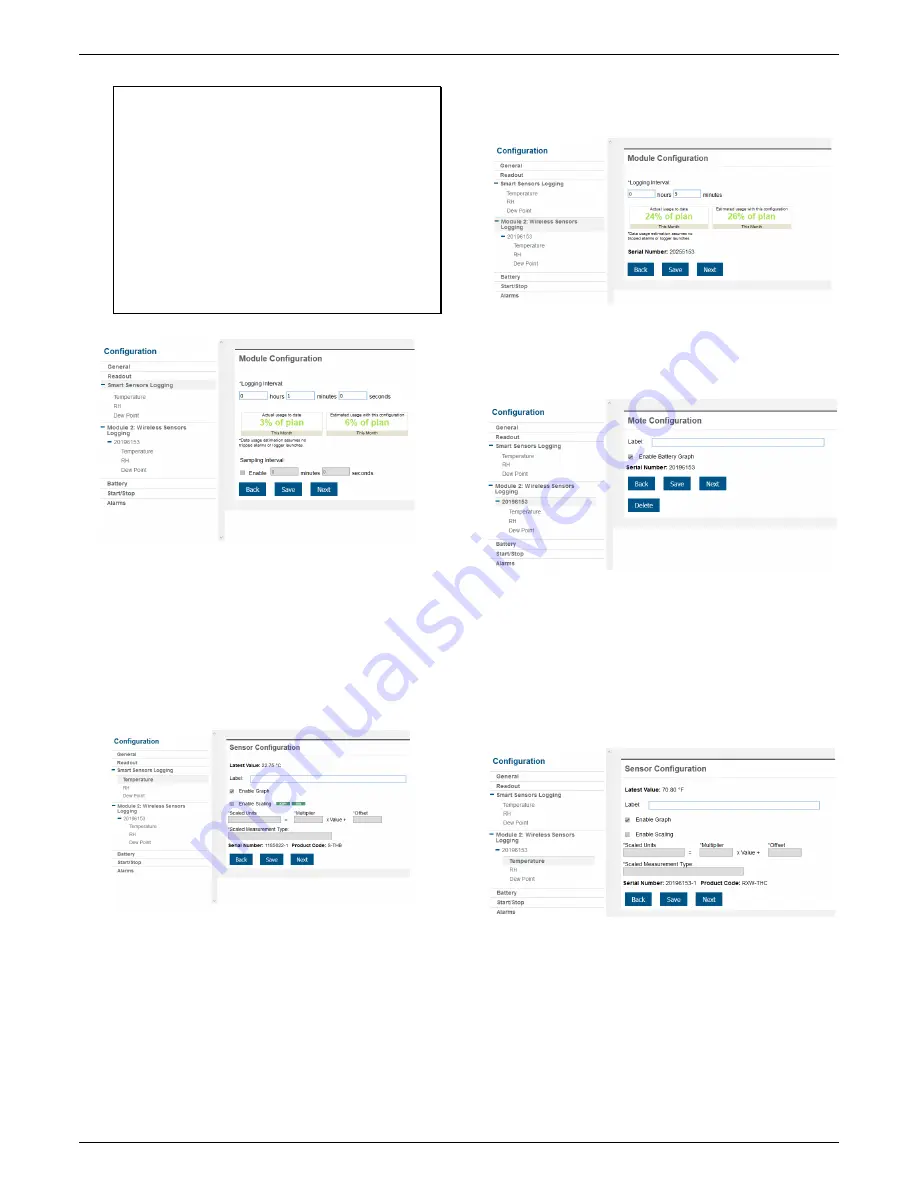
Tip:
When a sampling interval is configured, the station
will take multiple measurements within a given logging
interval and then average them together to create a
single logged data point. This is only an option for the
following smart sensors that support measurement
averaging: temperature (S-TMB-M0xx), PAR (S-LIA-
M003), solar radiation (S-LIB-M003), barometric
pressure (S-BPA-CM10 and S-BPB-CM50), 4-20mA input
(S-CIA-CM14), 12-bit voltage input (S-VIA-CM14), and
FlexSmart TRMS module (S-FS-TRMSA-D). Disable the
sampling interval if none of your smart sensors support
measurement averaging to avoid unnecessary drain on
the battery power.
d.
Click Save or click Next.
e.
Click a smart sensor from the Configuration menu.
f.
Type a label for the smart sensor (optional) and click to
enable or disable the graph (enabled by default).
g.
To set up scaling for the smart sensor, click the Enable
Scaling checkbox and fill in the Scaled Units, Multiplier,
Offset, and Scaled Measurement Type fields.
h.
Click Save. You can also click Next to move from one
smart sensor to the next and save the sensor
configuration. Clicking Back does not save the
configuration changes.
i.
Repeat steps e–h for any additional smart sensors you
need to configure.
Wireless Sensor Configuration
You can configure both the global settings for the manager
module that affect all sensor motes (logging interval) and
the settings for each individual mote (labels, enabled
graphs, and scaling).
a.
Click Module 2: Wireless Sensors Logging from the
menu on the left.
b.
Select the logging interval to be used for all wireless
sensors, which can be different than the one used for
smart sensors (if applicable).
c.
Click Save or Next.
d.
Click one of the motes from the menu under Module 2:
Wireless Sensors Logging as shown in the following
example. Click the serial number or name for the mote,
not the measurement type.
e.
Type a label for the mote (optional) and click to enable
the battery graph for the mote if desired. The label will
also automatically be applied to any mote sensors
without a default label.
f.
Click Save or click to Next to move to either the next
mote (if it is a repeater) or the sensor measurement
type for that mote.
g.
Click one of the mote measurement types from menu
under Module 2: Wireless Sensors Logging as shown in
the following example
h.
Type a label for the measurement type (optional) and
click to enable or disable the graph (enabled by default).
i.
To set up scaling for the wireless sensor, click the Enable
Scaling checkbox and fill in the Scaled Units, Multiplier,
Offset, and Scaled Measurement Type.
j.
Click Save or click Next.
k.
Repeat steps d–j for any additional motes you need to
configure for the module.


