HOBO Pro v2 User’s Manual
4
U23-002
1.
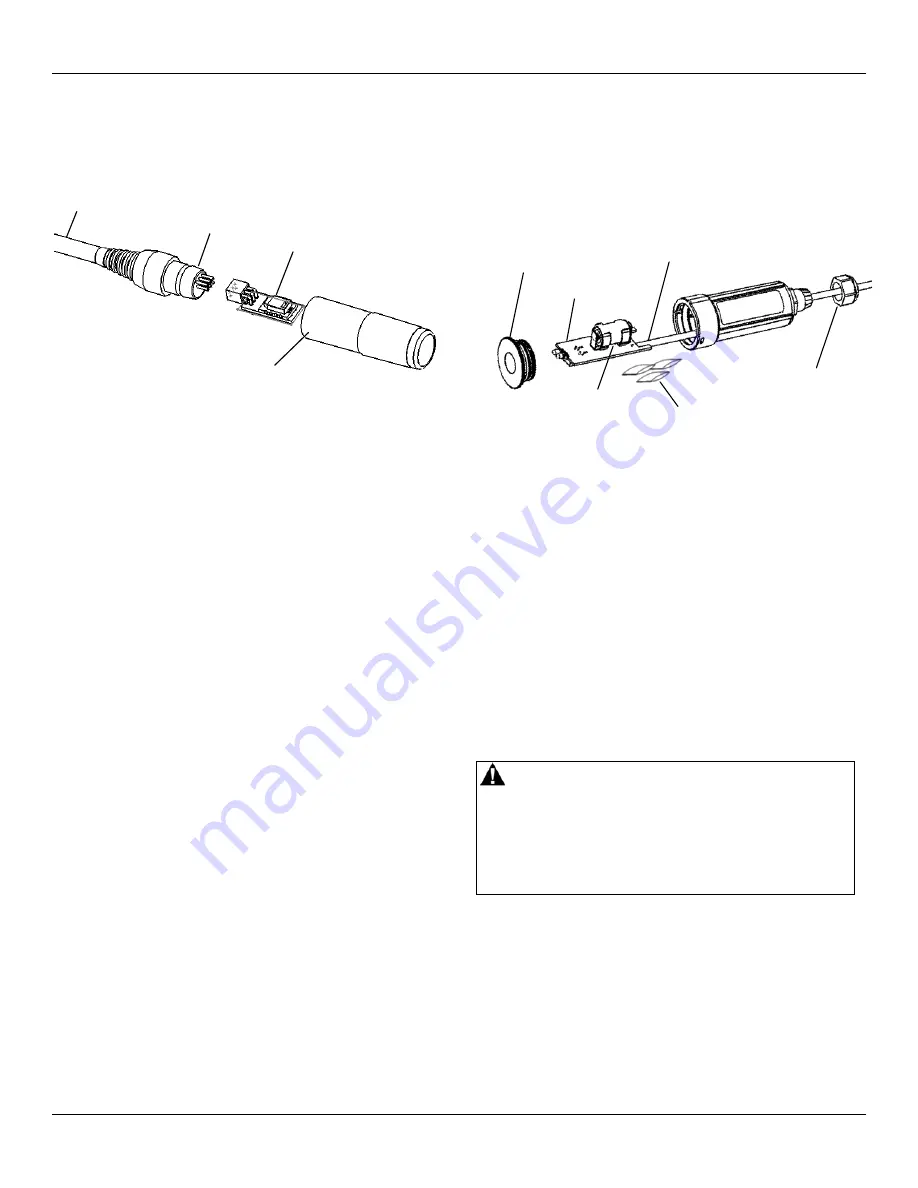
Grasp the cap and membrane and pull firmly. Discard them.
2.
Note the orientation of the small circuit board containing the
RH sensor. Pull it out and discard it.
Cable from logger
Receptacle
RH sensor
RH sensor cap
& protective membrane
3.
Holding the sides of the board only, push gently but firmly to
install the new sensor (Onset part # HUM-RHPCB-2) in the
same orientation.
WARNING:
Do not touch the actual
sensor (black chip) itself; doing so may compromise
accuracy.
4.
Put the new sensor cap and membrane on. Do not force the
cap. If it does not go on easily, the sensor may be installed
backwards. Reverse the sensor and try again.
Battery
Typical battery life is about three years. Actual battery life is a
function of the number of deployments, logging interval, and
operation/storage temperature of the logger. To obtain a three-
year battery life, use a logging interval of one minute or greater,
and operate and store the logger at temperatures between 0° and
40°C (32° and 104°F).
Frequent deployments with logging intervals of less than one
minute, and continuous storage/operation at temperatures above
40°C, will result in significantly lower battery life. For example,
continuous logging at a one-second logging interval will result in
a battery life of approximately one month.
The logger can report and log its own battery voltage. If the
battery falls below 3.1 V, the logger will record a “bad battery”
event in the datafile. If the datafile contains “bad battery” events,
or if logged battery voltage repeatedly falls below 3.3 V, the
battery is failing and should be replaced before the next
deployment. To change the battery:
1.
Turn slightly counter-clockwise and pull to remove the
protective cap. Loosen the cable grommet on the opposite
end, if the logger has an external sensor.
2.
Carefully pull out the circuit board containing the battery. (If
the logger has an external sensor, you will probably find it
easier to push the cable(s) into the case to push the circuit
board out.)
3.
Examine the desiccant packs that were packed into the case.
If the desiccant is not bright blue, put the desiccant packs in a
warm, dry place until the blue color is restored.
Circuit board
Protective cap
Battery
Desiccant packs
Cable from sensor
(if applicable)
Grommet for cable
(if applicable)
4.
Install a new 1/2 AA, 3.6 Volt lithium battery (part # HP-B).
The positive end of the battery should face towards the
communication LEDs.
5.
Use a clean, dry cloth to wipe away any moisture inside the
case.
6.
Push the board and the desiccant packs back into the case,
taking care not to bend the communication LEDs. Align the
board with the grooves inside the case. (If you try to put the
board in upside-down, the battery will get in the way.)
7.
Make sure o-ring on the protective cap is still in place. It
should not be pinched, twisted, or trapping dirt or lint, which
could interfere with the protective cap.
8.
Line up the bumps on the protective cap with the notches in
the logger’s case. Push and turn the cap slightly clockwise.
Pull the slack in the sensor cable(s) and tighten the grommet,
if applicable.
WARNING:
Do not cut open, incinerate, heat above
100°C (212°F), or recharge the lithium battery. The battery
may explode if the logger is exposed to extreme heat or
conditions that could damage or destroy the battery case. Do
not dispose of the logger or battery in fire. Do not expose the
contents of the battery to water. Dispose of the battery
according to local regulations for lithium batteries.


