background image


4 | 

P a g e


www.Hodedah.com 

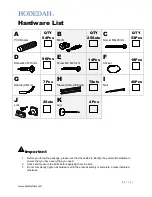
Hardware List


PVC Dowel 


QTY 

54Pcs 

Minifix 


QTY 

25Sets 


Screw M4x45mm 


QTY 

53Pcs 

Screw M3.5x16mm 


96Pcs 

Screw M3.5x21mm 


14Pcs 


Sticker 


18Pcs 


Handle (96mm) 


7Pcs 


H  

Drawer Slide (300mm) 


7Sets 


Nail 


40Pcs 


Lock


2Sets


Leg


4Pcs 


Important 

1.  Before you throw the package, please use the Check Box to identify the parts and hardware to 

ensure that you have everything you need. 

2.  Check and measure the bolts before applying them to parts. 
3.  Do not completely tighten all hardware until the entire assembly is complete, unless indicated 

otherwise. 

Summary of Contents for HI70DR-A

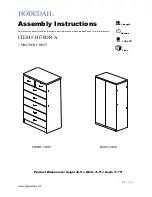
Page 1: ...s This instruction booklet contains important safety information please read and keep for future reference ITEM HI70DR A 7 DRAWER CHEST FRONT VIEW BACK VIEW Product Dimensions Height 48 5 x Width 31 5...

Page 2: ...rly assembled subjected to misuse abuse or which has been altered or repaired in any way To obtain warranty service original purchaser must present the following original bill of sale date of purchase...

Page 3: ...damage parts Your package should include the following hardware and parts Parts are labeled or stamped on the raw edge Please inspect contents to ensure you have received all components If you are mis...

Page 4: ...6mm 7Pcs H Drawer Slide 300mm 7Sets I Nail 40Pcs J Lock 2Sets K Leg 4Pcs Important 1 Before you throw the package please use the Check Box to identify the parts and hardware to ensure that you have ev...

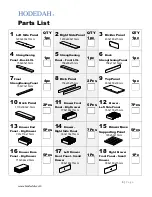
Page 5: ...nel 758x70x15mm 4pc 8 Kick Panel 758x95x15mm 2Pcs 9 Top Panel 800x450x30mm 1pc 10 Back Panel 1170x393x2 5mm 2Pcs 11 Drawer Front Panel Big Drawer 778x180x15mm 5Pcs 12 Drawer Left Side Panel 350x116x15...

Page 6: ...Hodedah com 19 Drawer Base Panel Small Drawer 323x344x2 5mm 2Pcs 20 Drawer End Panel Small Drawer 314x116x15mm 2Pcs The Breakdown 11 12 14 13 16 15 1 9 2 10 10 8 8 6 7 5 4 3 19 12 20 14 17 19 18 14 2...

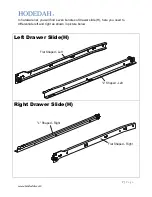
Page 7: ...ware list you will find seven bundles of drawer slide H here you need to differentiate left and right as shown in picture below Left Drawer Slide H Flat Shaped Left L Shaped Left Right Drawer Slide H...

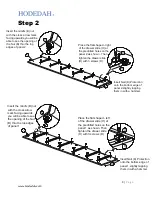
Page 8: ...edah com Step 1 Insert PVC dowel A to panel 1 2 3 4 5 6 7 8 12 and 14 s non thru holes as shown using hammer to gently tap them in Non thru holes are small indents in the wood that show you where the...

Page 9: ...the cross arrow mark facing upwards you will be able to see the opening of the Nut B thru the top edges of panel 2 H 1 Place the flat shaped left of the drawer slide H at the predrilled holes on the p...

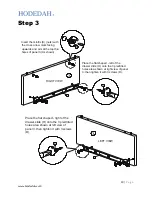
Page 10: ...panel 3 As shown Place the flat shaped left of the drawer slide H onto the 3 predrilled holes area shown at right view of panel 3 then tighten it with 3 screws D H RIGHT VIEW H D Place the flat shaped...

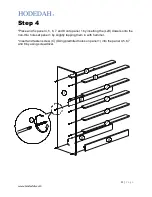
Page 11: ...6 7 and 8 onto panel 1 by inserting the Left dowels onto the non thru holes at panel 1 by slightly tapping them in with hammer Insert and fasten screw C Using predrilled holes on panel 1 into the pan...

Page 12: ...the panel 4 and 5 using predrilled holes and tighten it into panel 3 6 8 8 2 5 4 1 3 7 7 7 7 Place and fix panel 4 5 6 7 and 8 onto panel 2 by inserting the Right dowels onto the non thru holes at pa...

Page 13: ...ew D Fix panel 9 onto panel 1 2 and 3 align properly by inserting the 6 dowels of panel 1 and 2 onto the non thru holes of panel 9 Slightly hammer all in Gently tap the panel 9 to connect panel 1 pane...

Page 14: ...a g e www Hodedah com Step 7 Fix approximately 40 pieces of nails I into panel 10 using a hammer Cover all the screws C head with sticker F provided by stick up onto hole of screw C heads one by one 1...

Page 15: ...the minifix B X5 Insert the minifix B nuts with the cross arrow mark facing upwards and aim to panel 12 14 and 15 s top thru holes As shown Insert panel 16 into the drawer and align properly As shown...

Page 16: ...to panel 14 s upper thru holes to fix them onto panel 13 Next tighten screw C to panel 12 s upper thru holes to fix up to the panel 13 Tighten screw C to panel 13 upper thru holes to fix up to the pa...

Page 17: ...ing outward and should be in parallel with drawer front panel 11 Then tighten 3 screws D on each drawer slide H 14 H D H D D H X5 H H 12 L shaped right of the drawer slide stick to the end of drawer f...

Page 18: ...th the cross arrow mark facing upwards and aim to panel 12 and 14 s top thru holes As shown Slide in panel 16 into panel 12 and 14 slightly hammer panel 12 and 14 into panels 17 and 18 X2 C Place pane...

Page 19: ...ah com Flip the drawer over Tighten 2 screws E from inner side of panel 17 and 18 into the handle G holes 18 X2 17 J Flip the drawer over Tighten 4 screws D from inner side of panel 17 and 18 into the...

Page 20: ...and should be in parallel with drawer front panel 17 and 18 Then tighten 3 screws D on each drawer slide H 14 X2 17 18 H D D H H D H H 12 L shaped right of the drawer slide stick to the end of drawer...

Page 21: ...wers and slide them the white rollers at drawer slide at both side of drawers are to go into the track of the slide at each side panel All the way gently one drawer by one drawer starting from bottom...

Page 22: ...22 P a g e www Hodedah com...

Page 23: ...23 P a g e www Hodedah com Job Complete 9 2 18 17 11 11 11 11 11 Enjoy Thank you for purchasing from Hodedah...

Reviews: