background image

16

GB

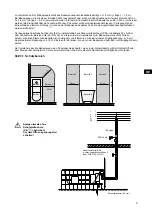
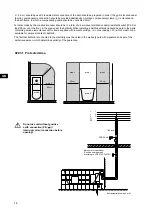
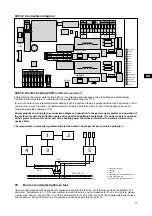
02.03.1 Protected Area

L       1 
L       2 
L       3 

PE 


Main switch in bathroom 
(Position outside area 2 
according to VDE 0100 Teil 701) 

10A rccb 

RCD 30 mA 

Equipotential bonding 4 mm² 

area 1

area 1

area 2

area 2

60 cm

60 cm

area 2

60 cm

225 cm

r = 60 cm

area 0

area 0

L = 2.5 m) should be used. Fixed electrical connection of the bath should be prepared in zone I (the unit is located under 

the tub), compensatory connection should be provided additionally. A marked compensatory clamp 

 is mounted on 

the bath frame, to which a compensating cable should be connected 4mm².

Terminal made by the construction team should be in a form of a permanent distributive damp-resistant socket (IP 65, at 

least 30 cm over the 

fl

 oor, in the area under the bathtub).When installing a bathtub attention should be paid to the parts 

containing active elements (except for items supplied with low safe voltage, i.e. not exceeding 12 V) which must not be 

available for persons located in bathtub.

The fact that bathtub is connected to the electricity must be noted in the warranty card with signature and seal of the 

authorised person, which determines validity of the guarantee.


Do not use unit without positive 

earth connection (PE, 

 )!

Interrupt current connection before 

opening!


Summary of Contents for Laola II

Page 1: ...ration instructions Instructions de montage et d utilisation du kit vapeur Istruzioni di montaggio ed uso Montage en gebruiksaanwijzing Instrukcja montażu i obsługi Инструкция по монтажу и эксплуатации 安装及操作指南 DE GB FR IT NL PL RU CN Whirlsystem Laola II ...

Page 2: ... Installation and operation instructions 14 Instructions de montage et d utilisation du kit vapeur 25 Istruzioni di montaggio ed uso 36 Montage en gebruiksaanwijzing 47 Instrukcja montażu i obsługi 58 Инструкция по монтажу и эксплуатации 69 安装及操作指南 80 Typ EN03 ...

Page 3: ...8 01 Wie funktioniert das Whirlsystem 9 08 02 Wie funktioniert das Airsystem 9 09 Funktionen Laola II 9 09 01 Tastatur 9 10 Trockenlaufschutz 10 11 Autom Abschalten des Systems 10 12 Ozonisierung nur bei Airsystem und Whirl Airsystem 10 13 Nachblasen nur bei Airsystem und Whirl Airsystem 10 14 Desinfektion 10 15 Benutzung und Pflege 11 15 01 Ab und Überlaufarmatur mit Drehknopf 12 15 02 Überlaufdr...

Page 4: ...ches Wandanschlussprofil Artikel Nr 6915 erforderliches Zubehör verwenden Bei Modellen die für eine Wandanbindung vorgesehen sind ist eine Wannenrandauflage erforderlich erforderliches Zubehör Wannenanker Artikel Nr 690401 gemäß der dort beiliegenden Montageanweisung montieren Bei der Montage darauf achten dass die Verkleidung den Wannenrand unterstützt 02 01 HOESCH Combi Plus Sonderzubehör Wannen...

Page 5: ...g stehen Eine markierte Klemmvorrichtung wird an der Badewanne angebracht an die ein Ausgleichskabel angeschlossen werden sollte 4mm Der bauseitige Anschluss hat über die fest zu installierende Feuchtraumverteilerdose IP 65 mindestens 30 cm über dem Fußboden im Bereich unter der Wanne zu erfolgen Bei der Installation einer Badewanne ist auf die Teile zu achten die aktive Elemente beinhalten mit Au...

Page 6: ...raten Netzanschluss für Heizungs Leistungsteil erstellen und mit 10 A separat absichern Polarität gemäß Anschlussplan gewährleisten Netzanschluss und Betrieb der Anlage nur mit aufgelegtem Schutzleiter und angeschlossenem Potentialausgleich Netzanschluss für Systemsteuerung und Heizungs Leistungsteil über einen gemeinsamen Fehlerstromschutzschalter 30 mA absichern Die Temperaturregelung erfolgt ma...

Page 7: ...lspezifischen Revisionsöffnungen sind mit einem einfachen Zugang und freier Öffnung von mindestens 400 bis 450 mm Breite sowie 350 mm Höhe gemäß der beiliegenden Maßzeichnung anzuordnen Zusätzlich ist eine Revisionsöffnung im Ablaufbereich vorzusehen Der Revisionseinsatz darf nur mit Werkzeug geöffnet werden Die Maße sind unbedingt einzuhalten da nur dann bei eventuell erforderlichen Wartungen ein...

Page 8: ...g Es ist soweit Das erste Bad in Ihrer HOESCH Whirlwanne steht bevor Wir wünschen Ihnen viel Freude an Ihrer neuen Wanne Ständige Produktionsüberwachung Forschung und Weiterentwicklung verbunden mit dem innovativen Design unserer Luxuswannen aus Sanitär Acryl gewährleisten dass Sie sich für ein hochwertiges Qualitätsprodukt entschieden haben Für ungetrübten Badespaß bitten wir Sie diese Bedienungs...

Page 9: ...Kurzes Drücken der Taste 2 schaltet die Pumpe mit der Leistung von 60 ein Das Drücken dieser Taste während des Betriebs schaltet die Pumpe aus 3 Taste zur Leistungsregelung der Gebläse und des Welleneffektes aus den Luftdüsen Die Taste ist während des Betriebs der Gebläse aktiv Kurzes Drücken der Taste 3 ändert die Gebläsenleistung Die Regelung ist wie folgt das weitere Drücken der Taste führt zur...

Page 10: ...beim gleichzeitigen Drücken der beiden Tasten startet sofort die Pumpe obwohl die Zeit zum Trocknungsbeginn nicht beendet wurde 1 Beim Drücken der Taste während des Betriebs wird die Pumpe ausgeschaltet Drücken der Taste während der Zeitabmessung zum Trocknungsbeginn verursacht das Löschen des Vorgangs 14 Desinfektion Die regelmäßige Desinfektion Ihrer Whirlwanne sorgt für eine optimale Hygiene Wi...

Page 11: ... walten lassen Die Fachbetriebe und der erste Eigentümer der Whirlwanne erklären den nachfolgenden Eigentümern und Benutzern die Bedienungsanleitung zur Verfügung zu stellen Die Wassertemperatur in der Whirlwanne soll die durchschnittliche Körpertemperatur nicht überschreiten Der ideale Temperaturbereich liegt bei 32 C bis 37 C Stellen Sie sicher dass keine Elektrogeräte oder andere stromführende ...

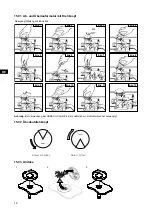
Page 12: ...mit Inbus M4 M 4 1 2 3 4 5 6 7 8 9 10 11 12 Bild Bild Bild Bild Bild Bild Bild Bild Bild Bild Bild Bild Achtung Bei Verwendung der HOESCH Combi Plus ist zusätzlich ein Rohrunterbrecher notwendig 15 02 Überlaufdrehknopf Ablauf schließen Ablauf öffnen 15 03 Airdüse 1 2 3 ...

Page 13: ...bern siehe Punkt 13 01 Massagedüsen Reinigung der Düsen Was ist zu tun wenn sich während dem Whirlbaden Schaum bildet Sofort Whirlbetrieb und Air Injection abschalten Wasser ablassen und eine gründliche Spülung durchführen Achten Sie grundsätzlich darauf nur geeignete keine schäumenden ölhaltigen Badezusätze zu verwenden Sie die Whirlwanne nicht benutzen oder abwesend sind z B Urlaub Grundsätzlich...

Page 14: ...s the whirl system function 20 08 02 How does the Air system function 20 09 Functions of Laola system 20 09 01 Control panel 20 10 Dry run protection 21 11 Automatic switching off of the system 21 12 Ozonation only for air system and whirl air system 21 13 System drying only for air system and whirl air system 21 14 Disinfection 21 15 Usage and maintenance 22 15 01 Drain overflow fittings with an ...

Page 15: ...al essential equipment bathtub anchor article No 690401 install according to the attached installation manual During the installation please pay attention to the fact that the apron must support the bathtub edge 02 01 HOESCH Combi Plus additional equipment bathtub tap with special drain overflow fitting An additional pipe interrupter is essential for the installation Water connection should be mad...

Page 16: ...nsating cable should be connected 4mm Terminal made by the construction team should be in a form of a permanent distributive damp resistant socket IP 65 at least 30 cm over the floor in the area under the bathtub When installing a bathtub attention should be paid to the parts containing active elements except for items supplied with low safe voltage i e not exceeding 12 V which must not be availab...

Page 17: ...nection should be made for part of the heating power and it should be protected separately 10 A Ensure polarity according to the connections diagram Connection to the power supply system and operation of the system only with the protection cable and connected equalizing of potentials The power supply connection of the system control unit and for part of the heating power should be protected with a...

Page 18: ...case of all models place easily accessible and easily opening inspection windows min 400 to 450 mm wide and 350 mm high according to annexed drawings with dimensions Moreover allow for an inspection window near the outlet The inspection window can be opened only with the use of proper tools The given dimensions should be absolutely maintained because in case of a need for maintenance only then it ...

Page 19: ...manual Finally you are about to bathe for the first time in your HOESCH whirl tub We wish you a lot of pleasure in your new bathtub The fact that you have a highest quality product is the effect of constant monitoring of the product research and development works in connection with the innovative design of our luxurious bathtubs made of sanitary acrylic However in order for your bathing not to be ...

Page 20: ...hting water pump off 1 Switch off everything switching all functions off 2 air pump on off Short pressing of button 2 turns the pump on with 60 power Pressing this button during operation turns the pump off 3 air pump power control button and wave effect button from air jets Active when air pump is on Short pressing of button 3 changes the air pump performance The adjustment is as follows at furth...

Page 21: ...2 4 simultaneous pressing of the buttons immediately starts the pump despite the fact that time to the beginning of drying has not elapsed 1 pressing the button during operation turns the pump off Pressing the button during time measurement to drying cancels the operation 14 Disinfection Regular disinfection ensures optimal hygiene It is recommended to start the disinfection once a month or every ...

Page 22: ...the first user declare that they will make the operating manual available for subsequent owners and users The temperature of water in the whirl tub should not exceed the average body temperature The ideal scope of temperatures is from 32 C to 37 C For your own safety please make sure that no electric devices or other current conducting elements will not fall into the bathtub filled with water Main...

Page 23: ...the use of an M4 hexagon socket screw key M 4 1 2 3 4 5 6 7 8 9 10 11 12 Bild Bild Bild Bild Bild Bild Bild Bild Bild Bild Bild Bild Notice With HOESCH Combi Plus it is necessary to use tubular interrupter 15 02 Overflow adjusting knob Close the drain Open the drain 15 03 Air jet 1 2 3 ...

Page 24: ... the drain valve see point 15 01 Massage jets Clean the jets What you should do when during whirl bathing foam appears Immediately switch the Whirl system and Air Injection off Drain and rinse the bathtub thoroughly Remember to use only appropriate additives for bathing the ones that do not foam and do not contain oils you do not use the whirl tub or you are absent e g you are leaving for a holida...

Page 25: ... 31 08 01 Comment fonctionne le système Whirl 31 08 02 Comment fonctionne le système Air 31 09 Fonctions Laola II 31 09 01 Clavier 31 10 Sécurité contre le fonctionnement à sec 32 11 Arrêt automatique du système 32 12 Ozonisation seulement pour Airsystem et Whirl Airsystem 32 13 Sèchage seulement pour Airsystem et Whirl Airsystem 32 14 Désinfection 32 15 Utilisation et entretient 33 15 01 Orifice ...

Page 26: ...ionnels en vente dans le commerce pour assurer une isolation acoustique éviter la propagation par effet de paroi Les modèles murales nécessitent une console murale accessoires optionnels dispositif d ancrage réf 690401 à poser conformément aux instructions de montage correspondantes Lors du montage veiller à ce que l habillage soutienne le rebord de la baignoire 02 01 HOESCH Combi Plus accessoire ...

Page 27: ... à disposition Un dispositif de serrage marqué doit être fixé à la baignoire à laquelle le câble de compensation doit être raccordé 4mm La boîte de raccordement réalisé sur chantier doit être construit en tant qu une raccordement résistante à l humidité IP 65 au minimum 30 cm au dessus du sol dans la zone au dessous de la baignoire Lors de l installation d une baignoire il faut porter une attentio...

Page 28: ...ctrique et doit être protégé séparément par un fusible de 10 A Assurer la polarité selon le schéma des raccordements Le branchement au réseau doit être correct et le fonctionnement de l installation ne peut être garantit en cas de raccordement d une ligne équipotentiel Protéger le branchement au réseau la commande du système et la partie de puissance du chauffage par un disjoncteur de 30 mA Le rég...

Page 29: ...ssai il est interdit de se servir de la baignoire dépourvue de son habillage 4 Installer les regards en fonction des modèles pour qu ils soient facilement accessibles dans une ouverture d au moins 400 à 450 mm de large et 350 mm de haut conformément au croquis joint Prévoir également une ouverture de regard dans la zone d écoulement Ouvrir la trappe du regard uniquement avec un outil Respecter imp...

Page 30: ...omassage HOESCH est arrivée Nous vous souhaitons de profiter le plus longtemps possible de votre nouvelle baignoire Votre choix s est porté sur un produit de qualité Il est le résultat d un contrôle permanant lors de la production d un travail de recherche et de nombreux perfectionnements valorisés par le design innovant Votre nouvelle baignoire de luxe est en acrylique sanitaire servant à la prod...

Page 31: ...nctions 2 Touche Pompe à air Marche Arrêt Une brève pression sur la touche 2 permet d allumer la pompe à une puissance de 60 Une pression sur cette touche en cours de fonctionnement permet d arrêter la pompe 3 Touche pour le réglage de la puissance de la pompe à air et de l effet de vague des buses d air La touche est active lorsque la pompe à air est en cours de fonctionnement Une brève pression ...

Page 32: ...mps sur ces deux touches la pompe démarre aussitôt même si la durée avant le début du séchage n est pas écoulée 1 une pression sur cette touche en cours de fonctionnement permet d éteindre la pompe Une pression sur cette touche pendant le compte à rebours avant le début du séchage annule le processus 14 Désinfection La désinfection régulière de votre baignoire balnéo vous garantit une hygiène opti...

Page 33: ...aux propriétaire et utilisateurs suivants La température de l eau dans la baignoire d hydromassage ne doit pas dépasser la température corporelle moyenne La température optimale est comprise entre 32 C et 37 C Pour votre sécurité assurez vous qu aucun appareil électrique ou conducteur d électricité ne risque de tomber dans la baignoire remplie Entretient L utilisation des produits de bain contenan...

Page 34: ... 4 5 6 7 8 9 10 11 12 Bild Bild Bild Bild Bild Bild Bild Bild Bild Bild Bild Bild Attention Pour l utilisation du système HOESCH Combi Plus un interrupteur de conduite est nécessaire en complément 15 02 Sélecteur rotatif de sécurité contre le débordement Fermer l écoulement Ouvrir l écoulement 15 03 Buse à air 1 2 3 ...

Page 35: ...nt Nettoyage de la vanne d écoulement voir Point 15 01 Buses de massage Nettoyage des buses Que faire quand La mousse se forme pendant l hydromassage Arrêter immédiatement l hydromassage et le système Air Injection Vider la cuve et effectuer un rinçage approfondi Veiller à n utiliser que des produits adaptés non moussants et ne contenant pas d huile Vous êtes absent pendant une longue période et v...

Page 36: ...2 08 02 Come funziona il sistema Air 42 09 Funzioni di Laola II 42 09 01 Tastiera 42 10 Protezione dal funzionamento a secco 43 11 Lo spegnimento automatico del sistema 43 12 Ozonizzazione solo per sistema Air e Whirl Airsystem 43 13 Soffiatura a fine Bagno solo per sistema Air e Whirl Airsystem 43 14 Disinfezione 43 15 L uso e manutenzione 44 15 01 Dispositivo di scarico troppopieno 45 15 02 Mano...

Page 37: ...di modelli previsti per il fissaggio a muro è necessario il supporto del bordo accessori necessari ancoraggio di vasca articolo 690401 installare conformemente all istruzione di montaggio allegata Durante il montaggio assicurarsi che la chiusura sostenga il bordo della vasca 02 01 Combi Plus della HOESCH accessori opzionali Colonna scarico con erogazione dal troppo pieno Per il montaggio è necessa...

Page 38: ...to di compensazione che deve essere collegato al cavo di compensazione 4 mm L allacciamento alla rete effettuato in opera dovrebbe essere effettuato tramite una scatola di collegamento IP 65 minimo 30 cm sopra il suolo nella parte sotto la vasca Durante l installazione della vasca da bagno occorre prestare attenzione ai componenti che contengono elementi attivi fatta eccezione per gli elementi con...

Page 39: ...vedere alla corretta polarità conformemente allo schema di allacciamento Il collegamento alla rete e il funzionamento dell impianto devono essere eseguiti solamente in presenza del conduttore di protezione e della messa a terra del supporto Assicurare tramite un unico interruttore di protezione della corrente 30 mA il collegamento alla rete della centralina e del riscaldatore La temperatura viene ...

Page 40: ... revisione accessibili e apribili facilmente di larghezza minima da 400 a 450 mm e altezza di 350 mm conformemente a tutti i disegni e dimensioni allegati Inoltre occorre provvedere ad un foro d ispezione nella zona di scarico L elemento d ispezione può essere aperto solo con gli strumenti adeguati Necessariamente devono essere mantenute le dimensioni indicate poichè in caso di una necessaria manu...

Page 41: ...Istruzione d uso Finalmente sei davanti alla vasca idromassaggio HOESCH Ti auguriamo tanto piacere nella Tua nuova vasca Il fatto che nelle Tue mani ci sia un prodotto di altissima qualità è dovuto ad un continuo processo di monitoraggio del prodotto ricerche scientifiche e ad uno sviluppo unitamente ad un design innovativo delle nostre vasche di lusso in acrilico adatto anche per prodotti sanitar...

Page 42: ... Nessuna luce pompa dell acqua non in funzione 1 Spegni tutto Spegnimento di tutte le funzioni 2 Tasto pompa pneumatica on off Premendo brevemente il tasto 2 la pompa viene accesa con una potenza del 60 Se si preme questo tasto durante il funzionamento la pompa viene spenta 3 Tasto per la regolazione della potenza della pompa pneumatica e dell effetto onda degli ugelli ad aria Il tasto è attivo du...

Page 43: ... il processo di asciugatura i tasti 1 2 e 4 sono attivi 2 4 se si premono contemporaneamente questi due tasti la pompa viene avviata immediatamente anche se non è trascorso il tempo necessario per l inizio dell asciugatura 1 se si preme questo tasto durante il funzionamento la pompa viene spenta Se il tasto viene premuto durante il calcolo del tempo per l inizio dell asciugatura il processo viene ...

Page 44: ...ffettuano il montaggio oppure il primo proprietario della vasca si impegnano a dare l istruzione d uso agli utenti e proprietari successivi La temperatura dell acqua nella vasca idromassaggio non deve superare la temperatura media del corpo L ambito ideale della temperatura è quello da 32 C a 37 C Avendo cura della propria sicurezza assicurarsi che nella vasca piena non cadano attrezzi elettrici o...

Page 45: ...ugola M4 M 4 1 2 3 4 5 6 7 8 9 10 11 12 Bild Bild Bild Bild Bild Bild Bild Bild Bild Bild Bild Bild Attenzione se si utilizza il Combi Plus di HOESCH è necessario montare un manicotto di giunzione 15 02 Manopola del troppopieno Chiudere il deflusso Aprire il deflusso 15 03 Bocchetta dell aria 1 2 3 ...

Page 46: ...ante diventa più debole Valvola di deflusso Pulire la valvola di deflusso vedere il punto 15 01 Bocchette massaggianti Pulire gli ugelli Cosa fare quando Durante l idromassaggio comincia a formarsi la schiuma Staccare subito l idromassaggio Far defluire l acqua e sciacquare la vasca abbondantemente Ricordare che per il bagno vengono usati esclusivamente i prodotti appropriati quelli che non provoc...

Page 47: ...ng 53 08 01 Hoe functioneert het Whirl systeem 53 08 02 Hoe functioneert het Air systeem 53 09 Functies Laola II 53 09 01 Toetsenbord 53 10 Droogloopbeveiliging 54 11 Automatische systeemuitschakeling 54 12 Ozonisatie alleen bij airsysteem en whirl airsysteem 54 13 Doorblazen alleen bij airsysteem en whirl airsysteem 54 14 Ontsmetting 54 15 Gebruik en onderhoud 55 15 01 Af en overloop armatuur met...

Page 48: ...n akoestische isolatie te bereiken met doel om de overbrenging van het materiaalgeluid op de muur te vermijden moet men een in de handel voorhanden profiel plaatsen artikel nr 6915 optie In geval van modellen welke niet voorzien zijn van een verbinding met een muur is het noodzakelijk een wandanker optie badanker artikel nr 690401 aan het bad te installeren in overeenstemming met de bijgevoegde mo...

Page 49: ...zone I de eenheid bevindt zich onder de kuip Bovendien moet er een vereffeningsaansluiting beschikbaar zijn Aan de badkuip wordt een gemarkeerd klemsysteem aangebracht waarop een vereffeningskabel moet worden aangesloten 4 mm De aansluiting uitgevoerd door de monteur moet uitgevoerd worden met een spatwaterdichte aansluitdoos IP 65 ten minste 30 cm boven de vloer onder het bad Bij het installeren ...

Page 50: ... elementen In dat geval moet men een bijkomende afzonderlijke kabel voorzien voor de verwarming spanning en afzonderlijke beveiligen met een bijkomende zekering van 10 A De polariteit controleren volgens het aansluitschema fasegevoelig Het systeem zal alleen werken indien een potentiaalvereffening is aangesloten De aansluiting op het net van sturing en verwarmingsvoeding beveiligen met een aparte ...

Page 51: ...ngen met een breedte van minimum 400 tot 450 mm en een hoogte van 350 mm plaatsen in overeenstemming met de bijgevoegde tekeningen en afmetingen Bovendien moet men een inspectieopening bij de afvoer plaatsen Het inspectieluik mag men alleen kunnen openen door gebruik van de gepaste werktuigen Men moet zeker de gegeven afmetingen behouden dit omwille van een eventueel onderhoud Alleen dan is een ge...

Page 52: ... kan voor de eerste maal uw whirlbad van HOESCH gebruiken Wij wensen u veel aangename momenten in uw nieuwe bad Het resultaat van constante productcontrole onderzoek en ontwikkeling samen met innovatief design van onze luxueuze baden uit sanitair acryl hebben u er toe gebracht dat u gekozen heeft voor een hoogwaardig kwaliteitsproduct Om er voor te zorgen dat u vanaf het eerste bad er probleemloos...

Page 53: ... van alle functies 2 Toets Luchtpomp aan uit Door kort op toets 2 te drukken wordt de pomp met een vermogen van 60 ingeschakeld Wanneer op deze toets wordt gedrukt terwijl de pomp in bedrijf is wordt de pomp uitgeschakeld 3 Toets voor het regelen van het vermogen van de luchtpomp en van het golfeffect uit de luchtsproeiers De toets is geactiveerd wanneer de luchtpomp in bedrijf is Door kort op toe...

Page 54: ...ewel de tijd tot het begin van het droogproces niet is afgerond 1 wanneer deze toets wordt ingedrukt tijdens het bedrijf van de pomp wordt de pomp uitgeschakeld Wanneer de toets wordt ingedrukt tijdens het meten van de tijd tot aan het begin van het droogproces wordt het proces geannuleerd 14 Ontsmetting Door uw whirlbad regelmatig te ontsmetten bereikt u een optimale hygiëne Daarom raden we u aan...

Page 55: ...e eigenaar moeten er over waken dat deze gebruiksaanwijzing overhandigd wordt aan de volgende eigenaars en gebruikers De watertemperatuur in een systeembad mag de gemiddelde lichaamtemperatuur niet overschrijden De ideale gebruikstemperatuur ligt tussen de 32 C en 37 C Voor uw eigen veiligheid wordt er op aangedrongen er voor te zorgen dat geen elektrische toestellen of andere stroomgeleidende ele...

Page 56: ...ulp van een M4 inbussleutel M 4 1 2 3 4 5 6 7 8 9 10 11 12 Bild Bild Bild Bild Bild Bild Bild Bild Bild Bild Bild Bild Let op Bij het gebruik van de HOESCH Combi Plus is een extra buisonderbreker nodig 15 02 Overloop draaiknop Afvoer afsluiten Afvoer openen 15 03 Airsproeier 1 2 3 ...

Page 57: ...s Jets reinigen Wat moet men doen bij Tijdens het bubbelen ontstaat schuim Het systeem Whirl en of Air onmiddellijk uitschakelen het water laten weglopen en een grondige spoeling uitvoeren Men moet altijd goed letten om passende verzorgingsproducten bij het baden te gebruiken zonder oliën of schuimcomponenten Het niet gebruiken van de whirlbad of als men afwezig is b v men is op vakantie Eigenlijk...

Page 58: ... 02 Jak funkcjonuje system Air 64 09 Funkcje systemu Laola II 64 09 01 Panel sterujący 64 10 Zabezpieczenie przed pracą na sucho 65 11 Automatyczne wyłączanie systemu 65 12 Ozonowanie tylko dla systemu powietrznego i systemu wodno powietrznego 65 13 Przedmuchiwanie tylko dla systemu powietrznego i systemu wodno powietrznego 65 14 Dezynfekcja 65 15 Użytkowanie i pielęgnacja 66 15 01 Armatura odpływ...

Page 59: ...uniknięcia przenoszenia dźwięku materiału na ścianę należy zastosować dostępny w handlu profil przyścienny nr artykułu 6915 niezbędne wyposażenie W przypadku modeli które przewidziane są do połączenia ze ścianą niezbędny jest profil przyścienny do wanny niezbędne wyposażenie kotwa wannowa nr artykułu 690401 zainstalować zgodnie z załączoną instrukcją montażu W trakcie montażu proszę zwrócić uwagę ...

Page 60: ... L 2 5m Przyłącze elektryczne do przyłączenia wanny na stałe należy przygotować w strefie I urządzenie znajduje się pod wanną dodatkowo należy zapewnić połączenie wyrównawcze wanny Na stelażu wanny zamontowany jest zacisk wyrównawczy oznaczony do którego należy podłączyć przewód wyrównawczy 4mm Przyłącze wykonane przez ekipę budowlana powinno być przygotowane jako stałe gniazdo rozdzielcze wilgoci...

Page 61: ...sieciowe dla części mocy ogrzewania i zabezpieczyć je oddzielnie poprzez 10 A Zapewnić biegunowość zgodnie ze schematem połączeń Podłączenie do sieci i praca instalacji tylko z położonym przewodem ochronnym i podłączonym wyrównaniem potencjałów Podłączenie sieciowe do sterowanie systemem i dla części mocy ogrzewania zabezpieczyć wspólnym wyłącznikiem ochronnym prądowym 30 mA Temperatura jest regul...

Page 62: ...ich modeli należy umieścić łatwo dostępne i swobodnie otwierające się otwory rewizyjne o szerokości min 400 do 450 mm i wysokości 350 mm zgodnie z załączonymi rysunkami z wymiarami Ponadto należy przewidzieć otwór rewizyjny w okolicy odpływu Wkład rewizyjny można otwierać tylko przy użyciu odpowiednich narzędzi Należy koniecznie zachować podane wymiary ponieważ w przypadku koniecznej konserwacji z...

Page 63: ...sz przed sobą swoją pierwsza kąpiel w wannie z hydromasażem firmy HOESCH Życzymy Ci wiele przyjemności w Twojej nowej wannie To że w Twoich rękach masz produkt najwyższej jakości jest efektem ciągłego monitoringu produktu prac badawczych i rozwojowych w połączeniu z innowacyjnym wzornictwem naszych luksusowych wanien z akrylu przeznaczonego do wyrobów sanitarnych Aby jednak twoja pierwsza kąpiel n...

Page 64: ...ystkich funkcji 2 Klawisz włącz wyłącz pompę powietrza Krótkotrwałe przyciśnięcie klawisza 2 spowoduje włączenie pompy z mocą 60 Wciśnięcie tego klawisza podczas pracy pompy spowoduje jej wyłączenie 3 Klawisz regulacji mocy pompy powietrza oraz efektu fali z dysz powietrznych Klawisz aktywny podczas pracy pompy powietrza Krótkotrwałe przyciśnięcie klawisza 3 spowoduje zmianę mocy pompy powietrza R...

Page 65: ...śnięcie klawiszy spowoduje natychmiastowy start pompy pomimo iż nie upłynął czas do rozpoczęcia osuszania 1 wciśnięcie klawisza w trakcie pracy pompy powoduje jej wyłączenie Wciśnięcie klawisza w trakcie odmierzania czasu do rozpoczęcia osuszania powoduje anulowanie procedury 14 Dezynfekcja Regularna dezynfekcja Państwa wanny z hydromasażem zapewnia optymalną higienę Z tego powodu zalecamy przepro...

Page 66: ...y specjalistyczne dokonujące montażu oraz pierwszy właściciel oświadczają że udostępnią instrukcję obsługi kolejnym właścicielom i użytkownikom Temperatura wody w wannie z hydromasażem nie powinna przekraczać średniej temperatury ciała Idealny zakres temperatury wynosi od 32 C do 37 C Dbając o własne bezpieczeństwo proszę pamiętać że do napełnionej wanny wodą nie mogą dostać się urządzenia elektry...

Page 67: ... imbusowego M4 M 4 1 2 3 4 5 6 7 8 9 10 11 12 Bild Bild Bild Bild Bild Bild Bild Bild Bild Bild Bild Bild Uwaga Przy użyciu Hoesch Combi Plus konieczne jest zastosowanie przerywacza rurowego 15 02 Pokrętło zabezpieczenia przed przelaniem Zamknąć odpływ Otworzyć odpływ 15 03 Dysza powietrzna 1 2 3 ...

Page 68: ...nkt 15 01 Dysze masujące Czyszczenie dysz Co należy zrobić gdy w trakcie kąpieli z hydromasażem zaczyna wytwarzać się piana Natychmiast wyłączyć hydromasaż i Air Injection Spuścić wodę i przeprowadzić gruntowne płukanie Proszę pamiętać o tym by do kąpieli używać tylko odpowiednich środków takich które się nie pienią i nie zawierają olejków nie używasz wanny z hydromasażem lub jesteś nieobecny n p ...

Page 69: ... Whirl 75 08 02 Как работает система Air 75 09 Функции системы Laola II 75 09 01 Панель управления 75 10 Защита от работы всухую 76 11 Автоматическое выключение системы 76 12 Озонирование только для аэромассажной системы и гидро аэромассажной системы 76 13 Продувка только для аэромассажной системы и гидро аэромассажной системы 76 14 Дезинфекция 76 15 Пользование и уход 77 15 01 Арматура слива пере...

Page 70: ...оляции предотвращение передачи корпусного шума на стену использовать обычный профиль для присоединения к стене артикула изделия 6915 В моделях ванн для которых предусмотрено сопряжение со стеной требуется опора для края ванны анкер для ванны артикула изделия 690401 установка согласно прилагаемой к нему инструкции по монтажу При монтаже следить за тем чтобы облицовка поддерживала край ванны 02 01 К...

Page 71: ...а L 2 5м Электричное присоединение для неразъемного подключения ванны к сети следует подготовить в I зоне устройство находится под ванной дополнительно требуется выполнить уравнительное соединение для ванны На каркасе ванны находится уравнительный зажим обозначен к которому следует подключить уравнительный провод 4 мм Требуемое стационарное подключение выполнить с помощью проверенной на степень за...

Page 72: ...езависимое сетевое подключение которое должно быть защищено отдельным предохранителем на 10 Апредохранителем 10 А Полярность следует обеспечить в соответствии со схемой присоединений Подключение к сети и работа установки должны выполняться только с установленным защитным проводом и присоединненным выравниванием потенциалов Подключение блока управления и блока мощности подогрева следует предохранит...

Page 73: ...простым доступом и свободным отверстием шириной не менее 400 450 мм и высотой 350 мм Кроме этого следует предусмотреть ревизионное отверстие в зоне слива Ревизионная решетка должна быть сделана так чтобы ее можно было открыть только при помощи инструмента Следует строго соблюдать указанные размеры так как только в этом случае будет обеспечена возможность свободного демонтажа составных частей систе...

Page 74: ...ассажная система 07 Инструкция по эксплуатации Наконец то Вас ожидает первый прием ванны с гидромассажем фирмы HOESCH Мы желаем Вам массу наслаждения в Вашей новой ванне Постоянный производственный контроль исследования и новые разработки соединенные с инновационным дизайном наших роскошных ванн из санитарно технического акрила гарантируют Вы приобрел и высококачественный продукт Для того чтобы ни...

Page 75: ...с работает не горит водяной насос выключен 1 Все выключить Выключение всех функций системы 2 Кнопка Воздушный насос вкл выкл Короткое нажатие кнопки 2 включает насос с мощностью 60 Нажатие этой кнопки во время работы насоса отключает насос 3 Кнопка для регулирования мощности воздушного насоса и создания эффекта волны от воздушных форсунок Кнопка активна во время работы воздушного насоса Короткое н...

Page 76: ...ушки еще не истекло 1 при коротком нажатии этой кнопки во время работы насоса он отключается Если нажать эту кнопку в течение отсчета времени до начала просушки то операция будет отменена 14 Дезинфекция Регулярная дезинфекция вашей гидромассажной ванны обеспечивает ее оптимальное гигиеническое состояние Поэтому мы рекомендуем производить дезинфекцию один раз в месяц или через каждые 2 3 использова...

Page 77: ... а также первый владелец ванны обязаны предоставить последующим владельцам и пользователям ванны инструкцию по эксплуатации Температура воды в ванне с гидромассажом не должна превышать средней температуры тела Идеальный диапазон температуры составляет от 32 C до 37 C В целях безопасности убедитесь в том чтобы в наполненную ванну не попадали никакие электрические приборы или другие элементы проводя...

Page 78: ...ого ключа M4 M 4 1 2 3 4 5 6 7 8 9 10 11 12 Bild Bild Bild Bild Bild Bild Bild Bild Bild Bild Bild Bild Замечание При использовании Hoesch Combi Plus необходимо применить трубный прерыватель 15 02 Ручка вороток защиты от перелива Закрыть слив Открыть слив 15 03 Воздушная форсунка 1 2 3 ...

Page 79: ...ная струя Сливной вентиль Очистка сливного клапана смотри пункт 15 01 Массажные форсунки Очистить массажные форсунки Что делать если во время принятия ванны образуется пена Незамедлительно отключить все функции гидромассажа Слить воду и провести тщательную промывку Следите за тем чтобы использовались только подходящие не при менять пенящиеся и содержащие масла средства для ванн Вы не пользуетесь в...

Page 80: ...表 84 06 设备 85 06 01 标准设备 85 06 02 附加设备 85 07 操作手册 85 08 导言 86 08 01 水按摩系统如何运作 86 08 02 气喷系统如何运作 86 09 Laola II 功能 86 09 01 控制面板 86 10 干运行保护 87 11 自动关闭系统 87 12 臭氧化 只适用于气喷系统和水气双系统 87 13 风干系统 只适用于气喷系统和水气双系统 87 14 消毒 87 15 使用和维修 88 15 01 带调节旋钮的排水 溢水配件 89 15 02 溢水调节旋钮 89 15 03 气按摩喷头 89 16 清单 90 安装前请仔细阅读安装手册 安装前请仔细阅读安装手册 系统符合下列规范 系统可配有下列标志 Typ EN03 TÜVRheinland I D 1 0 0 0 0 0000 0 ...

Page 81: ...缸铁锚 型号 690401 安装应根据所附的安装于册 安装时请注意浴缸边必须支撑裙边 02 01 HOESCH Combi Plus 附加设备 带特殊排水 溢水配件的浴缸龙头 安装时导管断续器是必不可少的 连接供水应根据所附的安装于册 02 02 供水安装 供水安装 供水和排水系统的安装应遵守有关规章 当连接到饮用水系统时 必须首先确保现场或上游的保护装置满足国家的安全规范 02 03 电气安装 电气安装 Hoesch的按摩浴缸是专为家庭使用而设计 包括酒店 职工宿舍 学生宿舍等 并符合相关DIN EN 的规范 唯一例外 是用于医疗用途 注意 注意 电气安装必须由拥有正式牌照的专业电工根据 电气安装必须由拥有正式牌照的专业电工根据DIN EN 国家规范和当地能源法进行 国家规范和当地能源法进行 按摩系统是按230 V AC 50 60 Hz 2kW交流电设计的 按摩系统的电力应该由一个独立...

Page 82: ... 区域 1 区域 1 区域 2 区域 2 60 cm 60 cm 区域 2 60 cm 225 cm r 6 0 c m 区域 0 区域 0 施工队设置的电器终端应该是永久分饰式防水插座 IP 65 离地最少30cm 在浴缸底部范围 安装浴缸时应注意带电的 元件 除了安全低电压的单元 例如12 V以下 不应让浴缸里的人接触到 关于浴缸接电的事 质保卡上必须具有认可人士的签署及盖章 证明保修的有效性 没有接地的话 PE 没有接地的话 PE 不要使用设 不要使用设 备 打开前请先断开电流连接 备 打开前请先断开电流连接 ...

Page 83: ...䋿 优儱 㭤 冎 儱 坬 02 03 3 电加热器 电加热器2千瓦 附加设备 千瓦 附加设备 电加热器2 kW接通后 旋转喷嘴会自动接通 浴缸内的水温一直维持在37 C左右 若带有电加热器2 kW 在工厂装配时系统配有一个电力部件及控制组件 在这种情况下电热应备有一个独立电力连接 同 时须以10 A独立保护 根据连接图确保电极 必须使用保护电缆来连接供电系统及操作系统 并连接好电位均衡 系统控制箱及加热部分的电源 根据连接图确保电极 必须使用保护电缆来连接供电系统及操作系统 并连接好电位均衡 系统控制箱及加热部分的电源 供应连接应该使用电源跳闸装置30mA 保护 手动调节电加热器的温度 应预先安排适当的触及位置 03 试运行和渗漏测试 试运行和渗漏测试 按02段中所述安装后 请进行试运行 要做到这一点 清洁浴缸和装满水 温度40 5 C 它来传输 然后在漩涡转了 10分钟 这时最大应该进行...

Page 84: ...装裙边的浴缸操作是不允许的 4 对于所有型号根据附录的尺寸图安装一个容易进出和开关的检修口 最小 400 mm 至 450 mm 宽 350 mm 高 对于所有型号根据附录的尺寸图安装一个容易进出和开关的检修口 最小 400 mm 至 450 mm 宽 350 mm 高 检修口最好靠近去水口 并且只能用合适的工具才能打开 上述的尺寸必须严格遵守 因为若有维修需 要的 话 才可以容易的拆卸系统组件 最理想的解决方案是安装Hoesch 公司生产的 检修栅 尺寸为420 x 325 mm 型号 6683 5 由于旋转喷嘴及鼓风机需要预留一个气口 鼓风机最大转数约为 Vo 60 0 m3 h 如果密封的话就没有空气 提供给 旋转喷嘴和鼓风机 一个 100 x 100 mm 的口便足够 用 检修栅 可提供足够的空气进入 05 图表 图表 1 自备用于连接电力系统的230V 50 60 Hz 10 A...

Page 85: ... 附加设备 附加设备 脚部和背部喷头 脚部和背部喷头 水喷按摩系统和水喷 气喷系统 07 操作手册 操作手册 最后 您马上就能首次享受HOESCH按摩浴缸 我们祝愿您新的浴缸为您带来前所未有的愉悦 您拥有最高品质的产品是 最后 您马上就能首次享受HOESCH按摩浴缸 我们祝愿您新的浴缸为您带来前所未有的愉悦 您拥有最高品质的产品是 因为我们以卫浴专用的亚克力材料生产富有创新设计的豪华浴缸 并不断地监控产品质量 以及对产品进行研发 若您不 因为我们以卫浴专用的亚克力材料生产富有创新设计的豪华浴缸 并不断地监控产品质量 以及对产品进行研发 若您不 希望沐浴时受到干扰 我们建议您阅读此手册 希望沐浴时受到干扰 我们建议您阅读此手册 ...

Page 86: ...效果不活跃 10 蓝色LED表光模式 11 蓝色LED表示水泵转速的改变 长亮 长亮 水喷头的波浪效果正在运作 连续变化 的速度 不亮 不亮 气喷头的波浪效果不活跃 12 蓝色LED表示水泵操作 长亮 长亮 水泵启动 不亮 不亮 水泵关闭 1 全关闭 全关闭 关闭所有功能 2 鼓风机开 关 鼓风机开 关 短按按钮1鼓风机会以60 的动力打开 在操作过程中按下此按钮将关闭风机 3 鼓风机电源控制按钮和气喷头的波浪效果按钮 鼓风机启动时运作 鼓风机电源控制按钮和气喷头的波浪效果按钮 鼓风机启动时运作 短 按按钮3改变鼓风机的性能 调校如下 进一步按下按钮增加转速至最 大值 风机到达最高速度后 继续按下按钮3 风机的转速会降到最低 值 风机的转速控制范围 30 100 按住按钮3约5秒 气喷头的波 浪效果启动 当波浪效果在运作时按下按钮3 波浪效果关闭 并且速 度稳定在目前的水平 4 照明开 关...

Page 87: ...全自动功率运行 在风干开始的时间测量及在干燥过程的时候 按钮1 2和4在运行状态 2 4 同时按下按钮便立即启动泵 尽管风干开始的时间还没过去 1 在操作过程中按下按钮便关闭泵 风干时间测量过程中按下按钮便取消操作 14 消毒 消毒 定期消毒以确保最佳的卫生 建议每月一次或每2 3次洗浴后进行消毒 定期消毒以确保最佳的卫生 建议每月一次或每2 3次洗浴后进行消毒 注意 若按摩浴缸很长一段时间没有使用 必须在使用前进行消毒 注意 若按摩浴缸很长一段时间没有使用 必须在使用前进行消毒 必须到达适当的水位才可进行消毒 水位必须达到特定的水平照明才可启动 必须到达适当的水位才可进行消毒 水位必须达到特定的水平照明才可启动 若由于使用不当造成损坏或危险 我们不承担责任 若由于使用不当造成损坏或危险 我们不承担责任 离开浴缸后 把消毒剂灌入 依生产商的指示 我们建议使用型号6923 或 133607 ...

Page 88: ...拿后不能马上使用 等身体冷却后可以使用气喷按摩 刚吃饱后 儿童不能单独使用 须由成年人监管 老人或残障人士使用按摩浴缸须特别注意 专业公司或第一次使用者宣称会把操作指南交付后期买主或使用者 按摩浴缸内的水温不应超过平均体温 理想的范围由 32 C 至 37 C 为了阁下的安全起见 请先确保没有任何电器或带电流的物体掉进盛水的浴缸内 维修 维修 带固体的沐浴添加剂 如浴盐 精油等 不可以使用 我们建议按摩浴缸使用HOESCH泡泡浴剂 沐浴后用清水冲洗浴缸表面并用湿布擦干 不可以使用磨砂类清洁剂 不可以使用磨砂类清洁剂 在使用一段时间后 需要彻底的清洁浴缸 洒几滴 清洁剂于浴缸表面然后用软布擦净 顽固的污垢可使用温水及中性液体清洁剂或肥皂液 硬水垢应用专用醋酸和水 不可用于五金件 不可用于五金件 若用排水管清洁剂请仔细阅读使用指南 在闪亮表面的一些令表面失去光滑的小刮痕或裂纹可使用HOESCH...

Page 89: ...水配件 清洁 维修需使用 M4 六角螺丝扳于 M 4 1 2 3 4 5 6 7 8 9 10 11 12 Bild Bild Bild Bild Bild Bild Bild Bild Bild Bild Bild Bild 注意 使用HOESCH的Combi Plus去水时也需要安装导管断续器 注意 使用HOESCH的Combi Plus去水时也需要安装导管断续器 15 02 溢水调节旋钮 溢水调节旋钮 关闭排 打开排水 15 03 气按摩喷头 气按摩喷头 1 2 3 ...

Page 90: ...保护启动 让马达冷却 控制单元的电子部件 重新启动马达 即停止电流约1分钟 按摩系统水流减弱 按摩系统水流减弱 排水阀 清洁排水阀 请看15 01段 按摩喷头 清洁按摩喷头 当遇到以下情况您应该 当遇到以下情况您应该 进行按摩浴时出现泡沫 进行按摩浴时出现泡沫 立即关闭水按摩系统和气喷系统 排空浴缸的水并彻底冲洗 只可以使用适当的沐浴添加剂 不起泡及不含油 不起泡及不含油 当您不使用按摩浴缸或者外出 比如 外出度假 当您不使用按摩浴缸或者外出 比如 外出度假 事实上您无需做任何特殊的工作 与其他电器一样 我们建议您关闭总开关 准备致电 准备致电HOESCH客户服务中心 客户服务中心 如果您无法自己解决问题 致电前需要准备以下的资料 让客户服务中心能够尽快找到解决办法 产品名称 型号 出厂编号 产品序列号 在保修卡或产品的控制盒上可以找到 例如 HOESCH Fabr Nr 0H7 0000...

Page 91: ...91 ...

Page 92: ... FR IT NL PL RU CN SP 09 14 Art Nr 97607 Alle Maßangaben in mm Technische Änderungen vorbehalten All dimensions in mm Subject to technical alterations Toutes Dimensions en mm Sous réserve de modifications technique Tutte Dimensioni in mm Salvo modifiche tecnich Alle afmetingen in mm Technische wijzigingen voorbehouden Wszystkie wymiary w mm Zastrzegamy sobie prawo do zmian technicznych Всe размeры...

Reviews: