background image

13

GB

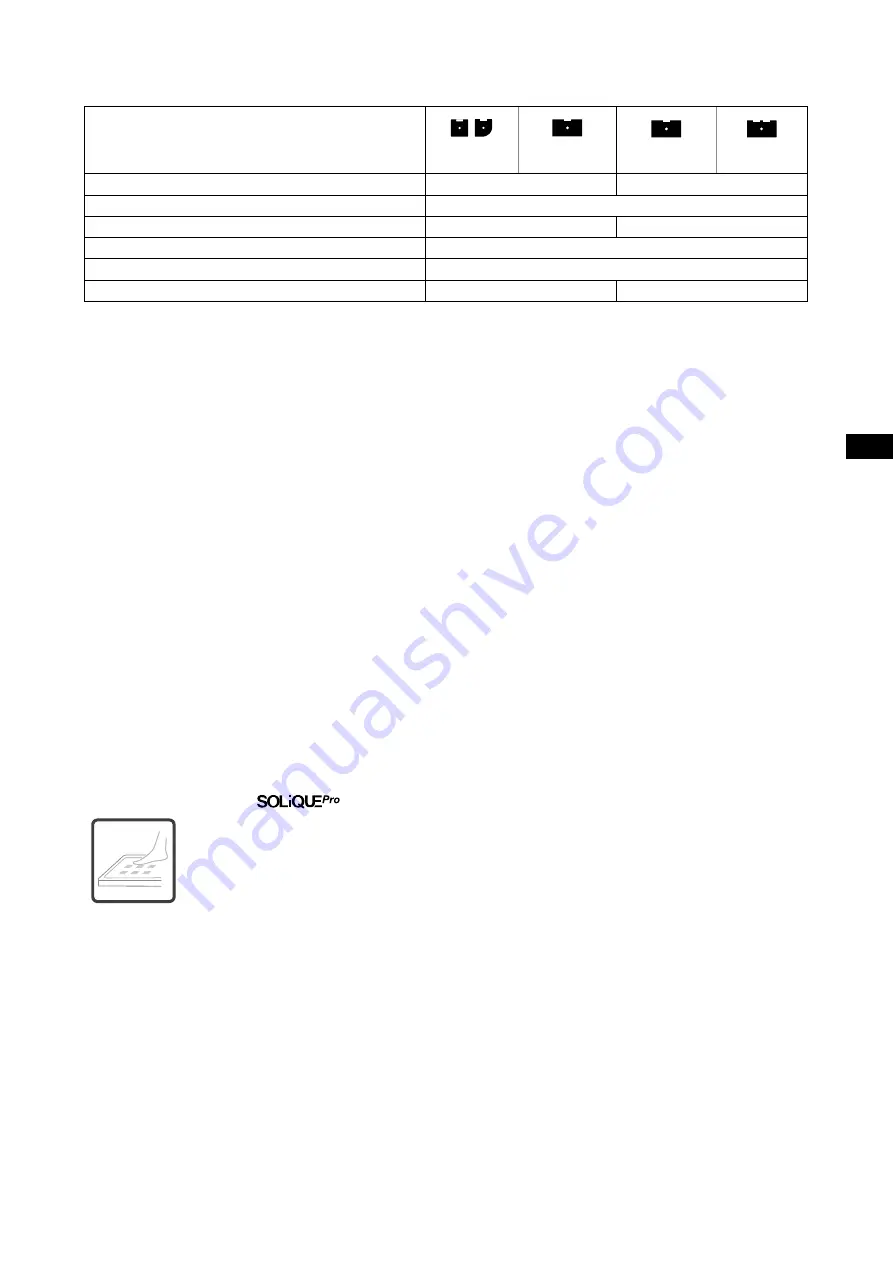
02.02   Steam generator technical data

1000x1000

1200x1000

1400x1000

1600x1000
1800x1000

Steam generator

3,3 kW

4 kW*

Voltage

1N~230 V,  50/60 Hz

Fuse protection

16 A

20 A

Line cross section

 3 x 2,5 mm²

Water connection (Cold Water + Hot Water)

R½“

Steam output

4,2 kg/h

6,5 kg/h

03 

Caring for the steam bath/shower cabin

After showering/steaming, rinse the tray and wall element surface with water and wipe down with a damp cloth. 

Do not use scouring 

agents!

 For occasional thorough cleaning, use a few drops of cleaning agent, e.g. Hoesch Cleaner (item no. 6999 00), on the surface 

and rub with a soft, dry cloth. Remove heavier soiling using warm water and liquid cleaning agent or a soap lye. Wipe away scale 
deposits using vinegar and water (

avoid contact with the fittings!

). Observe the manufacturer's instructions if using drain cleaners! 

Remove slight scratches or rough areas in glossy surfaces with the Hoesch Sanicryl care set (item no. 699100, follow instructions!). 
Remove deep scratch marks or burns on glossy or matt surfaces using 

fi

 ne sandpaper (no. 800-1500) or a 

fi

 ne steel wool metal eraser 

by rubbing carefully in one direction in a large area around the scratch. 

Treat glossy surfaces only

 with special polishing cream.

03.01   Caring for the glass panels and pro

fi

 les


After showering, quickly rinse the partition with clean water.


Use only a 

damp

 rag (never dry) to wipe down the panels and frame. You can also use a squeegee to dry the panels.


Only use gentle cleaners such as a weak vinegar and water solution. Never use cleansing powder or cleaners containing 
chlorine.


Do not use micro

fi

 ber cloths. They destroy any coatings and may cause the glass to become scratched.


It is a good idea to lightly oil sliding and swinging doors so they remain easy to open.

03.02   Caring for the 

fi

 ttings

For day-to-day cleaning, use neutral or citrus-based cleaning agents only. Use cleaning agents intended for cleaning 

fi

 ttings only. Follow 

the instructions for the cleaning agent!
Spray cleaning agent onto a cloth and use it to clean the 

fi

 ttings.

Rinse the 

fi

 tting with plenty of water and polish with a soft cloth.

03.03   Do not use ...


Scouring or scraping cleaning textiles or sponges.


Cleaning agents with 

fl

 uid acids such as hydrochloric or citric acid.


Scouring agents.


Cleaning agents containing chlorine bleach lye.

03.04   Anti-slip coating 

 (Optional) 

Durable, anti-slip coating applied on acrylic and mineral cast surface. It ensures a maximum of safety and bathing 
comfort. Aesthetic transparent patterns with a gentle structure create new visual effects in the bathroom. The 
anti-slip coating is smooth, which allows for easy cleaning of the shower tray. Showering is safe and more pleasant 
for the user.


 Attention! Do not grind the surface with anti-slip coating!

Summary of Contents for SensePerience 68986.101401

Page 1: ...Planungs Montage und Bedienungsanleitung Dampfduschbad Planning installation and operating instructions steam shower cabin DE GB SensePerience...

Page 2: ...2 PIN CODE...

Page 3: ...legehinweise 6 03 01 Pflegehinweise Scheiben und Profile 6 03 02 Pflegehinweise Armaturen 6 03 03 Benutzen Sie keine 6 03 04 Antirutschschicht Optional 6 03 05 Instandhaltung Nebeld se 7 04 Bedienungs...

Page 4: ...ktroinstallation F r den Elektroanschluss 230V 50 60 Hz 20 A ist eine entsprechende separate Zuleitung 3x2 5mm eine L nge von 2m aus der Wand herausragen lassen sowie eine Potentialausgleichsleitung 1...

Page 5: ...schen sensorischen oder geistigen F higkeiten oder mangels Erfahrung und oder mangels Wissen benutzt zu werden es sei denn sie werden durch eine f r ihre Sicherheit zust ndige Person beaufsichtigt ode...

Page 6: ...nach dem Duschen Dampfen mit klarem Wasser kurz abbrausen Scheiben und Profile nur mit einem feuchten Lappen nie trocken abreiben Die Scheiben k nnen auch mit einem Abzieher getrocknet werden Nur mild...

Page 7: ...vermeiden ist eine regelm ige Sp lung der Nebeld se erforderlich Bei einer Funktionspause 72 Stunden empfehlen wir die Aktivierung der Nebeld se f r ca 1 Minute pro Woche 7 Schwelleneinlauf Ein Aktiv...

Page 8: ...fventil 3 Kopfbrauseventil 4 Handbrauseventil 5 Temperaturregelung Armaturknopf 5 dient zur Temperaturregelung Bei einer Umdrehung ohne Dr cken der Temperatur Sicherheitssperre erm glicht er die Wasse...

Page 9: ...en Bei Verwendung von anderen Duftessenzen lehnen wir jede Gew hrleistung ab Vorsicht bei direktem Hautkontakt im Bereich des Dampfaustritts Verbr hungsgefahr 05 Richtig Dampfen Erst duschen dann damp...

Page 10: ...for the glass panels and profiles 13 03 02 Caring for the fittings 13 03 03 Do not use 13 03 04 Anti slip coating Optional 13 03 05 Maintaining the spray nozzle 14 04 Operating Instructions 14 04 01...

Page 11: ...draining of the steam generator and sent dispenser Electrical installation A separate feed cable of 3x2 5mm 2m long out of the wall and a ground cable 1x4mm should be provided for electrical connecti...

Page 12: ...it under supervision of relevant persons or get the instruction how to use it Children should use this product only under adult s supervision Attention due to high temperature within the working area...

Page 13: ...r showering quickly rinse the partition with clean water Use only a damp rag never dry to wipe down the panels and frame You can also use a squeegee to dry the panels Only use gentle cleaners such as...

Page 14: ...sed out regularly to prevent the build up of bacteria We recommend turning the spray nozzle on for around one minute a week when it has not been used for more than 72 hours 7 Cascade on Turns on when...

Page 15: ...er stream to chosen outlets Faucet knob 5 serves to set temperature 1 water distribution valve for the electrovalves of the control panel 2 cascade overflow valve 3 shower head valve 4 hand shower val...

Page 16: ...tank located on the steam nozzle Since scent extracts available in stores contain alcohol only HOESCH scent extracts may be used We will reject any claims on warranty if other scent extracts are used...

Page 17: ...17 06 Lieferumfang Scope of delivery...

Page 18: ...1000 L R 1800x1000 V 1800x1000 LN RN 1 6 6 6 6 6 6 6 6 6 12 12 12 12 12 12 2 3 3 3 2 2 2 2 2 2 2 2 2 2 2 2 3 2 1 1 1 1 1 1 1 1 1 1 1 1 1 1 4 8 4 4 4 4 4 4 4 4 4 4 4 4 4 4 5 2 2 3 3 4 2 3 4 2 3 4 2 3 4...

Page 19: ...5 6 6 6 6 6 6 6 6 6 6 6 6 6 6 6 12 4x40 BN 14058 150 P85M82505ZN 4 40 2 2 2 2 2 2 2 2 2 3 3 3 3 3 3 13 8x40 711 0202A 44 2 2 2 2 2 4 2 2 4 3 3 4 3 3 4 14 Nakr tka M5 2 3 3 4 4 4 4 4 4 4 4 4 4 4 4 15 M...

Page 20: ...LN RN 1600x1000 L R 1600x1000 V 1600x1000 LN RN 1800x1000 L R 1800x1000 V 1800x1000 LN RN 20 No 132797 1 1 No 132798 1 No 132795 1 1 1 1 No 132796 1 1 1 1 21 O O O O O No 27800 27803 27805 27807 27809...

Page 21: ...21 D C A 2150 30 120 min 120 2150 2180 30 2150 2180 2150 2270 min 120 min 120 min 120 B 07 Planungsanleitung Planning instruction...

Page 22: ...0 1000 1000 600 600 600 1400 1400 1000 1438 8 5 6 8 5 6 1000 1438 1000 1438 1000 1438 1000 1000 1000 1000 1000 1000 600 600 600 L V R 600 1000 1200 1000 1200 600 1000 1200 600 1000 600 1800 LN RN 1000...

Page 23: ...tion see point 01 Indications suppl mentaires voir Point 01 Avvertenze supplementari Vedere il punto 01 Extra aanwijzingen zie punt 01 Uwagi dodatkowe patrz punkt 01 DE GB FR IT NL PL RU CN A 230V L 2...

Page 24: ...dodatkowe patrz punkt 01 DE GB FR IT NL PL RU CN E E C No 27775 150 1350 150 2160 G G I J H 150 L E A E 54 B 3 5 0 3 0 0 90 E A E 54 B 3 5 0 3 0 0 90 D E E C 150 No 27775 150 150 1350 150 2160 G G G I...

Page 25: ...tkowe patrz punkt 01 DE GB FR IT NL PL RU CN C E E C No 27775 150 1320 120 2130 G G I J H 150 L 3 5 0 3 0 0 120 30 E A E 54 B E A E 54 B 3 5 0 3 0 0 120 30 D E E C 150 No 27775 150 150 1320 120 2130 G...

Page 26: ...odatkowe patrz punkt 01 DE GB FR IT NL PL RU CN D E E C No 27775 150 1320 120 2130 G G I J H 150 L E A E B E A E B D E E C 150 No 27775 150 150 1320 120 2130 G G G I I J J H 150 L L L 0 0 0 0 F C AxB...

Page 27: ...n Versionen werden analog montiert sofern nichts anderes gekennzeichnet wurde GB Most of the assembly steps are intended for the rectangular left L two seater version Other versions are assembled in a...

Page 28: ...21 DE GB Alle F e m ssen Kontakt zur Aufstellfl che haben die endg ltige Fu h he mittels Kontermutter am Gewindebolzen feststellen All the feet should be placed on the floor as the final height is fix...

Page 29: ...29 10 0 2 0 4 mm 3 2 4 B 7 5 S i l i k o n S i l i k o n S i l i k o n 6 h B2 1 B1 B1 B2 DE z B Schnell Fliesenkleber handels bliche Folie PE GB e g tile adhesive commercially available PE...

Page 30: ...30 0 2 0 4 mm 3 2 1 4 10 C 7 5 S i l i k o n S i l i k o n S i l i k o n 6 h 30 C2 C1 C1 C2 DE z B Schnell Fliesenkleber handels bliche Folie PE GB e g tile adhesive commercially available PE...

Page 31: ...31 2 3 4 Vaseline 1 5 6 D 20...

Page 32: ...32 0 3 3 Silikon Silikon 2 Silikon 0 Silikon 2 1 S i l i k o n D C B A Silikon 2 2 Silikon...

Page 33: ...33 Silikon 1 1 2 0 Vaseline 3 2 1 0 x3 5 6 4 7 8 3 3 12 15 14 6 9 19 7 14 15 7 6 5 17 18 2 14 6 9 7 19 LN RN 15...

Page 34: ...34 Silikon Vaseline 2 7 1 0 0 4 5 3 6 4 5 3 6 x6 8 8 17 18 10 19 5 6 7 15 14...

Page 35: ...35 0 0 1 1 11 3 5 4 7 6 8 9 2 x12 10min 10 10 A A B B No 27775 2 2 3 3 1 1 2 1 2 3 2 1 3 1 10 1 16 18 1400x1000 1600x1000 1800x1000...

Page 36: ...36 1mm 1mm 1 2 3 i 2 1 4 5 6 3 4...

Page 37: ...37 1 10 x2 2 1 4 4 19 S i l i k o n S i l i k o n S i l i k o n S i l i k o n 300 300 Silikon 300 Silikon...

Page 38: ...38 1 1 1 2 2 2 2 8 11 8 LN RN x12 2 1 2 10 18 1 Revision Zugang f r Service Maintenance opening DE GB...

Page 39: ...39...

Page 40: ...ww hoesch design com HOESCH Sanit r AG Industriestra e 4 CH 4658 D niken Tel 41 62 2887700 Fax 41 62 2887701 E Mail info hoesch ag ch www hoesch design com DE GB 09 17 Art Nr 9759801 SP 175 0434A ML H...

Reviews: