background image

3

28

Caution! For the sake of children’s safety, do not leave any packaging 

materials accessible and unattended (plastic bags, cardboard boxes, 

Styrofoam, etc.). Risk of suffocation!

Open the packaging and carefully take out the device. Inspect the set for completeness 

and any damage. Check that the plastic parts are not broken and that the power 

cord is not damaged. If you find that any components are missing or damaged, 

contact the vendor and do not use the device. Keep the packaging or dispose of it in 

accordance with local regulations.

7. USE

7.1 Before use

1.  Take out the device from the packaging, remove all the foil wrapping from the 

set items.

2.  Extend the power cord. Place the device on a dry, flat, stable and heat-resistant 

surface.

3.  For all the device components, which come into contact with food, clean them 

in accordance with section 

8. Cleaning and care

.

7.2 Operation modes

P

 – pulsing mode

0

 – turning off

1

 – low speed mode

2

 – high speed mode

7.3 Work with blending blades

1.  Place the device body on a flat and stable surface.
2.  Insert the drive extension into the openings in the body.
3.  Put the bowl onto the drive extension, previously installed on the body, so that 

1

Blender lid

1

Jug

1

Blender blades

1

Blender base

1

User’s manual

Summary of Contents for FP-9063

Page 1: ...ROBOT KUCHENNY 8w1 FOOD PROCESSOR 8 IN 1 INSTRUKCJA INSTRUCTION MANUAL ...

Page 2: ......

Page 3: ...ŻYTKOWANIA 4 4 OBJAŚNIENIE SYMBOLI 8 5 BUDOWA 9 6 ZAWARTOŚĆ ZESTAWU 10 7 UŻYTKOWANIE 11 8 CZYSZCZENIE I KONSERWACJA 14 9 NAPRAWA I KONSERWACJA 16 10 ROZWIĄZYWANIE PROBLEMÓW 16 11 PRZECHOWYWANIE I TRANSPORT 16 12 UTYLIZACJA 17 13 DEKLARACJA CE 17 14 GWARANCJA I SERWIS 18 Instrukcja obejmuje różne wersje kolorystyczne urządzenia ...

Page 4: ...ej czuciowej lub psychicznejlubosobyobrakudoświadczeniaiwiedzy jeśli pozostają one pod nadzorem lub korzystają z urządzenia bezpiecznie zgodnie z instrukcją obsługi oraz rozumieją zagrożenia 2 Urządzenie nie może być używane przez dzieci Należy trzymać urządzenie jak i jego wtyczkę poza zasięgiem dzieci 3 Maksymalny czas pracy urządzenia to 30 60 sekund dla nasadki do ugniatania nawet do 2 minut P...

Page 5: ...dzbanka 8 Wyłącz urządzenie i odłącz je od zasilania przed zmianą akcesoriów lub zbliżaniem się do ruchomych części 9 Podczas pracy urządzenia gdy misa lub dzbanek są przepełnione ich zawartość może wydostawać się na zewnątrz Nie przepełniaj urządzenia 10 Zawsze odłączaj urządzenie od zasilania jeśli zostało pozostawione bez nadzoru i przed montażem demontażem lub czyszczeniem 11 Dzieci nie mogą b...

Page 6: ...cia zasilającego urządzenia 19 Aby zapobiec porażeniu prądem elektrycznym nie zanurzać wtyczki przewodu sieciowego lub grzewczej części urządzenia w wodzie lub innych płynach 20 Nie przewieszać przewodu sieciowego przez kant stołu czy zlewu 21 Nie używaj przedłużacza Jeżeli jesteś gotów ponieść odpowiedzialność za takie działanie używaj wyłącznie przedłużacza w dobrym stanie z uziemieniem i odpowi...

Page 7: ...ączeniowego lub jeżeli urządzenie zostało upuszczone na podłogę 33 Po użyciu zawsze wyciągaj wtyczkę z gniazdka a także w przypadku jakiegokolwiek niewłaściwego działania 34 Ostrzeżenie Podczas czyszczenia lub obsługi nie zanurzać elektrycznych części urządzenia w wodzie lub innych cieczach Nigdy nie trzymaj urządzenia w pobliżu wody 35 Urządzenie może być używane wyłącznie przy zastosowaniu dołąc...

Page 8: ...ością Urządzenie do użytku wewnątrz pomieszczeń Oznaczenie materiału z którego wykonane jest opakowanie tektura falista Znak towarowy który oznacza że producent wniósł wkład finansowy w budowę i funkcjonowanie systemu odzysku i recyklingu odpadów opakowaniowych Klasa ochronności II w urządzeniach tej klasy ochronności bezpieczeństwo pod względem porażeniowym jest zapewnione przez zastosowanie odpo...

Page 9: ...3 9 5 BUDOWA 1 Korpus 2 Pokrętło wyboru prędkości i funkcji 3 Przedłużka napędu 4 Misa 5 Wielofunkcyjna nakładka 6 Pokrywka misy 7 Popychacz 8 Uchwyt pod nakładki ...

Page 10: ... ugniatania 1 Nasadka do łączenia produktów 1 Sitko wyciskarki 1 Stożek wyciskarki 1 Korek blendera 1 Pokrywka blendera 1 Dzbanek 1 Instrukcja obsługi 9 Nakładka do krojenia 10 Nakładka do rozdrabniania 11 Nakładka do tarcia 12 Ostrza do rozdrabniania 13 Nasadka do ugniatania 14 Nasadka do łączenia produktów 15 Sitko wyciskarki 16 Stożek wyciskarki 17 Korek blendera 18 Pokrywka blendera 19 Dzbanek...

Page 11: ...dpornej na wysokie temperatury 3 Wyczyść wszystkie elementy urządzenia mające kontakt z żywnością według punktu 8 Czyszczenie i konserwacja 7 2 Tryby pracy P tryb pulsacyjny 0 wyłączanie urządzenia 1 tryb niskich obrotów 2 tryb wysokich obrotów 7 3 Praca z ostrzami do rozdrabniania 1 Umieść korpus urządzenia na płaskiej i stabilnej powierzchni 2 Włóż przedłużkę napędu w otwory w korpusie 3 Nałóż m...

Page 12: ...ądź twardy ser nie przeciążaj urządzenia Pracując zbyt długo W przeciwnym razie produkty ulegną przegrzaniu i zaczną się topić Uwaga Standardowy okres siekania rozdrabniania 30 60 sek 7 4 Praca z nasadką do ugniatania 1 Powtórz kroki 1 3 z punktu 7 3 Praca z ostrzami do rozdrabniania 2 Nałóż nasadkę do ugniatania na wielofunkcyjnej nakładce upewnij się że wypustki w wielofunkcyjnej nakładce wpasow...

Page 13: ...roduktów do zagniatania mąki Przykładowe produkty Mąka Jajka 7 6 Praca z nakładkami do tarcia krojenia rozdrabniania 1 Powtórz kroki 1 3 z punktu 7 3 Praca z ostrzami do rozdrabniania 2 Włóż jedną z 3 dostępnych nakładek nakładka do krojenia nakładka do rozdrabniania nakładka do tarcia do uchwytu pod nakładki Następnie nałóż uchwyt pod nakładki z zamontowaną nakładką na przedłużkę napędu w misie 3...

Page 14: ...lendera i przekręć w prawo Uchwyt dzbanka powinien znajdować się z prawej strony korpusu który stoi przodem do Nas patrzymy na włącznik wyłącznik z regulatorem obrotów 3 Umieść produkty w dzbanku 4 Nałóż pokrywę dzbanka i korek 5 Rozpocznij blendowanie 6 Aby dokonać demontażu postępuj w odwrotnej kolejności do montażu Uwaga Wybierz prace w trybie pulsacyjnym do wstępnego mieszania przed właściwym ...

Page 15: ...pełnij go wodą 3 Umieść dzbanek na korpusie i przekręć pokrętło kilka razy na pozycję P 4 Zdejmij dzbanek z podstawy 5 Wylej wodę z dzbanka i umyj dzbanek z dodatkiem płynu do mycia naczyń 6 Pozostałe akcesoria mające kontakt z żywnością można myć pod bieżącą wodą z dodatkiem delikatnego detergentu lub w zmywarce nie dotyczy ostrzy Uwaga Upewnij się że podstawa dzbanka jest sucha zanim położysz na...

Page 16: ...ania jest prawidłowo podłączona Sprawdź czy nastąpiło wyłączenie zasilania lub czy nastąpiła przerwa w zasilaniu Urządzenie nagle się wyłącza Montaż misy lub dzbanka poluzował się Zamontuj ponownie pokrywę misy dzbanka Silnik działa a element nie ruszają się Upewnij się że montaż został dokonany prawidłowo t 11 PRZECHOWYWANIE I TRANSPORT 1 Urządzenie należy czyścić zgodnie z opisem i pozostawić do...

Page 17: ...iałów lub innym formom wykorzystania zużytych urządzeń wnoszą Państwo istotny wkład w ochronę naszego środowiska 4 Informacji o właściwym punkcie usuwania zużytych urządzeń elektrycznych i elektronicznych udzieli Państwu administracja gminna lub sprzedawca urządzenia Materiały z opakowania nadają się w 100 do wykorzystania jako surowiec wtórny i są oznakowane symbolem recyklingu Utylizacji opakowa...

Page 18: ...om lub kontaktować się telefonicznie 48 667 090 903 Informacje o statusie naprawy można uzyskać kontaktując się z serwisem Serwis gwarancyjny i pogwarancyjny urządzeń prowadzi firma QUADRA NET Sp z o o tel 61 853 44 44 tel kom 664 44 88 00 email infolinia quadra net com www www quadra net pl Twoja opinia jest dla nas ważna Oceń nasz produkt pod adresem www vershold com opinie Producent Gwarant VER...

Page 19: ... się taki produkt który nie spełnia funkcji określonych w instrukcji obsługi a przyczyną tego stanu jest wewnętrzna właściwość urządzenia 3 Uprawniony do gwarancji jest zobowiązany dostarczyć urządzenie do Punktu Obsługi Klienta w danym sklepie w celu reklamacji sprzętu Przy realizacji uprawnień z tytułu gwarancji należy okazać prawidłowo wypełnioną kartę gwarancyjną lub paragon fakturę zakupu ora...

Page 20: ...ompletnego celem usprawnienia działań serwisowych 9 Niniejsza gwarancja na sprzedany towar konsumpcyjny nie wyłącza nie ogranicza ani nie zawiesza uprawnień kupującego wynikających z przepisów o rękojmi za wady rzeczy sprzedanej zgodnie z postanowieniami Kodeksu Cywilnego z dnia 23 kwietnia 1964 roku Dz U 2014 121 10 Terytorialny zasięg ochrony gwarancyjnej terytorium Rzeczpospolitej Polskiej ...

Page 21: ...FETY INSTRUCTIONS 22 4 EXPLANATION OF SYMBOLS 25 5 OVERVIEW 26 6 SET CONTENTS 27 7 USE 28 8 CLEANING AND CARE 32 9 REPAIR AND MAINTENANCE 33 10 TROUBLESHOOTING 33 11 HANDLING AND STORAGE 34 12 DISPOSAL 34 13 CE DECLARATION 34 14 WARRANTY 35 The user s manual covers various color versions of the device ...

Page 22: ...als lacking the necessary experience and knowledge provided that they are supervised or use the device safely in compliance with the user s manual and understand the hazards involved 2 Children must not use the device Keep the device and its power cord out of the reach of children 3 The device s maximum operation time is 30 60 seconds and for the kneading attachment up to 2 minutes After that time...

Page 23: ... changing accessories or approaching moving parts 9 When the device is operating if the bowl or jug is overfilled its contents may spew out Do not overfill the device 10 Always disconnect the device from the power source before leaving it unattended and before assembly disassembly or cleaning 11 Children must not play with the device 12 When cleaning the device surface and its parts that come into...

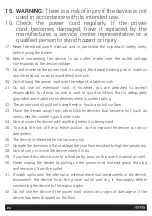
Page 24: ...hes the device s electric current rating 22 The power cord should not hang freely or touch any hot surface 23 Place the device away from other kitchen devices that become hot such as ovens electric cookers gas burners etc 24 Do not cover the device with anything when it is being used 25 To avoid the risk of fire or electrocution do not expose the device to rain or dampness 26 The device is intende...

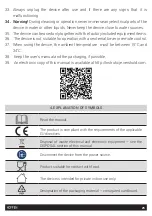
Page 25: ... 37 When using the device the ambient temperature must be between 15 C and 34 C 38 Keep the user s manual and the packaging if possible 39 An electronic copy of this manual is available at http instrukcje vershold com Read the manual The product is compliant with the requirements of the applicable EU directives Disposal of waste electrical and electronic equipment see the DISPOSAL section of this ...

Page 26: ...ade a financial contribution to the development and operation of a packaging materials recovery and recycling system Protection class II Protection against electric shock is ensured by adequate insulation double or enhanced the failure of which is very unlikely ...

Page 27: ...Squeezer screen 16 Squeezer cone 17 Blender plug 18 Blender lid 19 Jug 20 Blender blades installed in the jug 21 Blade base installed in the jug 6 SET CONTENTS Quantity Item 1 Body 1 Drive extension 1 Bowl 1 Multifunctional attachment 1 Bowl lid 1 Pusher 1 Attachment holder 1 Cutting attachment 1 Blending attachment 1 Grating attachment 1 Blending blades with blade covers 1 Kneading attachment 1 P...

Page 28: ...egulations 7 USE 7 1 Before use 1 Take out the device from the packaging remove all the foil wrapping from the set items 2 Extend the power cord Place the device on a dry flat stable and heat resistant surface 3 For all the device components which come into contact with food clean them in accordance with section 8 Cleaning and care 7 2 Operation modes P pulsing mode 0 turning off 1 low speed mode ...

Page 29: ...istic click will be heard 8 Insert the products through the opening push down using the pusher 9 For disassembly perform the installation steps in reverse order Sample products Chocolate Cheese Meat Tea spices herbs seasonings Fruit vegetables Tips 1 Use the pulsing mode several times if you do not want the products to be blended too finely 2 When blending chocolate or hard cheese do not overload ...

Page 30: ...5 Place the pusher in the opening 6 For disassembly perform the installation steps in reverse order Caution The product mixing attachment may be used to mix cheese and eggs or to quickly prepare mayonnaise or pudding Caution Do not use the product mixing attachment to knead flour dough Sample products Flour Eggs 7 6 Work with grating cutting blending attachments 1 Repeat steps 1 3 from section 7 3...

Page 31: ...ution It is recommended to use mode 1 low speed to squeeze citrus fruit Caution When squeezing the juice may splash around 7 8 Work with the blender 1 Place the device body on a flat and stable surface 2 Put the blender jug onto the body so that the tabs in the body engage with the tabs in the blender jug and twist clockwise The jug handle should be located on the right side of the body when looki...

Page 32: ...oth then wipe dry Caution The components which come into contact with food are dishwasher safe excluding the blades in temperatures not exceeding 70 C Cleaning the jug 1 Unplug the device from the power source 2 Empty the jug and refill it with water 3 Place the jug on the body and turn the knob several times to P 4 Remove the jug from the base 5 Pour the water out of the jug and clean the jug usi...

Page 33: ...ce on your own Always have a specialist perform repairs Check the power cord regularly If the power cord becomes damaged have it replaced by the manufacturer service representative or a qualified person to avoid hazard or injury Problem Solution The device does not turn on Assemble the components correctly Make sure the power supply plug is connected correctly Check whether the power supply is off...

Page 34: ... communicates this requirement 3 The plastics contained in the device can be recycled in accordance with the specific marking Thanks to recycling re use of materials or other forms of utilizing used equipment you make a significant contribution to the protection of our natural environment 4 Information on the location of electric and electronic device collection points is available from local gove...

Page 35: ...ershold com or contact us by phone 48 667 090 903 Information on the repair status may be obtained by contacting the relevant service desk Warranty and post warranty service is provided by QUADRA NET Sp z o o tel 61 853 44 44 mobile 664 44 88 00 email infolinia quadra net com www www quadra net pl Your opinion is important to us Evaluate our product at www vershold com opinie Manufacturer Warranto...

Page 36: ... or faulty product shall become the Warrantor s property 2 A defective damaged product is a product failing to provide the features described in the user s manual due to intrinsic properties of the device 3 The Beneficiary under the warranty shall deliver the appliance to the Customer Service Point at a given store in order to submit a complaint about the equipment When asserting your rights under...

Page 37: ...plete product be submitted together with the complaint so as to facilitate service operations 9 This warranty for the sold consumer product does not exclude restrict or suspend any rights of the Buyer related to laws and regulations concerning warranty for defects in sold items pursuant to the provisions of the Civil Code of 23 April 1964 Journal of Laws Dz U 2014 121 10 The warranty shall be appl...

Page 38: ...338 ...
Reviews: