Installation 11
HRT1 HP-313
3. INSTALLATION
Field Wiring Connections
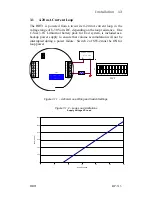
Connections are made to the HRT1 on two six-position terminal
blocks, labeled as terminals 1-12 (Fig. 3.1). Connections are made to
the terminal blocks using wire gauges 16-28 AWG, tightening Torque
0.22 to 0.25Nm. A ten-position DIP switch (SW2) located on the back
of PCA186A provides a quick selection of various input/output
options. The following pages illustrate connections and switch settings
for various options.
To make field wiring connections to the HRT1-4 option (NEMA 4X,
front panel mounted on the outside of the clear cover), complete the
following:
1.
Loosen the four cover screws.
2.
Remove the clear cover and HRT1 assembly.
3.
Use a small flat blade screwdriver and turn counter-clockwise
to loosen the proper terminal screw.
4.
Insert wire and turn terminal screw clockwise to tighten.
5.
Lightly pull on wire to ensure proper connection.
For the HRT1-2 option (NEMA 4X, front panel mounted behind the
clear cover):
1.
Loosen the four cover screws and remove the clear cover.
2.
Remove the four #4-40 x 5/16” black oxide screws from the
corners of the panel and remove the HRT1 assembly.
3.
Use a small flat blade screwdriver and turn counter-clockwise
to loosen the proper terminal screw.
4.
Insert wire and turn terminal screw clockwise to tighten.
5.
Lightly pull on wire to ensure proper connection.
For the HRT1-3 or HRT1-3A option (Explosion proof enclosure):
1.
Unscrew the cover of the enclosure counter-clockwise until it
separates from the body of the enclosure.
2.
Remove the two #4-40 x 1” black oxide screws from the top
left and bottom right section of the front panel.
3.
Remove the HRT1 assembly from the mounting standoffs.
4.
Use a small flat blade screwdriver and turn counter-clockwise
to loosen the proper terminal screw.
5.
Insert wire and turn terminal screw clockwise to tighten.
6.
Lightly pull on wire to ensure proper connection.
Warning: When contained in an Explosion-Proof
enclosure, do not open the cover while circuits are live in
hazardous atmospheres.
Summary of Contents for HRT1
Page 2: ......
Page 3: ......
Page 4: ......
Page 14: ...Introduction 6 HP 313 HRT1 This Page Intentionally Left Blank...
Page 34: ...Operation and Maintenance 26 HP 313 HRT1 This Page Intentionally Left Blank...
Page 48: ...HART Communications 40 HP 313 HRT1 This Page Intentionally Left Blank...
Page 53: ...Appendix B Declaration of Conformity 45 HRT1 HP 313 APPENDIX B Declaration of Conformity...
Page 54: ...Appendix B Declaration of Conformity 46 HP 313 HRT1...

